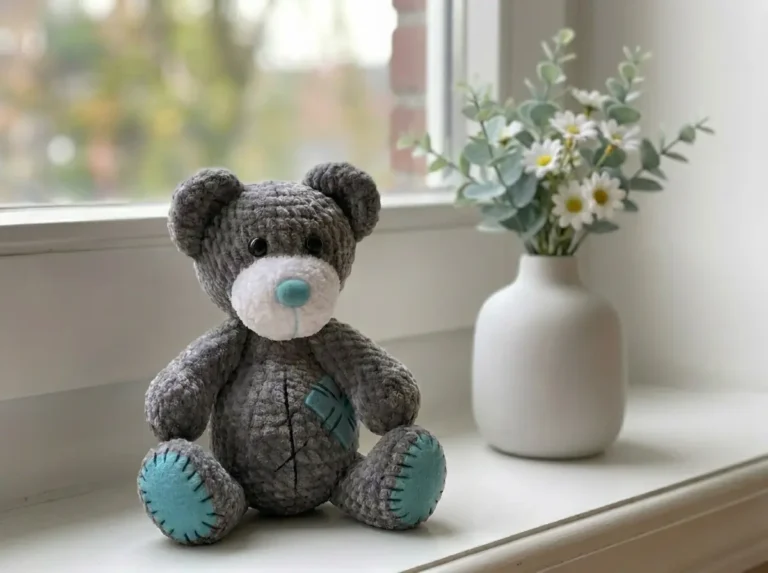
Free Panda Amigurumi Pattern — Squishy Velvet Panda
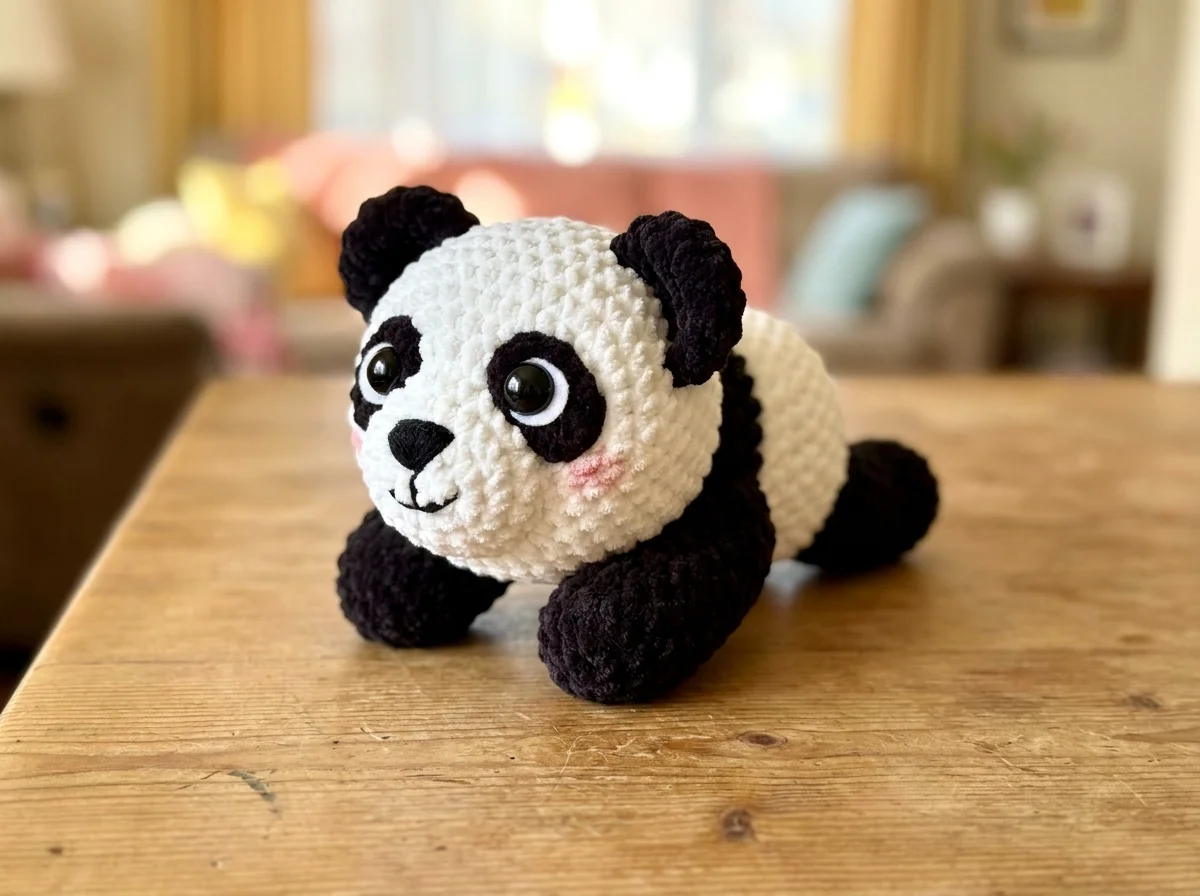
This panda amigurumi is honestly one of the squishiest, most lovable things I’ve ever crocheted. Plush velvet yarn in soft black and white, a wide-eyed expression framed by white felt circles, and a hand-embroidered nose that is genuinely too sweet for words — this panda amigurumi pattern creates a huggable bear about 11 inches tall, just the right size to cradle in your arms. Every tiny detail makes you fall a little more in love. Let’s make this precious thing together.
🩷 Pattern Highlights
- Cuteness Rating: 🩷🩷🩷🩷🩷
- Finished Size: approx. 11 in (28 cm)
- Difficulty: Intermediate
- Hook Size: H/8–J/10 (5.0–6.0 mm) for body; 2.5–3.0 mm for nose embroidery
- Yarn Palette: soft velvet white and deep velvet black
- Key Detail: white felt eye patches with 18mm glossy safety eyes and a satin-smooth embroidered nose
- Estimated Time: 6–10 hours
What You’ll Need for This Panda Amigurumi
The materials list for this panda is delightfully simple — two colors, a handful of supplies, and one very special texture choice that makes all the difference.
- Main Yarn: Bulky (5) chenille or velvet yarn in black and white. The original pattern uses YarnArt Dolce. US alternatives: Bernat Baby Velvet or Premier Parfait Chunky. Any plush velvet-style yarn at 95–120 m per 100 g will work beautifully. This is classified as Bulky weight (5) — soft, thick, and absolutely irresistible to touch.
- Embroidery Yarn: Approx. 20 in (50 cm) of any standard black yarn for the mouth
- Felt: A small amount of white, dense felt for the eye patches
- Hook: H/8–J/10 (5.0–6.0 mm) for the main body; 2.5 mm (no US letter equivalent) – 3.0 mm (no US letter equivalent) for nose embroidery only
- Stuffing: Polyester fiberfill — you’ll need a generous amount for this size
- Safety Eyes: 18mm black safety eyes × 2 — these large eyes are the centerpiece of the whole design, and getting them right is everything
- Tapestry Needle: For sewing parts and weaving ends
- Stitch Markers: Non-negotiable — this pattern has specific marked stitches you absolutely need to track
- Pins: For the nose embroidery placement
🩷 Chloe’s Yarn Note: The velvet/chenille texture is what gives this panda that impossibly soft, plush look — like a stuffed animal from a boutique toy shop. If you’ve never crocheted with velvet yarn before, it does feel a little different to work with. Go slowly, use good lighting, and trust yourself. The result is completely worth it.
Abbreviations
| Abbreviation | Meaning |
|---|---|
| ch | chain |
| sc | single crochet |
| sl st | slip stitch |
| inc | increase — 2 sc worked into the same stitch |
| dec | invisible decrease (preferred) — insert hook through front loops only of next 2 stitches simultaneously, yarn over, pull through, yarn over, pull through 2 loops |
| 3-in-1 inc | 3 sc worked into the same stitch |
| fpsc | front post single crochet — insert hook around the post of the stitch below from front to back, complete as a regular sc |
| FO | fasten off |
| st(s) | stitch(es) |
All parts, unless otherwise stated, are worked in a continuous spiral.
Before You Begin — The Details That Make This Panda
This pattern has a few moments that deserve a little extra love and attention. Here’s what I want you to know before your first stitch.
The head is worked in two joined pieces. The panda’s iconic black eye patches are built directly into the head structure — you’ll crochet two small black circles, add a round of white front post single crochets to define the edges, then join them into one unified head piece. It sounds complex but it’s so satisfying once you see it come together. Follow the notes between rows carefully and you’ll be fine.
The felt eye patches go on before the washer locks. You’ll cut two small circles of white felt, slightly smaller than a US quarter, with tiny holes in the center. These slip onto the safety eye post before you push the eye into the head. They create that gorgeous white eye ring that gives this panda its kawaii expression. If you’ve never worked with felt eyes before, our safety eyes tutorial walks you through the whole process so you feel completely confident before committing.
The nose is embroidered with your hook. Because the velvet yarn is tricky to thread through a needle, you’ll use a smaller hook (2.5–3.0 mm) to embroider the nose in a beautiful triangular satin stitch. The pattern walks you through this step by step — it’s one of those techniques that sounds intimidating and ends up feeling like magic.
🩷 Chloe’s Eye Tip: Before you lock those 18mm safety eyes in place, hold the head under a bright lamp and look at it straight on. With eyes this large, even a tiny tilt is very visible. Take your time here. Once the washers click, there’s no going back — but when they’re perfectly even, that expression is everything.
For a deeper look at getting your stuffing smooth and even on a piece this size, our guide to how to stuff amigurumi has all the tips you need for keeping the shape round and firm without lumps.
Free Panda Amigurumi Pattern
Head (×1)
Colors: black (Rows 1–3), white (Row 4 onward)
Starting method: chain 2 start
You will make TWO identical pieces of Rows 1–3 before continuing. Work the first piece, then set it aside and make a second identical piece. On both pieces, Row 4 is worked in white using front post single crochets. On the first piece, cut and secure the yarn after Row 4. On the second piece, leave the yarn uncut — you’ll use it to join both pieces in Row 5.
— Make both pieces: —
Row 1: Chain 2, work 6 sc into the 1st ch, join in round. [black] (6)
Row 2: 6 inc [black] (12)
Row 3: (inc, 1 sc) × 6 [black] (18)
Now switch to white yarn for Row 4. Join yarn, ch 1 as the first stitch of the row. Row 4 is worked entirely as front post single crochets (fpsc). For regular increases, work into the same stitch again; for 3-in-1 inc, work 3 times into the same stitch.
Row 4: 1 sc, inc, 2 sc, 3-in-1 inc, inc, 3 sc, inc, 3-in-1 inc, 2 sc, inc, 2 sc, inc, 1 sc [white, fpsc throughout] (27)
Mark the highlighted increases on each piece — these will be your eye placement guides. On the first piece, cut and secure the yarn. On the second piece, leave the yarn uncut.
This is the moment where the panda’s face starts to take shape — two little black rounds with white edges, like tiny eye patches waiting to meet each other. So cute, I could cry.
— Continue on the second piece (yarn uncut): —
Row 5: Work sc around, joining both pieces together; skip the marked increases and the stitches between them. (40)
Pull your working loop out long so it doesn’t get lost — this is the moment for the eyes. Cut two circles from white felt, slightly larger than the eye and slightly smaller than a US quarter. Cut small holes in the centers. Slide the felt circles onto the safety eye posts. Push the eyes into the head at the marked positions and adjust the felt so the eyes appear to look outward and very slightly downward. Lock the washers in place when the expression looks just right.
🩷 Chloe’s Felt Tip: The felt circles are the secret to this panda’s whole look. Take a moment to position them so they sit flat and even around each eye before locking. That soft white ring framing the glossy black pupil is absolutely the detail that makes this panda irresistible.
Rows 6–12: 40 sc (40)
Row 13: (dec, 8 sc) × 4 (36)
Row 14: (dec, 4 sc) × 6 (30)
Row 15: (2 sc, dec, 1 sc) × 6 (24)
Row 16: (dec, 2 sc) × 6 (18)
Stuff the head firmly before continuing.
Row 17: (1 sc, dec) × 6 (12)
Row 18: 6 dec (6)
Finishing: Cut yarn and close the opening. Add any remaining stuffing through the remaining hole, then sew shut. Note: plush velvet yarn is tricky to sew with — use a separate yarn that closely matches the color for closing.
Muzzle (×1)
Color: white
Starting method: chain 2 start
Row 1: Chain 2, work 6 sc into the 1st ch. (6)
Row 2: 6 inc (12)
Row 3: (3 inc, 3 sc) × 2 (18)
Row 4: 2 sc, 2 inc, 7 sc, 2 inc, 5 sc (22)
Row 5: 22 sc (22)
Finishing: sl st, FO, cut yarn and secure. This soft oval will nestle right up against those gorgeous eyes — the shape is rounder on one side and slightly flatter on the other, which helps it sit beautifully on the face.
Body (×1)
Colors: white (Rows 1–14), black (Row 15 onward)
Starting method: chain 2 start
Row 1: Chain 2, work 6 sc into the 1st ch. [white] (6)
Row 2: 6 inc [white] (12)
Row 3: (inc, 1 sc) × 6 [white] (18)
Row 4: (2 sc, inc) × 6 [white] (24)
Row 5: (inc, 3 sc) × 6 [white] (30)
Row 6: (3 sc, inc, 6 sc) × 3 [white] (33)
Rows 7–12: 33 sc [white] (33)
Row 13: dec, 5 sc, dec, 5 sc, dec, 17 sc [white] (30)
Row 14: (2 sc, dec) × 3, 18 sc [white] (27)
You may mark one of the decreases at the bottom to help with sewing placement later. Sl st, cut and secure white yarn.
Row 15: Work 27 fpsc [black] (27)
Rows 16–18: 27 sc [black] (27)
Finishing: sl st, cut yarn and secure. The crisp black band created by the fpsc row defines the panda’s waistline beautifully — it’s such a satisfying color break when you see it form.
Back Legs (×2)
Color: black
Starting method: chain 2 start
Row 1: Chain 2, work 6 sc into the 1st ch. (6)
Row 2: 6 inc (12)
Row 3: (inc, 3 sc) × 3 (15)
Rows 4–11: 15 sc (15)
Row 12: (dec, 3 sc) × 3 (12)
Stuff the leg at this point.
Row 13: 6 dec (6)
Finishing: Close the opening. Make two.
Front Arms (×2)
Color: black
Starting method: chain 2 start
Row 1: Chain 2, work 6 sc into the 1st ch. (6)
Row 2: 6 inc (12)
Row 3: (inc, 3 sc) × 3 (15)
Rows 4–13: 15 sc (15)
Row 14: (dec, 3 sc) × 3 (12)
Stuff the arm at this point.
Row 15: 6 dec (6)
Finishing: Finish stuffing, cut yarn and close the opening. Make two. The arms are a few rows longer than the legs — they’ll drape forward beautifully so your finished panda can rest right on them.
Ears (×2)
Color: black
Starting method: chain 2 start
Row 1: Chain 2, work 6 sc into the 1st ch. (6)
Row 2: 6 inc (12)
Row 3: (inc, 1 sc) × 6 (18)
Rows 4–5: 18 sc (18)
Finishing: sl st, cut yarn and secure. Do not stuff the ears. Fold each ear in half — they’ll naturally curve into a sweet rounded shape that’s perfect for sewing flat against the head.
Panda Amigurumi Assembly
Assembly is where this panda truly comes to life. Take your time with positioning — especially the arms, which give this bear its signature resting pose. Our guide to sewing amigurumi parts together has helpful tips if you’d like more detail on getting clean, secure joins on a piece this size.
- Muzzle: Gently stretch the muzzle piece sideways to shape it slightly. Lightly stuff to give it dimension. Position it directly below and just touching the safety eyes, overlapping slightly upward between them. Don’t sew completely shut — when a small opening remains, add a little more stuffing to keep it perfectly round, then finish sewing.
- Body to Head: Stuff the body firmly. Sew the body to the head so the panda lies with its bottom facing upward. Leave a small opening as you sew — add more stuffing to firm it up, then finish closing.
- Front Arms: Sew the front arms at the level of the middle of the body, beginning at the black band. Angle them forward and slightly downward so they tuck just under the chin. Also attach each arm to the head itself. When correctly positioned, the finished panda should rest comfortably forward on its arms — the cutest sitting pose.
- Back Legs: Sew the back legs approximately at the middle of the body, slightly lower — about 6 rows down from the black band, positioned toward the back. They should not stick straight up or hang in the air. Sew to approximately the midpoint of each leg so they angle slightly inward toward the bottom.
- Ears: The ears will naturally curve when folded — sew them in that curved shape, attaching each side separately. Placement guide: attachment width is 3 rows, spacing between ears is 5 sts, positioned 6 rows from the top of the eye level.
Nose and Mouth Embroidery
This step is the part that takes a little extra love — and also the moment the panda goes from beautiful to heartbreaking levels of cute.
Nose: Use black velvet yarn (the same yarn used for the body), cut to approximately 31 in (80 cm). Mark the nose edges with pins: 1 row up from the head, aligned with the inner edges of the eyes, and 2 rows lower at the center point — this creates your triangular guide.
Because the velvet yarn doesn’t thread easily through a needle, use your 2.5 mm (no US letter equivalent) – 3.0 mm (no US letter equivalent) hook for all embroidery.
- Pull the yarn through approximately the center of the nose area and tie a knot inside. Tuck the short tail inside the head.
- Bring the long end out at the bottom pin mark. Pull carefully — remove any loose fibers that come away, and gently tuck any displaced stuffing back in or trim it.
- Insert the hook from below the bottom mark upward toward one upper mark, catch the yarn and pull it out at the bottom. Hold the forming stitch in place with your finger as you pull through.
- Repeat from the other upper corner. You’ve now defined the triangle outline.
- Fill in the triangle with stitches, inserting the hook from bottom to top in different positions until the stitches lie smooth and snug with no gaps.
- For the final stitch, bring the yarn out at one upper corner and make one stitch across to the other upper corner to neaten the top edge. Tuck the remaining tail inside the head.
Mouth: Embroider the mouth using simple straight stitches with any standard black yarn (approx. 20 in / 50 cm). A gentle curved smile is all it takes — just two diagonal stitches meeting at the center point below the nose.
Making Your Panda Amigurumi Extra Cute
This is the section I’ve been looking forward to. Because there are a few finishing choices that take this panda from lovely to absolutely irresistible.
Pink cheek blush. I know the original pattern doesn’t call for it, but I cannot see a panda face without adding the tiniest embroidered blush. Use a single strand of pale blush pink or dusty rose embroidery floss and work 3–4 horizontal straight stitches just below the outer edge of each safety eye. Keep them light and airy — just a whisper of rosy color. The contrast against the white velvet is so delicate and sweet.
Getting the eyes perfectly even. With 18mm safety eyes, symmetry matters enormously — they’re large enough that even a 1-stitch difference is noticeable. Before locking the washers, photograph the face straight-on with your phone and look at the image. Sometimes the photo reveals a tilt your eyes don’t catch in person. Take the extra moment. The relief when they’re perfect is genuinely wonderful.
Felt patch shape. Round felt circles are beautiful and classic, but you could also try cutting the felt slightly into a soft oval to elongate the eye area for an even more expressive, manga-inspired look. Experiment on a scrap piece before cutting your final shapes.
Color variations. The black and white combination is iconic, but this panda silhouette works beautifully in other colorways too. Imagine a soft lavender and cream version, or a dusty sage and white — technically not a panda anymore, but a perfectly kawaii bear. The velvet texture holds any color with equal softness.
Safety note for gifting. Because of the large 18mm safety eyes, this panda is intended for display or older children. If you’re gifting to a young child, please review toy safety guidelines from the U.S. Consumer Product Safety Commission (CPSC) before deciding on eye style — embroidered eyes are always the safest option for babies and toddlers.
🩷 Chloe’s Detail Tip: Once assembly is complete and before you call it finished, sit your panda on a flat surface and look at it from a few feet away. Check that the arms are level, the ears are evenly spaced, and the muzzle sits centered. Small adjustments to positioning before the final stitches are locked make such a visible difference in the finished piece.
Chloe’s Final Look
I have been staring at this finished panda for an embarrassing amount of time and I do not regret a single second of it. The contrast of that deep matte black against the soft white velvet, those glossy 18mm eyes peeking through the white felt patches, the smooth satin triangle of the embroidered nose — it all comes together into something that genuinely makes my heart do a little skip. Display this one somewhere it can be admired, or make a matching set of three in slightly different sizes and line them up together. Tiny panda family. I’m not crying, you’re crying. 🩷
What yarn is best for panda amigurumi?
Velvet or chenille yarn in Bulky (5) weight is the best choice — it gives this panda amigurumi its soft, plush, boutique-toy appearance. YarnArt Dolce is used in the original pattern; Bernat Baby Velvet and Premier Parfait Chunky are widely available US alternatives.
How long does it take to crochet a panda amigurumi?
Plan for 6–10 hours depending on your experience with velvet yarn. The two-piece joined head construction and the hook-embroidered nose are the most time-intensive steps.
Can beginners make this panda amigurumi pattern?
This pattern is rated Intermediate — primarily because of the two-piece head join and the feel of velvet yarn. If you’re comfortable crocheting amigurumi in continuous spirals and have completed a few projects, you’ll handle this pattern well.