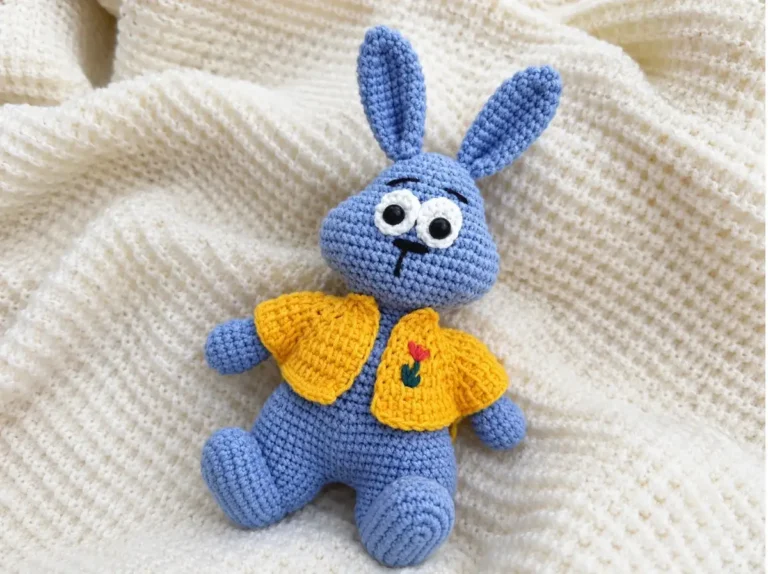
Free Crochet Bunny Keychain Pattern — Scrap-Friendly Mini Amigurumi
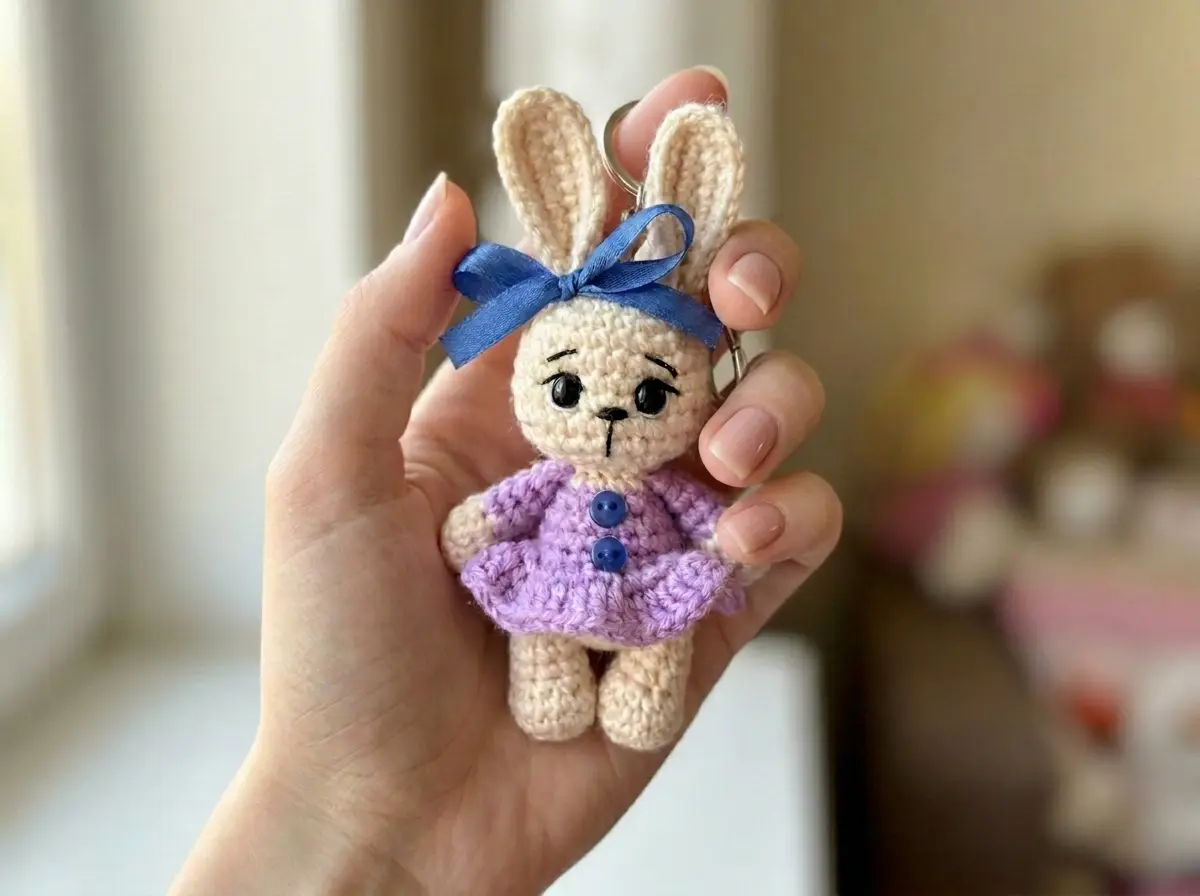
This free crochet bunny keychain pattern is built for your scrap bin — it uses under 50 yards of yarn total, works up in a couple of hours, and the little flared skirt makes it look way more involved than it actually is. I’ve made a dozen of these from leftover fingering and DK weight yarn and they’re consistently the fastest thing I make that people actually want to keep. Grab your scraps and let’s go.
🧶 What You’ll Need From Your Stash
- 💰 Yarn Needed: ~45 yards total (main color ~30 yds, dress color ~12 yds, small amounts of white and black for embroidery)
- 🎨 Colors: main color (body/head/ears), dress color (skirt/arms), white and black thread or yarn for face details
- 🪝 Hook: 2.5mm (approx. US C/2) or size to match your yarn weight
- ⏱️ Time: 2–3 hours
- 📏 Finished Size: approx. 4 in (10 cm) tall
- 💡 Difficulty: Intermediate Beginner
- 🎁 Great For: keychains, bag charms, handmade gifts, market bundles, stash-busting sets
Materials — What You Probably Already Have
This mini crochet bunny keychain is intentionally light on materials. Here’s exactly what you need:
- Main color yarn — approximately 30 yards. Any DK or fingering weight works. This is your body, head, ears, legs, and arms — the biggest chunk of the project.
- Dress color yarn — approximately 12 yards. Pick any contrast color from your stash. The skirt and upper arm section eat most of this.
- White thread or thin yarn — a small amount for embroidering the eye whites
- Black thread or thin yarn — a small amount for lashes, brows, and nose
- 6mm half-bead eyes — 2 pieces. Available at craft stores or online. These are glued on rather than inserted with a washer, so they’re especially important for decorative use only. Not suitable for young children.
- Craft glue — for securing the eyes
- Small buttons — 2–3 for dress decoration (optional, but they sell the look)
- Thin ribbon — a small piece for the ear bow
- Polyester fiberfill — a small pinch per piece. Poly-Fil by Fairfield works great and is widely available at Joann, Michaels, and Hobby Lobby.
- Tapestry needle — for assembly and weaving in ends
- Stitch marker — one is enough, but you’ll use it constantly
- Scissors
- Keychain ring — optional, if you’re using this as a bag charm
🧶 Scrap Check: The entire main-color body uses about 30 yards. If you’ve got a leftover skein from any recent project — even a partial ball — you almost certainly have enough. No need to buy anything new for this one.
Abbreviations Used in This Crochet Bunny Keychain Pattern
| Abbreviation | Meaning |
|---|---|
| sc | single crochet |
| inc | increase — 2 sc in the same stitch |
| dec | invisible decrease |
| MR | magic ring |
| ch | chain |
| sl st | slip stitch |
| dc | double crochet |
| BLO | back loops only |
| FLO | front loops only |
| Rnd | round |
Smart Crafter Tips Before You Start
Use the invisible decrease, not sc2tog. Every single decrease in this pattern should be worked as an invisible decrease — insert your hook through the front loops only of the next two stitches simultaneously before completing the decrease. It eliminates the gap that sc2tog leaves behind, which matters a lot on a small piece like this where every stitch is visible.
The skirt trick is worth understanding before you get there. Round 8 of the body is worked in back loops only, which leaves the front loops free. Those free loops become your skirt foundation later. It sounds confusing the first time but makes total sense once you’re holding the piece. Our guide to continuous rounds has a good explanation of what’s happening with those loop layers if you want to get ahead of it.
Match your hook to your yarn weight. This pattern was designed for fingering to DK weight yarn at a tight gauge. If you’re using DK, start with a 3.0mm hook and swatch a round or two — you want your fabric tight enough that stuffing doesn’t peek through the gaps. For the Craft Yarn Council’s official hook and weight pairing reference, see the CYCA yarn weight system.
🧶 Scrap Check: Working in continuous rounds the whole way through. No joining needed between rounds — just keep going and move your stitch marker up as you work.
The Pattern
Legs — Make 2 (Main Color)
Each leg uses roughly 6–7 yards of main color yarn.
Rnd 1: 6 sc in MR (6)
Rnd 2: 6 inc (12)
Rnd 3: (3 sc, inc) × 3 (15)
Rnd 4: 15 sc (15)
Rnd 5: 6 dec, 3 sc (9)
Rnds 6–9: 9 sc per round, 4 rounds total (9)
Stuff lightly. Fold the opening flat and sc 4 across to close. Fasten off. Leave a short tail — you won’t need much for joining these into the body.
Arms — Make 2 (Main Color transitioning to Dress Color)
Rnd 1: 6 sc in MR (6)
Rnd 2: (1 sc, inc) × 3 (9)
Rnds 3–4: 9 sc per round, 2 rounds total (9)
Rnd 5: (1 sc, dec) × 3 — switch to dress color before starting this round (6)
Rnds 6–8: 6 sc per round, 3 rounds total (6)
Stuff lightly. Fold flat and sc 3 across to close. Fasten off with a tail for sewing.
🧶 Scrap Check: Both arms together use about 10 yards — roughly split between main and dress color. If your dress color scrap is on the smaller side, prioritize it here and for the skirt.
Body — Make 1 (Main Color → Dress Color → Main Color)
Rnd 1: 6 sc in MR (6)
Rnd 2: 6 inc (12)
Rnd 3: (1 sc, inc) × 6 (18)
Rnd 4: (2 sc, inc) × 6 (24)
Rnd 5: 24 sc (24)
Rnd 6: Join 1st leg: 4 sc across leg, 9 sc on body, join 2nd leg: 4 sc across, 7 sc on body (24)
Rnd 7: 24 sc — switch to dress color before starting this round (24)
Rnd 8: Work in BLO: (2 sc, dec) × 6 (18)
The front loops from this round stay open — you’ll come back to them for the skirt.
Rnds 9–10: 18 sc per round, 2 rounds total (18)
Rnd 11: (1 sc, dec) × 6 (12)
Rnd 12: Join 1st arm: 3 sc across arm, 4 sc on body, join 2nd arm: 3 sc across, 2 sc — switch to main color before starting this round (12)
Stuff firmly. Leave a long tail for sewing the head on later.
Skirt — Dress Color
Go back to the free front loops from Rnd 8 of the body. This is where your skirt lives. Attach dress color yarn to any of those free loops and work outward.
Rnd 1: Work one inc (2 sc) into every front loop around — 24 stitches become 48 (48)
Rnd 2: Ch 2, (3 dc, dc-inc) × 12 (60)
Fasten off and weave in ends. The ch-2 at the start of Rnd 2 counts as the first dc.
🧶 Scrap Check: The skirt uses the most dress-color yarn of any section — about 8–10 yards. If you’re running low on your contrast color, work Rnd 2 in a different scrap color. Mixed-color skirts look intentional on tiny pieces like this.
Head — Make 1 (Main Color)
Rnd 1: 6 sc in MR (6)
Rnd 2: 6 inc (12)
Rnd 3: (1 sc, inc) × 6 (18)
Rnd 4: (2 sc, inc) × 6 (24)
Rnd 5: (3 sc, inc) × 6 (30)
Rnds 6–9: 30 sc per round, 4 rounds total (30)
Rnd 10: (3 sc, dec) × 6 (24)
Rnd 11: (2 sc, dec) × 6 (18)
Rnd 12: (1 sc, dec) × 6 (12)
Stuff firmly before the opening gets too small. Fasten off and leave a long tail for sewing.
Ears — Make 2 (Main Color)
These are flat pieces started from a chain, not a magic ring.
Start with a chain of 11.
Rnd 1: Beginning in the 2nd chain from hook: 9 sc, 3 sc in the 1st chain (tip of ear), 8 sc back along the other side, inc in final stitch (22)
Rnd 2: inc, 8 sc, 3 inc, 8 sc, inc, sl st (27)
Fasten off with a long tail. Fold each ear in half lengthwise and sew the two sides together at the base to give it a natural stand. The ear should hold its shape without extra stuffing.
Assembly
- Attach the ears. Pin both ears to Rnd 3 of the head, evenly spaced. Sew through several stitches on each side for stability. The base-fold you did earlier will make them stand upright naturally.
- Attach the head to the body. Use the long tail from the body. Line up the head so it sits centered over the shoulders. Sew all the way around, pulling the pieces close before knotting off.
- Sculpt the eye sockets. Thread a long length of main-color yarn through the head, pulling a stitch between Rnds 7 and 8 inward on each eye side. Pull gently until you see a slight indent, then knot and bury the thread. This step takes about two minutes and makes a visible difference.
- Glue the eyes. Position both 6mm half-bead eyes with 3 sc of space between them, centered over Rnds 7–8. Apply a small dot of craft glue to the flat side of each bead and hold in place until set.
- Embroider the face. Using white thread, embroider small oval highlights above or beside each eye. Switch to black thread for the lashes (short straight stitches extending from the eye edges), the brows (a gentle curve above each eye, 3–4 stitches), and the nose (a small Y-shape or inverted triangle between Rnds 9–10 of the head).
- Decorate the dress. Sew 2–3 small buttons down the front of the body across the dress color section.
- Add the bow. Tie a small piece of ribbon around the base of one ear. A simple bow knot works fine — trim the ends short.
- Add keychain hardware. If you’re using this as a bag charm, thread a keychain ring through one of the ear stitches or through the top of the head between the ears.
💡 Assembly note: The eye sculpting step in #3 is optional but worth the two minutes. On a face this small, the slight indents give the eyes depth that flat embroidery alone doesn’t achieve.
Stretch It Further — Make a Set
💡 Stretch It Further: Make three of these in different main-color yarns — one cream, one gray, one dusty pink — and keep the dress color the same across all three. Suddenly you have a coordinated gift set from three scraps that were never going to become anything else. Tie them together with a bit of ribbon and you’ve got a handmade present that costs almost nothing in materials. Total yarn for all three: well under 150 yards. That’s one partial skein of fingering weight.
Want to skip the skirt entirely for a simpler build? Just stop after Rnd 7 of the body and continue in main color straight up. The plain-body version works up even faster and takes less yarn — good option when you’re really low on that contrast color.
These also work beautifully as Christmas ornaments. Skip the keychain ring and use a looped piece of thin ribbon threaded through the head instead. Add a tiny jingle bell to the bow for bonus points.
Mia’s Take
Two colors, under 50 yards, and a handful of embroidery thread you probably already have in a drawer somewhere — that’s the full cost of this mini crochet bunny keychain. The skirt trick is genuinely clever: one round of FLO and a simple dc round turns a plain amigurumi body into something that looks like you put in way more effort. Make a few in different color combos and bundle them — three bunnies in coordinating colors is one of the easiest handmade gift sets you can put together. That’s the kind of project this scrap bin was made for. 🧶
What yarn is best for this crochet bunny keychain pattern?
Fingering or DK weight yarn works best. Any scrap yarn in these weights will do — the entire project uses under 50 yards total, so leftover yarn from other projects is ideal.
How long does it take to crochet this bunny keychain?
Most crocheters complete this pattern in 2–3 hours. The individual parts work up quickly, and assembly adds roughly 20–30 minutes depending on your embroidery pace.
Can beginners make this crochet bunny keychain pattern?
It’s rated Intermediate Beginner. You should be comfortable with magic rings, increases, decreases, and working in continuous rounds. The BLO skirt technique is new for some crocheters but is explained step by step in the pattern.