Free Crochet Cat Amigurumi Pattern — Big, Sleepy, and Soft
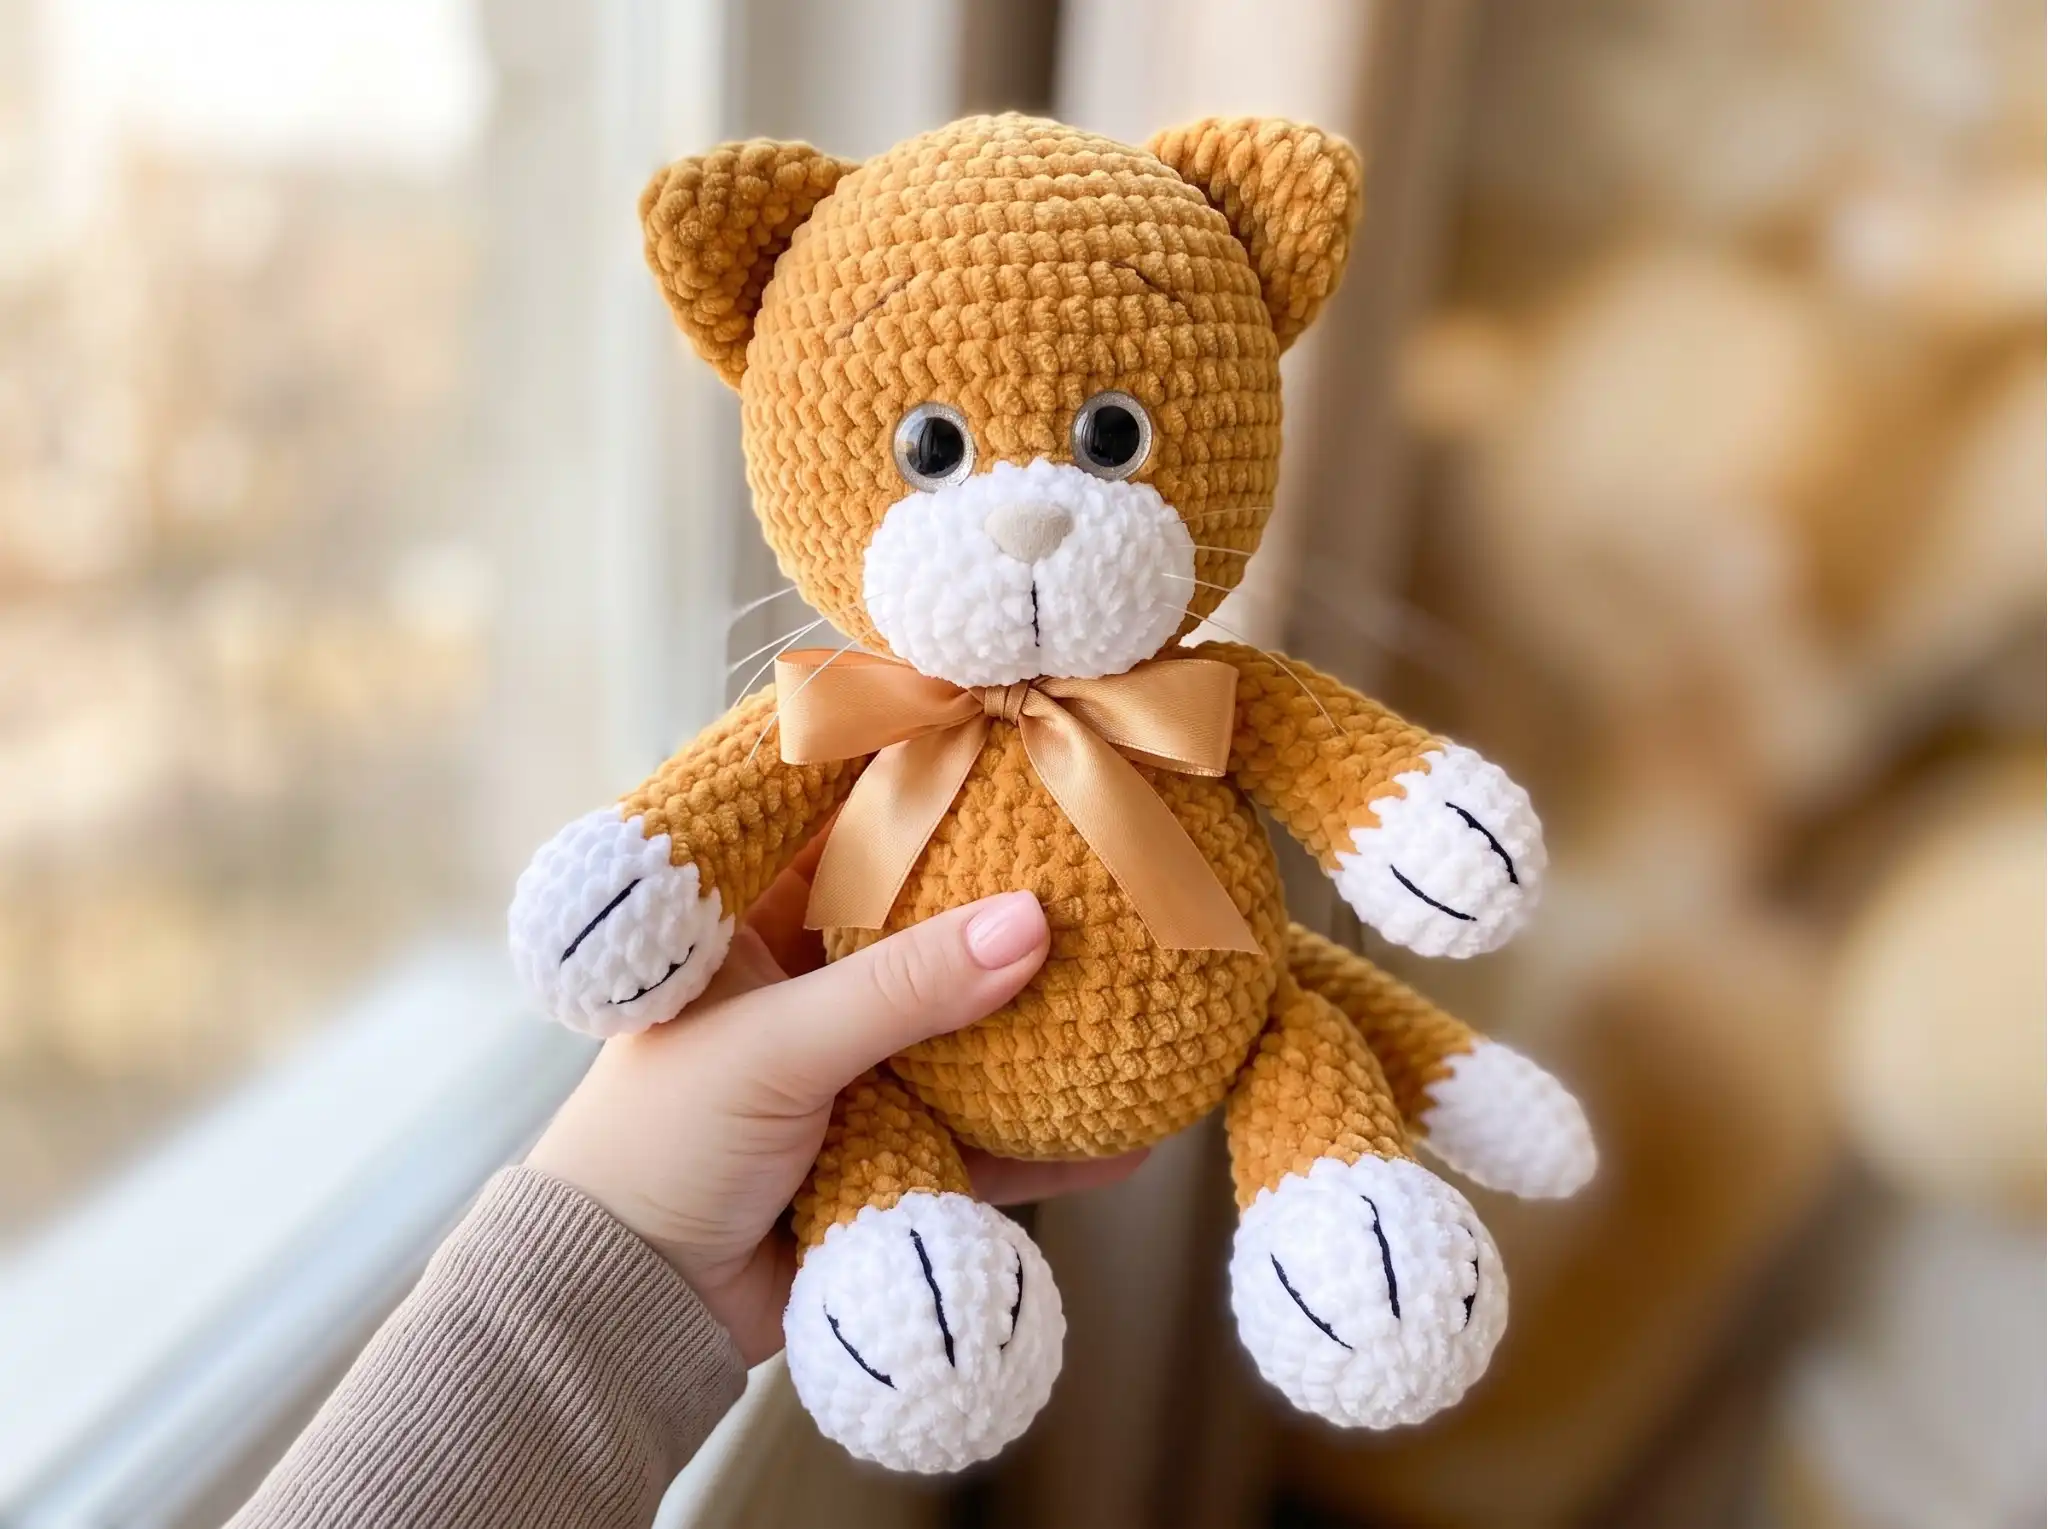
This crochet cat amigurumi free pattern makes a big, soft creature who looks like she’s just woken up from the best nap of her life — round-cheeked, half-lidded, and completely unbothered. I named her Marmalade before her ears were even attached, because that’s exactly the color she came out in: warm and honeyed, like something you’d want to curl up next to. If you’ve been wanting to make something substantial — something with real presence on a shelf — this is a good place to start.
📖 Meet Marmalade
- 🌟 Personality: sleepy, affectionate, unhurried
- 🎨 Color Palette: warm honey-amber with soft white paws, muzzle, and tail tip
- 📏 Size: 15.7 in
- 🪝 Hook: 3.5mm (approx. US E/4) for the muzzle; 4.0–4.5mm (approx. US G/6–7) for the rest
- ⏱️ Time: 12-16 hours
- ✨ Signature Detail: a ribbon bow at the neck and fishing-line whiskers sewn in so they catch the light just right
- 💡 Difficulty: Beginner
Before the Story Begins — A Few Notes on This Crochet Cat Amigurumi Free Pattern
Marmalade is worked mostly in a chenille yarn, which is what gives her that soft, almost velvety look — the kind of texture that makes people reach out and touch her before they even ask what she’s made of.
- Main color (warm honey-amber): Himalaya Dolphin Baby, or a US alternative like Bernat Baby Velvet or Premier Parfait — a bulky chenille, about 1.5 skeins
- White: the same chenille, a small amount, for the paws, tail tip, and inner ears
- White (for the muzzle): a small amount of Alize Softy, or a similar soft DK / Light Worsted yarn, held double
- Hook: 3.5mm (approx. US E/4) for the muzzle, and 4.0–4.5mm (approx. US G/6–7) for the body, legs, ears, and tail
- Stitch marker
- Polyester fiberfill stuffing
- Black cotton embroidery thread (for claws, lip, and eyebrows)
- Tapestry needle and scissors
- A length of ribbon, for the bow
- Fishing line, for the whiskers
- 24x16mm safety nose
- 20mm safety eyes
This yarn falls into the Bulky (5) category — it works up quickly and gives Marmalade that plush, huggable quality that a thinner yarn just wouldn’t.
Abbreviations Used in This Cat Amigurumi Pattern
| Abbreviation | Meaning |
|---|---|
| sc | single crochet |
| inc | increase (2 sc in same stitch) |
| inv dec | invisible decrease |
| mr | magic ring |
| st(s) | stitch(es) |
✨ Sophie’s Note: Every decrease in this pattern is worked as an invisible decrease rather than a standard sc2tog. It keeps the shaping smooth instead of leaving little gaps along the way — and it doesn’t change a single stitch count, just how neatly they sit.
Instructions for This Crochet Cat Amigurumi Free Pattern
Every piece of Marmalade begins the same way every amigurumi does — with a magic ring. It’s a small, quiet start for something that’s going to end up fifteen and a half inches of soft, honey-colored cat, and there’s something nice about that contrast.
As she shapes, you’ll be working a lot of invisible decreases — especially through the head and body, where the shaping does most of the work of giving her that round, sleepy-cheeked look. Take your time here. The decreases are what carve out her expression.
And when it comes to stuffing, resist the urge to pack her tight everywhere. The stuffing guide is worth a look before you start, especially for the legs — Marmalade is meant to be soft and a little floppy in places, not firm all the way through. That softness is part of her personality.
Pattern: Crochet Cat Amigurumi Instructions
Upper Legs (make 2)
Yarn: white, changing to main color partway through
Start: mr
Row 1: 5 sc in mr (5)
Row 2: 5 inc (10)
Row 3: (1 sc, 1 inc) × 5 (15)
Row 4: (2 sc, 1 inc) × 5 (20)
Rows 5-8: 20 sc (20)
✨ Sophie’s Note: After row 8, switch over to the main color — this is where the white “sock” ends and Marmalade’s honey-amber coat begins.
Row 9: 20 sc (20)
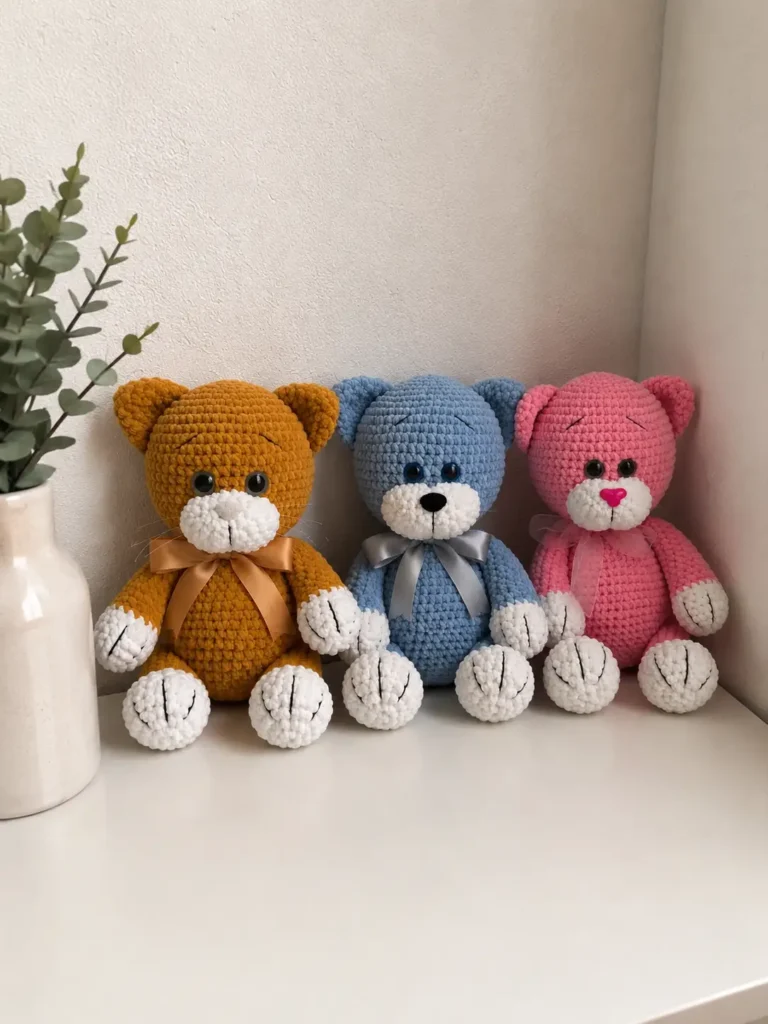
✨ Sophie’s Note: After this row, embroider a few small claw marks in black cotton thread across the white part of the paw. It’s a tiny detail, but it’s the kind that makes people look twice.
Row 10: 7 sc, 3 inv dec, 7 sc (17)
Row 11: 6 sc, 3 inv dec, 5 sc (14)
Rows 12-22: 14 sc (14)
Finishing: Don’t stuff the last three rows fully — leave them soft, or even unstuffed. Fold the piece flat and crochet 7 sc through both layers to close the opening. Make the second leg to match.
Lower Legs (make 2)
Yarn: white, changing to main color partway through
Start: mr
Row 1: 6 sc in mr (6)
Row 2: 6 inc (12)
Row 3: (1 sc, 1 inc) × 6 (18)
Row 4: (2 sc, 1 inc) × 6 (24)
Rows 5-8: 24 sc (24)
✨ Sophie’s Note: Same as before — switch to the main color after row 8.
Row 9: 4 sc, 5 inv dec, 6 sc, 1 inv dec, 2 sc (18)
✨ Sophie’s Note: Embroider the claw marks after this row, the same as you did on the upper legs.
Rows 10-12: 18 sc (18)
Row 13: 4 sc, 2 inv dec, 10 sc (16)
Rows 14-24: 16 sc (16)
Finishing: Leave the last few rows lightly stuffed or unstuffed, fold flat, and close with 8 sc through both layers. Make the second leg to match.
Head and Body
Yarn: main color throughout
Start: mr
This is the longest part of Marmalade, and the one where her whole shape comes together — head, cheeks, shoulders, and belly all in one continuous piece.
Row 1: 6 sc in mr (6)
Row 2: 6 inc (12)
Row 3: (1 sc, 1 inc) × 6 (18)
Row 4: (2 sc, 1 inc) × 6 (24)
Row 5: (3 sc, 1 inc) × 6 (30)
Row 6: (4 sc, 1 inc) × 6 (36)
Row 7: (5 sc, 1 inc) × 6 (42)
Row 8: (6 sc, 1 inc) × 6 (48)
Row 9: (7 sc, 1 inc) × 6 (54)
Row 10: (8 sc, 1 inc) × 6 (60)
Rows 11-18: 60 sc (60)
✨ Sophie’s Note: Insert the safety eyes between rows 15 and 16, on the opposite side from your stitch marker. This is the moment Marmalade starts looking back at you.
Row 19: (8 sc, 1 inv dec) × 6 (54)
Row 20: (7 sc, 1 inv dec) × 6 (48)
Row 21: (6 sc, 1 inv dec) × 6 (42)
Row 22: (5 sc, 1 inv dec) × 6 (36)
Row 23: (4 sc, 1 inv dec) × 6 (30)
Row 24: (3 sc, 1 inv dec) × 6 (24)
Row 25: (2 sc, 1 inv dec) × 6 (18)
Row 26: (1 sc, 1 inv dec) × 6 (12)
✨ Sophie’s Note: That’s the head, fully shaped. Set the piece down for a second and look at it — even without the muzzle or whiskers yet, there’s already a face forming in the curve of it.
Row 27: 12 inc (24)
✨ Sophie’s Note: This row is where the body begins — the neck narrows in behind you, and everything from here on out is Marmalade’s chest and belly.
Row 28: 24 sc (24)
✨ Sophie’s Note: Attach the upper legs into this row as you crochet, so they’re built into the body rather than sewn on after.
Row 29: (3 sc, 1 inc) × 6 (30)
Rows 30-32: 30 sc (30)
Row 33: 13 sc, 6 inc, 11 sc (36)
✨ Sophie’s Note: The increases in this row need to sit centered between the eyes — that’s what forms the belly. If yours don’t line up quite right, adjust how many sc you work before the increases (without changing the total stitch count) until it looks centered on your piece.
Row 34: (5 sc, 1 inc) × 6 (42)
Row 35: 42 sc (42)
Row 36: (6 sc, 1 inc) × 6 (48)
Row 37: (7 sc, 1 inc) × 6 (54)
Rows 38-41: 54 sc (54)
Row 42: (7 sc, 1 inv dec) × 6 (48)
Row 43: (6 sc, 1 inv dec) × 6 (42)
Row 44: (5 sc, 1 inv dec) × 6 (36)
✨ Sophie’s Note: Attach the lower legs into this row, the same way you did the upper legs earlier.
Row 45: 36 sc (36)
Row 46: (4 sc, 1 inv dec) × 6 (30)
Row 47: (3 sc, 1 inv dec) × 6 (24)
Row 48: 24 sc (24)
Row 49: (2 sc, 1 inv dec) × 6 (18)
Row 50: (1 sc, 1 inv dec) × 6 (12)
Row 51: 12 sc (12)
Row 52: 6 inv dec (6)
Finishing: Fasten off, close the opening, and weave in the ends.
Ears (make 2)
Yarn: main color
Start: mr
Row 1: 6 sc in mr (6)
Row 2: 6 inc (12)
Row 3: (1 sc, 1 inc) × 6 (18)
Row 4: (2 sc, 1 inc) × 6 (24)
Rows 5-7: 24 sc (24)
Finishing: Leave unstuffed, fasten off, and weave in the ends. Make the second ear to match.
Tail
Yarn: white, changing to main color partway through
Start: mr
Row 1: 6 sc in mr (6)
Row 2: (1 sc, 1 inc) × 3 (9)
✨ Sophie’s Note: Switch to the main color after row 6 — this is what gives the tail its white tip.
Rows 3-17: 9 sc (9)
Finishing: Fasten off, leaving a long tail of yarn for sewing it on later.
Muzzle
Yarn: white (Alize Softy, held double)
Hook: 3.5mm (approx. US E/4)
Start: mr
Row 1: 6 sc in mr (6)
Row 2: 6 inc (12)
Row 3: (1 sc, 1 inc) × 6 (18)
Row 4: (2 sc, 1 inc) × 6 (24)
Row 5: (3 sc, 1 inc) × 6 (30)
Row 6: (4 sc, 1 inc) × 6 (36)
Row 7: (5 sc, 1 inc) × 6 (42)
✨ Sophie’s Note: Try the muzzle on Marmalade’s face after this row, holding it under the eyes. If it already looks big enough for her face, stop here — work 42 sc in row 8 and fasten off. If it needs to be a little bigger, keep going to row 9.
Row 8: (6 sc, 1 inc) × 6 (48)
Row 9: 48 sc (48)
✨ Sophie’s Note: Insert the safety nose before you finish sewing this piece on.
Finishing: Fasten off, leaving a long tail for sewing.
Assembly — Bringing Marmalade Together
This is the moment the pieces stop being individual parts and start being one soft, sleepy cat.
- Sew the tail on at the level of the lower legs.
- Sew each ear on through both layers, without folding them — let them keep their natural curve.
- Sew the muzzle on under the eyes, gradually stuffing it as you go so it doesn’t stretch out of shape. This one placement decision does more for her expression than almost anything else — a muzzle sewn slightly lower gives a droopier, sleepier look; a touch higher and she looks more alert.
Decoration — Giving Marmalade Her Expression
The face is really where Marmalade becomes herself, and it’s worth taking your time here rather than rushing through:
- Gently press small hollows into the top and bottom of the muzzle, between the eyes and at the chin, to give it some real shape instead of a flat oval.
- Embroider a small lip under the nose in black cotton thread.
- Embroider two short eyebrows above the eyes — this is a small detail, but it’s a big part of what makes her look sleepy rather than surprised.
- Sew in the whiskers using fishing line, stitching through the muzzle so they sit symmetrically on both sides.
- Tie a ribbon in a bow around her neck.
Meet Marmalade
Meet Marmalade. She sits with her paws tucked under her, tail curled around one side, that little bow at her neck slightly crooked no matter how many times I straighten it. There’s a moment in every one of these where the yarn stops being yarn — for her, it was somewhere around the eyebrows, when that heavy-lidded, half-asleep look finally showed up. Once that happens, they stop being a project and start being someone who lives on your shelf. Name yours whatever suits her. Put her somewhere soft-lit, on a windowsill or next to a stack of books, and let her be exactly as sleepy as she looks. I hope you enjoyed working through this crochet cat amigurumi free pattern. 🧶🧶
If you enjoyed making a cat this size, our cozy gray kitty pattern is a smaller, quicker companion piece worth a look too.
FAQ
What yarn is best for this crochet cat amigurumi?
A bulky (weight 5) chenille yarn, like Himalaya Dolphin Baby or Bernat Baby Velvet, works best to give this cat a soft, velvety, and huggable texture.
How long does it take to crochet this cat?
It takes approximately 12 to 16 hours to complete, making it a wonderful and substantial weekend project.
Do I need any special tools for this amigurumi?
Besides basic crochet supplies, you will need fishing line for the realistic whiskers, safety eyes and a safety nose, and a length of ribbon for the final touch.