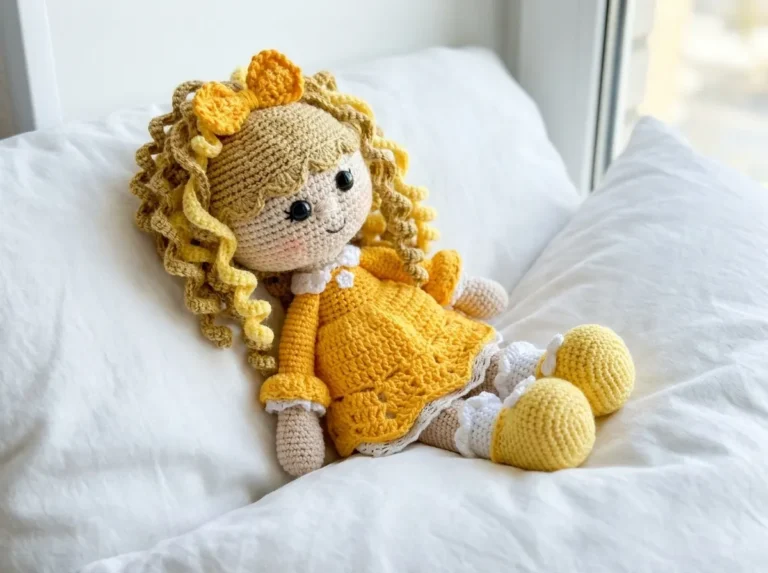
Marusya Amigurumi Doll — Free Crochet Pattern
This amigurumi doll free pattern brings you Marusya — a 10.6-inch doll with sculpted facial features, hand-attached hair, and a two-tiered ruffled dress. I’ll be honest: this is not a quick build. It’s a genuine intermediate project with layered construction, multiple yarn weights, and detailed face work that takes time to do right. The payoff, though, is something worth every stitch. Every count in this pattern has been checked twice. Let’s build her right.
📋 Pattern Quick Stats
- Difficulty: Intermediate
- Finished Size: 10.6 in (27 cm)
- Hook Sizes: 1.75mm (body, head, limbs); 1.25mm (dress and fine details) — no standard US letter equivalents for these sizes
- Yarn Weights: DK/Light Worsted (3) for body and limbs; Fingering (1) and Lace (0) for dress, hair, and embroidery details
- Techniques: magic ring, invisible decrease, color changes, BLO/FLO split-row construction, joining limbs in-round, face sculpting, embroidery, hair attachment
- Estimated Time: 15–20 hours
Materials for This Amigurumi Doll Free Pattern
This pattern draws on several yarn weights across different parts of the doll. The body, head, and limbs use a smooth DK-weight cotton-blend yarn at 1.75mm — you want dense, clean stitches with no stuffing showing through. The dress and fine decorative details step down to lace or light fingering weight at 1.25mm. I’ve listed US-available alternatives throughout.
Yarn
- Body, head, arms, and legs (skin tone): DK/Light Worsted weight (3) cotton-acrylic blend — approximately one 50 g / 175 yd skein. US alternatives: Lion Brand 24/7 Cotton (DK), Paintbox Simply DK, or Drops Muskat.
- Pink (bloomers detail and shoe accent): Same DK weight as above — small amount, approximately 30–40 yds.
- Bleached white (bloomers waistband and shoe toe): Same DK weight — small amount, approximately 20–25 yds.
- Hair: Sport weight (2) yarn in your chosen hair color — approximately 50 yds. US alternatives: Lion Brand Pound of Love (Sport), Bernat Softee Baby, or any smooth sport weight in brown, blonde, or black.
- Eyebrows and eyelashes: Fingering weight (1) dark brown yarn or fine embroidery thread — very small amount. US alternatives: DMC Perle Cotton thread, or any fingering cotton in dark brown.
- Dress: Lace (0) or light Fingering (1) weight yarn in your chosen dress color — approximately 100–120 yds. US alternatives: Drops Lace, Lion Brand Coboo, or Caron Simply Soft Fine.
- Dress ruffles and headband: Lace weight (0) white cotton — approximately 50–60 yds. US alternatives: Aunt Lydia’s Classic Crochet Thread (Size 10) or Drops Safran.
- Heart: DK weight (3) red yarn — approximately 15–20 yds. Same weight as body yarn.
- Mouth accent: DK weight in a soft lip color — less than 5 yds. Same weight as body yarn.
- Leaves (headband decoration): Fingering (1) green yarn — approximately 15 yds. US alternative: Lion Brand Coboo in sage or olive.
For yarn weight classifications, I follow the Craft Yarn Council yarn weight system.
Tools and Notions
- 1.75mm crochet hook (no standard US letter equivalent — available as a steel hook at Joann, Michaels, Hobby Lobby, or on Amazon)
- 1.25mm crochet hook (no standard US letter equivalent — same sources as above)
- 9mm or 10mm safety eyes (×2)
- Polyester fiberfill stuffing (Poly-Fil by Fairfield, available at Joann, Michaels, or Hobby Lobby)
- Tapestry needle (blunt yarn needle)
- Stitch markers — non-negotiable for this pattern; several parts require tracking multiple color joins and return rows simultaneously
- Long doll needle for face sculpting
- Wire, approximately 5–6 in, wrapped in medical or craft tape (for neck reinforcement — optional but recommended)
- 2 × 8mm sew-on snap buttons or small decorative buttons for dress closure
- 1 decorative button for bow center
- 5 small paper or crocheted flowers for headband
- Clear fabric glue (Aleene’s Original Tacky Glue works well) for headband flowers
- Pink chalk pastel or blush powder for cheek coloring
- Small soft brush for pastel application
💡 Emma’s Tip: The micro hooks (1.75mm and 1.25mm) work the hands harder than larger sizes. This is a multi-session project by design — there is genuinely no rush. I’d suggest completing each major part in a dedicated sitting rather than trying to power through.
Abbreviations
| Abbreviation | Meaning |
|---|---|
| mr | magic ring — an adjustable loop start that closes completely, eliminating the center hole |
| ch | chain |
| sc | single crochet |
| hdc | half double crochet |
| dc | double crochet |
| tr | treble crochet |
| sl st | slip stitch |
| inc | increase — 2 sc (or 2 dc) worked into the same stitch |
| inv dec | invisible decrease — insert hook through the front loops only of the next 2 stitches simultaneously, yarn over, pull through, yarn over, pull through 2 loops. This is the only decrease method used throughout this pattern. |
| dc4tog | 4 double crochets worked together as a cluster — used in the arm to create the thumb detail |
| FLO | front loop only |
| BLO | back loop only |
| shift st | a repositioning slip stitch worked at the end of a round to shift the starting point of the next round. Not counted in stitch totals. |
Special Techniques
Before you cast on a single chain, make sure these techniques are solid. Each one shows up multiple times in this amigurumi doll free pattern, and shaky execution will be visible in the finished piece.
- Magic ring: Every 3D part of this doll begins with a magic ring — head, body, arms, legs, and heart. If yours tends to leave a gap in the center, now is the time to fix that habit. Our step-by-step magic ring tutorial walks through it from scratch.
- Invisible decrease: The inv dec is used throughout the head, body, legs, and heart shaping. It works through the front loops only of two consecutive stitches, which eliminates the gap you’d get from sc2tog. This is one of those details that makes all the difference in how clean the finished doll’s skin looks. Our complete invisible decrease tutorial shows exactly how it’s executed.
- Safety eyes: The 9mm or 10mm safety eyes must be installed during head construction at a specific row — before the head is fully closed. If you’re new to placing and locking safety eyes, check out our safety eye tutorial before you start. For dolls intended for children under 3, embroidered eyes are the safer alternative; the U.S. Consumer Product Safety Commission has guidelines covering toy safety standards worth reviewing.
- Split-row FLO/BLO technique: Several parts of this pattern use a construction method where one row is worked into the front loops of a previous row, and a second row is then worked back into the remaining free back loops of that same original row. This appears in the shoe-to-leg transition, the body waistline, and the dress hem tiers. Every instance is flagged with a callout tip in the pattern below.
- Joining limbs in-round: Both the legs (Body Row 11) and the arms (Body Row 34) are attached by crocheting through all three layers simultaneously — the two folded sides of the limb plus the body stitch. Fold the limb flat before that row and pin it in position. It’s worth taking an extra minute here; the strength and alignment of every limb depends on it.
Amigurumi Doll Free Pattern: Complete Instructions
Work each part to completion before beginning assembly. Stitch counts are shown at the end of each row in bold. Colors are noted in italics within rows.
Head (×1)
Color: Skin/body tone | Start: Magic ring
Row 1: 6 sc in mr (6)
Row 2: 6 inc (12)
Row 3: (1 sc, inc) × 6 (18)
Row 4: 1 sc, inc, (2 sc, inc) × 5, 1 sc (24)
Row 5: (3 sc, inc) × 6 (30)
Row 6: 2 sc, inc, (4 sc, inc) × 5, 2 sc (36)
Row 7: (5 sc, inc) × 6 (42)
Row 8: 3 sc, inc, (6 sc, inc) × 5, 3 sc (48)
Row 9: (7 sc, inc) × 6 (54)
Row 10: (8 sc, inc) × 6 (60)
Rows 11–16: 60 sc (6 rows) (60)
Row 17: 24 sc, ch 1 (skip 1 sc), 10 sc, ch 1 (skip 1 sc), 24 sc
Row 18: 18 sc, inc, 3 sc, inc, 3 sc, inc, 6 sc, inc, 3 sc, inc, 3 sc, inc, 18 sc (66)
Rows 19–23: 66 sc + 1 shift st (66)
Row 24: 18 sc, (inv dec, 3 sc) × 2, inv dec, 6 sc, (inv dec, 3 sc) × 2, inv dec, 18 sc (60)
Row 25: 60 sc (60)
Row 26: 4 sc, inv dec, (8 sc, inv dec) × 5, 4 sc (54)
Row 27: (7 sc, inv dec) × 6 (48)
Row 28: 3 sc, inv dec, (6 sc, inv dec) × 5, 3 sc (42)
Row 29: (5 sc, inv dec) × 6 (36)
Row 30: 2 sc, inv dec, (4 sc, inv dec) × 5, 2 sc (30)
Row 31: (3 sc, inv dec) × 6 (24)
Row 32: 1 sc, inv dec, (2 sc, inv dec) × 5, 1 sc (18)
💡 Emma’s Tip: The two ch-1 gaps in Row 17 are the eye placements. Install your 9mm or 10mm safety eyes into those gaps before you continue past Row 18 — once you’re closing the back of the head, there won’t be room to seat the washer backing. Begin stuffing the head from Row 20 onward, adding fiberfill a little at a time so it distributes evenly through the increasing shaping. Fasten off with a long tail for attachment later. Do not sew the head to the body yet — face sculpting and hair attachment come first.
Arms (×2)
Color: Skin/body tone | Start: Magic ring
Row 1: 6 sc in mr (6)
Row 2: 6 inc (12)
Row 3: (3 sc, inc) × 3 (15)
Row 4: 15 sc (15)
Row 5: 2 sc, inc, (4 sc, inc) × 2, 2 sc (18)
Row 6: 18 sc (18)
Row 7: 9 sc, dc4tog, 8 sc (18)
Row 8: 18 sc (18)
Row 9: 2 sc, inv dec, (4 sc, inv dec) × 2, 2 sc (15)
Row 10: (inv dec, 3 sc) × 3 (12)
Row 11: (5 sc, inc) × 2 (14)
Rows 12–27: 14 sc (16 rows) (14)
💡 Emma’s Tip: In Row 7, the dc4tog cluster is worked into a single stitch — 4 double crochets drawn together — and protrudes slightly to form the thumb. Stuff the arm lightly as you go, but leave the last 1–1.5 in of the top un-stuffed. Those top stitches get crocheted into the body at Row 34, and the join works much cleaner without stuffing pushing into the seam. Make the second arm the same way.
Shoes and Legs (×2)
Colors: White (sole and ruffle), Pink (shoe upper), Skin/body tone (leg) | Start: Foundation chain of 6 + 1 turning chain
Row 1: inc, 4 sc, 4 sc in one stitch, 4 sc, inc [white] (16)
Row 2: 1 sc, inc, 4 sc, 4 inc, 4 sc, inc, 1 sc [white] (22)
Row 3: 1 sc, inc, 5 sc, (inc, 1 sc) × 4, 6 sc, inc [white] (28)
Row 4: 2 sc, inc, 5 sc, (inc, 2 sc) × 4, 7 sc, inc [white] (34)
Row 5: 3 sc, inc, 5 sc, (inc, 3 sc) × 4, 5 sc, inc, 3 sc [white] (40)
Row 6: BLO 40 sc [switch to pink] (40)
Rows 7–9: 40 sc + 1 shift st [pink] (40)
Row 10: 8 sc, (1 sc, inv dec) × 8, 8 sc [pink] (32)
Row 11: 32 sc FLO [pink] (32)
💡 Emma’s Tip: After Row 11, cut and fasten off the pink yarn. Now return to the back loops that Row 11 left unused — those are the back loops of Row 10. Attach your skin-tone yarn there and work Row 11a. This split-row technique creates the clean ankle line where the shoe meets the leg skin with no messy color bleed.
Row 11a: 32 sc BLO [skin color, worked into the back loops of Row 10] (32)
Row 12: 8 sc, 8 inv dec, 8 sc [skin color] (24)
Row 13: 4 sc, 8 inv dec, 4 sc [skin color] (16)
Rows 14–30: 16 sc (17 rows) [skin color] (16)
Row 31: 16 sc [switch to white] (16)
Row 32: 16 sc BLO [white] (16)
Rows 33–34: 16 sc [white] (16)
Row 32a: (1 sc, ch 2) × 16 FLO [white, worked into the front loops of Row 32]
💡 Emma’s Tip: Row 32a creates the ankle ruffle. Return to Row 32, attach white yarn into the free front loops, and work downward — end with a sl st. Do not stuff the top portion of the leg; those upper stitches join into the body at Row 11 of the body section, and loose stuffing will complicate that join. Make the second leg the same way.
Body (×1)
Colors: White (bloomers, Rows 1–19), Skin/body tone (torso, Rows 19a–41) | Start: Magic ring
Row 1: 6 sc in mr [white] (6)
Row 2: 6 inc [white] (12)
Row 3: (1 sc, inc) × 6 [white] (18)
Row 4: 1 sc, inc, (2 sc, inc) × 5, 1 sc [white] (24)
Row 5: (3 sc, inc) × 6 [white] (30)
Row 6: 2 sc, inc, (4 sc, inc) × 5, 2 sc [white] (36)
Row 7: (5 sc, inc) × 6 [white] (42)
Row 8: 3 sc, inc, (6 sc, inc) × 5, 3 sc [white] (48)
Row 9: (7 sc, inc) × 6 [white] (54)
Row 10: (8 sc, inc) × 6 [white] (60)
Row 11: 21 sc, 8 sc together with leg, 2 sc, 8 sc with leg, 21 sc [white] (60)
💡 Emma’s Tip: Row 11 is the leg join. Fold each finished leg flat — toes pointing forward — and hold each one against the inside of the body at the marked positions. When you reach each leg section, crochet through all three layers at once: the front of the leg, the back of the leg, and the body stitch sitting behind them. Pin everything before committing. Once you start crocheting through all three layers, there’s no easy way to correct the angle. Both legs oriented consistently before this row is one of those details that makes all the difference.
Rows 12–18: 60 sc (7 rows) [white] (60)
Row 19: FLO 60 sc [white] (60)
💡 Emma’s Tip: After Row 19, cut and fasten off the white yarn. The front loops you just worked in Row 19 will remain visible as a clean ridge — that’s the waistline where the dress will sit. Attach skin-tone yarn to the back loops of Row 18 (the loops Row 19 left free) and work Row 19a from there.
Row 19a: BLO 60 sc [skin color, worked into the back loops of Row 18] (60)
Row 20: 9 sc, (inv dec, 2 sc) × 3, 18 sc, (2 sc, inv dec) × 3, 9 sc [skin color] (54)
Rows 21–22: 54 sc [skin color] (54)
Row 23: 8 sc, (inv dec, 2 sc) × 3, 15 sc, (2 sc, inv dec) × 3, 7 sc [skin color] (48)
Rows 24–25: 48 sc [skin color] (48)
Row 26: (6 sc, inv dec) × 6 [skin color] (42)
Rows 27–30: 42 sc [skin color] (42)
Row 31: (5 sc, inv dec) × 6 [skin color] (36)
Rows 32–33: 36 sc [skin color] (36)
Row 34: 6 sc, 7 sc together with arm, 11 sc, 7 sc together with arm, 5 sc [skin color] (36)
💡 Emma’s Tip: Row 34 joins the arms exactly as the legs were joined in Row 11 — three layers simultaneously. Make sure the thumbs are pointing outward before you start. The stitch marker for Rows 32–33 should be sitting at the center back of the body; use shift stitches to reposition it if needed before Row 34.
Row 35: 2 sc, inv dec, (4 sc, inv dec) × 5, 2 sc [skin color] (30)
Row 36: (3 sc, inv dec) × 6 [skin color] (24)
Row 37: 24 sc [skin color] (24)
Row 38: 1 sc, inv dec, (2 sc, inv dec) × 5, 1 sc [skin color] (18)
Rows 39–41: 18 sc [skin color] (18)
💡 Emma’s Tip: Stuff the body firmly — especially before Row 35 when the neck shaping starts closing up. Leave the final neck rows (39–41) lightly stuffed or empty to make room for the wire reinforcement and the head attachment. Fasten off, leaving a long yarn tail.
Dress (×1)
Colors: Dress color, white | Start: Foundation chain of 38 + 2 turning chains
This piece is worked flat in rows, not in continuous rounds. Begin each row with 2 turning chains (counts as the first dc of that row).
Row 1: 4 dc, (inc, 3 dc) × 8, 2 dc (46)
Row 2: 9 dc, ch 8 (skip 8 dc), 12 dc, ch 8 (skip 8 dc), 9 dc
Row 3: 4 dc, (inc, 6 dc) × 6 (52)
Row 4: 4 dc, (inc, 7 dc) × 6 (58)
Row 5: 4 dc, (inc, 8 dc) × 6 (64)
Row 6: 64 dc (64)
Row 7: 6 dc, (inc, 9 dc) × 5, inc, 7 dc (70)
Rows 8–9: 70 sc [switch to white before Row 8] (70)
Row 10: 69 inc [switch to dress color; overlap the dress by 1 dc to join into a round, sl st at the end of each following row] (138)
Rows 11–13: 138 dc [dress color] (138)
Row 14: (sc, ch 4, skip 2 stitches) × 46 FLO (46 arches)
Rows 15–16: Continue arch pattern (46 arches)
Row 17: (in the first arch sc, in the next arch 6 dc) × 23 [switch to white]
💡 Emma’s Tip: After Row 17, fasten off the white yarn. The front loops from Row 14 are used — but the back loops of Row 13 are still free. Attach dress-color yarn to those back loops and work Rows 14a–16a in the same arch pattern, then repeat the Row 17 ruffle edging in white for the second tier. This is the split-row technique again, and it’s what gives the hem its layered two-tiered look.
Rows 14a–16a: Work the arch pattern (as Rows 14–16) into the back loops of Row 13 [dress color] (138)
Then repeat the Row 17 ruffle edging in white for the second tier.
💡 Emma’s Tip: Row 2 of the dress creates the two armhole openings by chaining over skipped stitches. Those chain-span openings are where the sleeves are worked in the next section. Mark them with stitch markers before moving on so you don’t lose track.
Sleeves (×2)
Colors: Dress color, white | Start: Around the armhole opening
Row 1: Crochet 27 dc around the armhole opening (27)
Row 2: (sc, ch 4, skip 2 stitches) × 9 (9 arches)
Row 3: In each arch crochet (2 sc, ch 2, 2 sc) × 9 [switch to white]
Fasten off and weave in tails. Repeat for the second sleeve.
Bow (×1)
Color: Dress color | Start: Per chart, using treble crochet stitches
Work the bow shape in treble crochet following the chart. Work a row of sl st around the full perimeter for a clean finished edge. Sew a decorative button to the center of the bow, then set aside for assembly.
Ears (×2)
Color: Skin/body tone | Start: Crocheted directly into the head fabric
Mark ear placement with pins between Rows 17–19 of the head, approximately 7 sc from each safety eye. Both sides should be symmetrical before you begin.
Row 1: Crochet 3 sc directly into the head fabric (3)
Row 2: Turn work (no turning chain), sl st, inc (2 sc in one stitch), sl st
Fasten off and hide yarn tails inside the head. Crochet the second ear the same way.
Headband (×1)
Color: White | Start: Foundation chain of 30 + 2 turning chains, leaving a long beginning tail
Work dc across the foundation chain. At the final chain, work 5 dc into it. Turn and work dc along the opposite side of the foundation chain. Work 4 dc into the final chain, then sl st to close.
Fasten off, leaving a long tail. Using a tapestry needle, move to the center of the headband and chain 30–35 ch on both sides for the ties. Adjust tie length based on the finished hair volume. Weave in all tails.
Leaves (×5)
Color: Green fingering yarn | Start: Foundation chain of 10 (11th chain on hook)
Along the chain: sc, hdc, 1 dc, 3 tr, 2 dc, hdc, sc, ch 3. Turn the leaf and work along the second side of the foundation chain in reverse order. Join with sl st. With the working yarn held under the leaf and the hook above, work sl st through the leaf down the center to create a vein line. Fasten off. Make 5 leaves total.
Heart (×1)
Color: Red DK yarn | Start: Two separate halves, each beginning with a magic ring
Make two identical halves:
Row 1: 6 sc in mr (6)
Row 2: 6 inc (12)
Row 3: (1 sc, inc) × 6 (18)
Row 4: 18 sc (18)
Cut yarn on the first half and fasten off. On the second half, do not cut the yarn. Place the two halves together and join them with 3 sc.
Row 5: 30 sc (30)
Row 6: 4 sc, inv dec, (8 sc, inv dec) × 2, 4 sc (27)
Row 7: 27 sc (27)
Row 8: (7 sc, inv dec) × 3 (24)
Row 9: 3 sc, inv dec, (6 sc, inv dec) × 2, 3 sc (21)
Row 10: (5 sc, inv dec) × 3 (18)
Row 11: (1 sc, inv dec) × 6 (12)
Row 12: 6 inv dec (6)
Row 13: 3 inv dec (3)
Stuff as you go. Close the opening. Bring the yarn tail out through the top center of the heart, form a loop of your desired length, fasten off, and pull the tail back inside.
Assembly
Take your time with this stage. I always pin every piece in place before I sew a single stitch — getting proportions right before you commit is the difference between a doll that looks deliberate and one that looks slightly off. For a thorough walkthrough of how to join amigurumi parts cleanly, see our tutorial on sewing amigurumi parts together.
- Face and hair first: Complete all face sculpting, embroidery, and hair attachment (instructions in the next section) before sewing the head to the body. The head is significantly easier to work on while unattached.
- Neck reinforcement (optional but recommended): If the neck feels unstable once the body is stuffed, insert a piece of wire approximately 5–6 in long wrapped tightly in medical or craft tape through the neck and into the body before sewing the head on. This gives Marusya a posable head and prevents forward slump.
- Head to body: Using the long tail left on the head, sew it to the neck opening of the body. Check that the face is centered and level — both eyes at equal height from the neck seam — before pulling the yarn tight.
- Dress: Sew two 8mm sew-on snap buttons (or small buttons) at the back of the bodice for the dress closure. Sew the completed bow with its decorative button to the front center of the bodice.
- Headband: Using clear fabric glue, attach the 5 crocheted leaves and 5 paper or crocheted flowers to the white headband. Let dry fully before tying it onto the doll’s head.
- Heart: Attach the crocheted heart to the doll’s hand, wrist, or sew it onto the dress as an accessory.
Face Design and Finishing Details
This is the section most people rush — and it shows. The face is what makes this amigurumi doll free pattern come alive. Each step below shapes Marusya’s expression, and it’s worth doing with good lighting and no distractions.
Eye Sculpting
- Thread a long doll needle with skin-tone yarn. Insert the needle just below the left safety eye and bring it out through the open neck opening at the base of the head. Pull the yarn through and rethread the needle with the other end.
- Insert the needle on the opposite side of the same eye and bring it back through the neck opening. The stitch should sit hidden directly beneath the eye socket.
- Repeat this pass 2–3 times per eye — in through the neck, out below the eye, across to the other side, back through the neck.
- Pull both yarn tails firmly from the neck opening until each eye sinks slightly into its socket. Tie a secure knot inside the neck and hide the tails. Repeat for the second eye.
Embroidering the Nose
Using skin-tone yarn, embroider the nose between Rows 19 and 20 of the head. Work 5 horizontal stitches across approximately 3 sc width. Bring thread ends out through the neck opening, tie a knot, and hide the tails.
Mouth Sculpting and Lips
- Mark the two mouth corners with pins between Rows 23 and 24. The distance between pins should span approximately 4 sc.
- Using skin-tone yarn and the long doll needle, insert the needle through the neck opening and bring it out at the first mouth corner pin. Step 1 sc inward, insert the needle back, and return through the neck opening. Pull gently — not tight. Repeat for the second corner.
- Pull both tails from inside the neck until slight cheek dimpling forms. Tie and hide the tails.
- Using a lip-colored yarn, make one neat horizontal stitch between the two sculpted corners to suggest the lips. Tie and hide ends.
Eyelashes and Eyebrows
Using fine dark brown fingering yarn or embroidery thread, embroider eyelashes around each safety eye. If desired, add a small ring of white yarn around the outer edge of each eye to suggest the eye whites.
Embroider the eyebrows in two stitches each. The highest point of each brow sits between Rows 12 and 13 of the head; the lowest point sits one row below. Mark placement with pins on both sides before stitching, and check symmetry before fastening off.
Hair Attachment
- Use a contrasting scrap yarn to trace the full hairline on the head — mark the bangs, temples, and the back of the head — before cutting any hair yarn.
- To cut consistent lengths, wind the hair yarn around a notebook or book of appropriate size and cut along one side. Each cut strand, folded in half, should equal your intended finished hair length.
- Fold each strand in half. Using a tapestry needle or thin crochet hook, attach each strand as fringe into the marked holes along the hairline, then fill in the crown row by row for even distribution.
- Once all hair is attached, style as desired. Apply pink chalk pastel or blush powder to the cheeks with a soft brush — build the color gradually until you get the warmth you want.
Emma’s Note
Marusya is one of the most layered builds I’ve put together instructions for, and I mean that in the best possible way. The face sculpting alone is its own session, and the split-row technique in the legs and body is something I’d genuinely recommend practicing once on scrap yarn before doing it on the finished piece. If your count is off anywhere — don’t push through. Frog back to the last correct row. She’s worth doing right, and the result is the kind of amigurumi doll that people ask about when they see it.
If you’d like something that shares a similar construction spirit with a gentler learning curve, our free crochet gnome pattern is a satisfying next step. Happy hooking! 🧶
What yarn is best for this amigurumi doll free pattern?
A smooth DK-weight cotton-acrylic blend is recommended for the body and limbs to achieve dense, clean stitches, while lace or fingering weight yarn is ideal for the dress and details.
How long does it take to crochet this amigurumi doll?
This is a detailed intermediate project that requires face sculpting and advanced techniques, taking approximately 15 to 20 hours to complete.
Do I need wire reinforcement for this amigurumi doll?
While wire reinforcement is optional, inserting a 5-6 inch wrapped craft wire through the neck into the body is highly recommended to prevent head slump and keep it posable.