A Ladybug Amigurumi You’ll Fall Completely in Love With
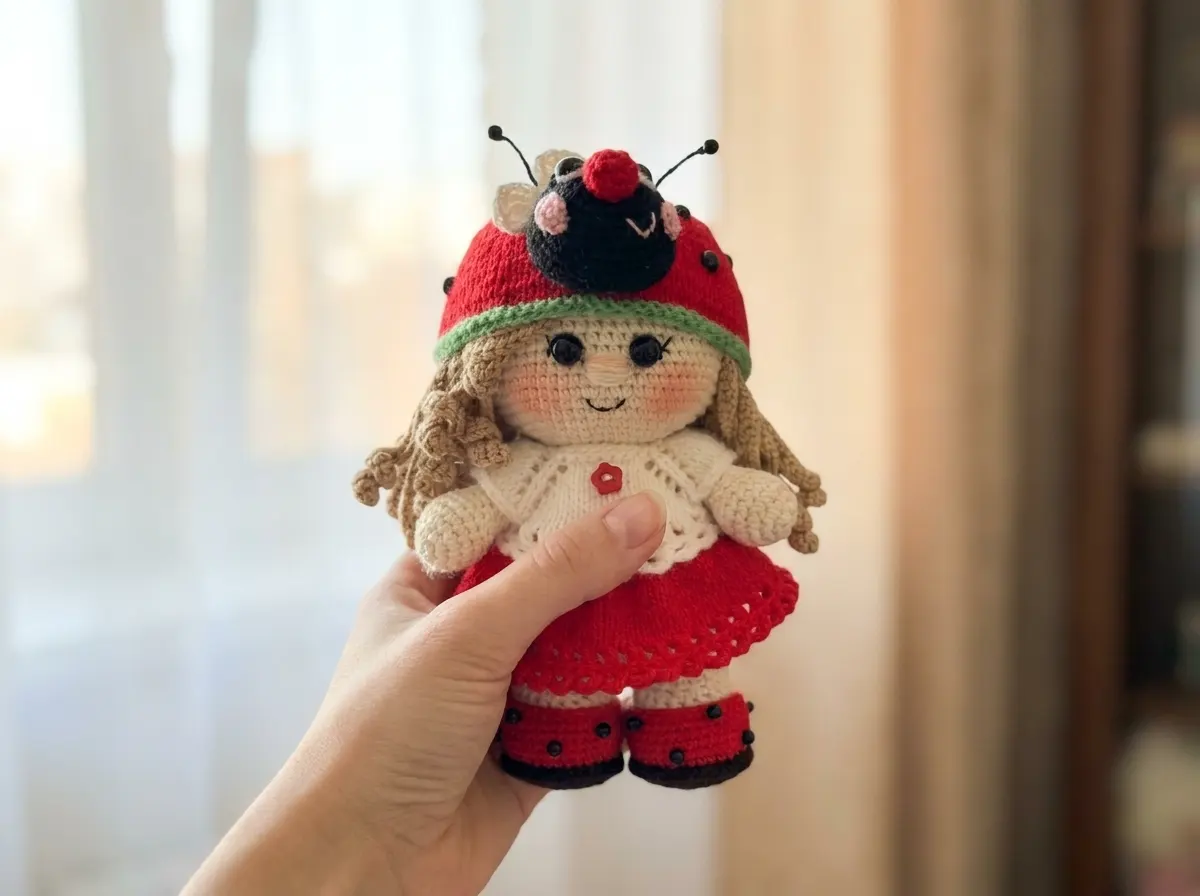
This free crochet ladybug amigurumi pattern creates the most darling baby doll you’ve ever seen — soft warm beige skin, a hand-knitted red-and-black ladybug hat with a crocheted bug face, tiny bead antennae, and the sweetest embroidered smile. She comes dressed in a crisp white knitted cardigan and a red eyelet skirt, and she stands at a precious seven inches of pure squishy adorableness. Every single detail on this little one is a tiny gift. Let’s bring her to life.
🩷 Pattern Highlights
- Cuteness Rating: 🩷🩷🩷🩷🩷
- Finished Size: 7 in (18 cm)
- Difficulty: Advanced — combines crochet and knitting techniques
- Hook Size: 1.9mm (approx. US Steel #5) for body and wig; 2.0mm (US Steel #4) for slippers; 1.75mm (approx. US Steel #7) for ladybug head and nose
- Knitting Needles: US size 0 (2.0mm)
- Yarn Palette: warm ivory beige, brilliant red, deep black, crisp white, sage green, soft blush pink, warm golden caramel (wig)
- Key Detail: hand-knitted ladybug hat with crocheted bug face, wire bead antennae, glossy safety eyes, and embroidered rosy cheeks
- Estimated Time: 12–18 hours
Materials for Your Ladybug Amigurumi
Yarn
- Warm ivory beige — DK/Light Worsted (3): Main color for the doll’s skin, body, and legs. YarnArt Jeans color 03 is the original yarn. US alternatives: Drops Muskat or Paintbox Simply DK in a nude or beige tone.
- Warm golden caramel — DK/Light Worsted (3): For the wig. Gazzal Baby Cotton color 3434 or 6944 is the original. US alternatives: Drops Safran or Paintbox Simply Cotton DK in a warm honey or caramel shade.
- Brilliant red — DK/Sport weight: For the knitted hat, skirt, slippers, and crocheted ladybug nose. Look for a smooth, tightly plied yarn with a clean stitch definition — those knitted eyelet rows will really show off a quality red.
- Sage green — DK/Sport weight: A small amount for the two-row brim accent on the hat. A dusty, muted sage reads especially beautifully against the red.
- Deep black — DK/Sport weight: For the crocheted ladybug head and the slipper soles.
- Crisp white — DK/Sport weight: For the knitted cardigan and the delicate crocheted bow.
- Soft blush pink — DK/Sport weight: A very small amount for the tiny crocheted cheek circles on the ladybug head. The kind of color you buy because it’s gorgeous even before you know what you’ll use it for.
- Black embroidery thread: Iris thread or six-strand black embroidery floss for the doll’s eyelashes and mouth.
The main accent yarns for the clothing and accessories all fall in the DK / Light Worsted (3) or Sport (2) weight range — smooth, plied yarns with good stitch definition will give you the crispest results on those tiny knitted rows.
Hooks and Needles
- 1.9mm (approx. US Steel #5) — for the body and wig
- 2.0mm (US Steel #4) — for the slippers
- 1.75mm (approx. US Steel #7) — for the ladybug head and ladybug nose
- US size 0 (2.0mm) knitting needles — for the cardigan, skirt, and hat
Additional Supplies
- Polyester fiberfill (Poly-Fil works beautifully)
- 4 safety eyes — 2 for the doll, 2 for the ladybug head (sizing notes in the finishing section)
- Small black half-beads or mini safety eyes for the ladybug polka dot details
- Small decorative beads for the slippers and antennae tips
- Thin beading wire, approx. 3.9–4.3 in (10–11 cm)
- Tapestry needle
- Stitch markers
- Craft glue (for polka dots and wire antennae)
- 5 buttons total: 2 for the cardigan button band, 1 decorative button for the cardigan center, 2 for the skirt
Abbreviations
Crochet Abbreviations
| Abbreviation | Meaning |
|---|---|
| mr | magic ring |
| ch | chain |
| sl st | slip stitch |
| sc | single crochet |
| hdc | half double crochet |
| dc | double crochet |
| tr | treble crochet |
| inc | increase — 2 sc worked into the same stitch |
| dec | invisible decrease (inv dec) — insert hook through the front loops only of the next 2 stitches simultaneously, yarn over, pull through, yarn over, pull through 2 loops. This is always the preferred decrease method for amigurumi. |
| BLO | back loop only |
| FLO | front loop only |
| rev sc | reverse single crochet (crab stitch) |
| FO | fasten off |
| st(s) | stitch(es) |
Knitting Abbreviations
| Abbreviation | Meaning |
|---|---|
| k | knit |
| p | purl |
| yo | yarn over |
| k2tog | knit 2 together — right-leaning decrease |
| kfb | knit front and back — increase |
| sel st | selvedge stitch — slip the first stitch, purl the last stitch of every row |
| St st | stockinette stitch |
| BO | bind off |
Before You Begin — Details That Make This Ladybug Amigurumi Extra Special
This is an advanced project that beautifully combines crochet construction with knitted accessories — and that combination is exactly what gives her that heirloom, handcrafted quality. The knitted cardigan, skirt, and hat have a delicate texture no crocheted fabric could replicate. The tiny hook sizes (some as small as 1.75mm) mean every stitch is visible, so take your time and enjoy the process. Here are a few things that will make your experience smoother — and her final look truly precious.
🩷 Chloe’s Detail Tip: Wherever you see dec in the crochet sections of this pattern, use the invisible decrease method — working through the front loops only of the next two stitches. This keeps the surface smooth and gap-free, which matters so much on tiny bodies and little faces. Take the extra second. You’ll see the difference immediately.
For the doll’s safety eyes — they install between rows 18 and 19 of the head (counting from the crown, where the head begins at row 17), with 5 stitches of space between them. Our safety eyes tutorial is the perfect companion here — it walks you through placement, symmetry checks, and how to secure the washers so nothing shifts once you’ve closed the head.
🩷 Chloe’s Detail Tip: Before pressing those safety eye washers on, hold the doll’s head under a bright lamp and check from directly in front. Are they level? Are they in the right position on her face? Once those washers click, they are permanent — so take an extra thirty seconds. When they’re perfectly placed, she goes from a crocheted ball to a living little character. That moment is everything.
The wig involves working long chain strands directly into the base cap — this is the most time-intensive part of the pattern and the most magical. Take it slowly, refer carefully to the row notes, and use a stitch marker to track your position in the round. And when you’re filling and closing the body and head, our stuffing guide has everything you need for getting that perfect rounded shape with smooth, even fiberfill throughout.
Free Ladybug Amigurumi Pattern — Part by Part
Legs (×2)
Yarn: warm ivory beige | Hook: 1.9mm (approx. US Steel #5) | Start: magic ring
Row 1: 6 sc in mr (6)
Row 2: 6 inc (12)
Row 3: (1 sc, inc) × 6 (18)
Row 4: 1 sc, inc, (2 sc, inc) × 5, 1 sc (24)
Row 5: BLO: 24 sc (24)
Rows 6–8: 24 sc through both loops — 3 rows (24)
Row 9: 8 sc, 4 dec, 8 sc (20)
Row 10: 8 sc, 2 dec, 8 sc (18)
Rows 11–16: 18 sc — 6 rows (18)
Finishing: Stuff both legs with fiberfill. For the first leg, fasten off and cut yarn. For the second leg, do NOT cut yarn — continue directly to the Body.
These little rounded feet with their sweet toe definition are already so precious before they even become a doll. Stuff them firmly enough to hold their shape, but not so full that the seams pull.
Body
Yarn: warm ivory beige | Hook: 1.9mm (approx. US Steel #5) | Start: join from legs
With the second leg still on your hook: work 6 sc along the second leg, ch 2. Join to the first leg: 18 sc along the first leg, 2 sc across the ch-2 bridge, 12 sc along the second leg. (40 sts)
Row 1: 40 sc (40)
Row 2: 7 sc, inc, 18 sc, inc, 13 sc (42)
Row 3: 3 sc, inc, (6 sc, inc) × 5, 3 sc (48)
Row 4: (11 sc, inc) × 4 (52)
Row 5: 52 sc (52)
Row 6: (11 sc, dec) × 4 (48)
Row 7: (dec, 10 sc) × 4 (44)
Row 8: (9 sc, dec) × 4 (40)
Row 9: (dec, 8 sc) × 4 (36)
Row 10: (7 sc, dec) × 4 (32)
Row 11: (dec, 6 sc) × 4 (28)
Row 12: (5 sc, dec) × 4 (24)
Rows 13–14: 24 sc — 2 rows (24)
Row 15: (dec, 4 sc) × 4 (20)
Row 16: 20 sc (20)
Note: Stuff gradually as you go. Do not fasten off — continue directly to the Head.
This is the part where the shape really starts happening — that rounded tummy, the sweet little waist forming as the decreases pull things in. So satisfying to watch it all come together.
Head
Yarn: warm ivory beige | Hook: 1.9mm (approx. US Steel #5) | Continuation from Body, beginning at Row 17
Row 17: (4 sc, inc) × 4 (24)
Row 18: (3 sc, inc) × 6 (30)
Row 19: 2 sc, inc, (4 sc, inc) × 5, 2 sc (36)
Row 20: (5 sc, inc) × 6 (42)
Row 21: 3 sc, inc, (6 sc, inc) × 5, 3 sc (48)
Row 22: (7 sc, inc) × 6 (54)
Row 23: 4 sc, inc, (8 sc, inc) × 5, 4 sc (60)
Row 24: (9 sc, inc) × 6 (66)
Rows 25–34: 66 sc — 10 rows (66)
Row 35: (9 sc, dec) × 6 (60)
Row 36: 4 sc, dec, (8 sc, dec) × 5, 4 sc (54)
Row 37: (7 sc, dec) × 6 (48)
Row 38: 3 sc, dec, (6 sc, dec) × 5, 3 sc (42)
Row 39: (5 sc, dec) × 6 (36)
Row 40: 2 sc, dec, (4 sc, dec) × 5, 2 sc (30)
Row 41: (3 sc, dec) × 6 (24)
Row 42: 1 sc, dec, (2 sc, dec) × 5, 1 sc (18)
Row 43: (1 sc, dec) × 6 (12)
Row 44: 6 dec (6)
Finishing: sl st to close. Tighten the opening completely. FO, cut yarn, and weave in ends.
🩷 Chloe’s Detail Tip: Install the doll’s safety eyes between rows 18 and 19 of the head (where row 17 is the first head increase row), spacing them 5 stitches apart. Do this while you can still reach inside — around row 40, pause, add fiberfill gradually, position your safety eyes, and then check the symmetry under good light before pressing the washers on. Once she has those glossy eyes, she genuinely comes alive. The difference is immediate and I may have squealed a little the first time.
Arms (×2)
Yarn: warm ivory beige | Hook: 1.9mm (approx. US Steel #5) | Start: magic ring
Row 1: 6 sc in mr (6)
Row 2: 6 inc (12)
Row 3: (1 sc, inc) × 6 (18)
Rows 4–6: 18 sc — 3 rows (18)
Row 7: (1 sc, dec) × 6 (12)
Rows 8–10: 12 sc — 3 rows (12)
Rows 11–12: 2 dec, 3 sc, 2 inc, 3 sc — 2 rows (12)
Rows 13–16: 12 sc — 4 rows (12)
Row 17: 6 dec (6)
Finishing: Lightly stuff the fist only — do not overstuff, so the arm hangs and bends naturally rather than sticking straight out. FO, cut yarn, weave in ends.
Wig
Yarn: warm golden caramel (DK/Light Worsted) | Hook: 1.9mm (approx. US Steel #5) | Start: magic ring
Row 1: 6 sc in mr (6)
Row 2: BLO: 6 inc (12)
Row 3: BLO: (1 sc, inc) × 6 (18)
Row 4: BLO: 1 sc, inc, (2 sc, inc) × 5, 1 sc (24)
Row 5 — Strand Work:
(ch 16, starting from the 2nd ch from hook: 15 sc, sl st into the next st) × 9; then continue: ch 40, work 39 sc from the 2nd ch from hook — repeat this 15 times.
Now work into the front loops of this same row (turn work): sl st, ch 40, 39 sc from the 2nd ch from hook, sl st into the next st; sl st into the next st, ch 40, 39 sc from the 2nd ch from hook, sl st into the next st. Work in alternating stitches (every other stitch). Make 13 such strands total. Then make strands every 2 stitches. In the final round at the crown — work into every stitch.
🩷 Chloe’s Detail Tip: The wig is the most time-intensive part of this project — and also the most magical transformation. Those long golden strands are what give her that flowing, layered hair with its own personality. Place a stitch marker at the beginning of each round and take breaks as you go. The finished effect is completely worth every single strand, I promise.
Ladybug Head
Yarn: deep black | Hook: 1.75mm (approx. US Steel #7) | Start: foundation chain of 8 ch
Row 1: Starting from the 2nd ch from hook: 6 sc, 3 inc; work back along the other side of the chain: 5 sc, inc (16)
Row 2: inc, 5 sc, 3 inc, 5 sc, 2 inc (22)
Row 3: 22 sc (22)
Row 4: 1 sc, inc, 5 sc, (sc, inc) × 3, 5 sc, (sc, inc) × 2 (28)
Row 5: 2 sc, inc, 5 sc, (2 sc, inc) × 3, 5 sc, (2 sc, inc) × 2 (34)
Row 6: 34 sc (34)
Row 7: 3 sc, inc, 5 sc, (3 sc, inc) × 3, 5 sc, (3 sc, inc) × 2 (40)
Rows 8–9: 40 sc — 2 rows (40)
Row 10: (4 sc, dec) × 6, 2 sc, dec (33)
This flat-oval shape will become the sweet bug face sitting on top of the hat — rounded at the top, slightly curved at the base. Lightly stuff before closing and attaching.
Ladybug Nose
Yarn: brilliant red | Hook: 1.75mm (approx. US Steel #7) | Start: magic ring
Row 1: 6 sc in mr (6)
Row 2: 6 inc (12)
Row 3: 12 sc (12)
Row 4: 6 dec (6)
Finishing: FO and leave a long tail for sewing. Attach to the center front of the ladybug head.
Cheeks (×2)
Yarn: soft blush pink | Hook: 1.75mm or 1.9mm | Start: magic ring
Row 1: 6 sc in mr (6)
Finishing: FO and leave a tail for sewing. These tiny blush circles attach to either side of the ladybug head — and they are, without question, my favorite detail on this entire project. Okay but those cheeks though.
Bow
Yarn: crisp white | Start: magic ring
Row 1: into mr: 5 ch, 6 tr, 4 ch, sl st, 4 ch, 6 tr, 4 ch, sl st
Finishing: Pull the center tight through the magic ring to cinch the bow shape. Attach to one of the ladybug’s antennae — the most perfectly tiny finishing touch you’ve ever seen.
Slippers (×2)
Yarn: deep black + brilliant red | Hook: 2.0mm (US Steel #4) | Start: magic ring in black
Row 1: 6 sc in mr — black (6)
Row 2: 6 inc (12)
Row 3: (1 sc, inc) × 6 (18)
Row 4: 1 sc, inc, (2 sc, inc) × 5, 1 sc (24)
Row 5: (3 sc, inc) × 6 (30)
Row 6: (6 sc, inc) × 4, 2 sc (34)
Row 7: BLO: 34 sc — switch to red at the start of this row; work in back loop only (34)
Rows 8–11: 34 sc through both loops — 4 rows (34)
Row 12: 11 sc, 6 dec, 11 sc (28)
Finishing: Work reverse sc (crab stitch) along the sole edge in black yarn, working into the front loops left from Row 7. Add small decorative beads at the toe for extra sweetness.
Glossy black with that brilliant red upper and the crab stitch trim at the sole — these slippers are so delicate. They’re honestly one of my favorite details on the whole doll.
Knitted Cardigan
Yarn: crisp white | Needles: US size 0 (2.0mm) | Cast on 35 stitches (33 + 2 selvedge stitches)
The selvedge stitch is maintained throughout: slip the first stitch and purl the last stitch of every row. The first and last 3 stitches form the button band and are knitted (k) on every row.
Rows 1–3: p across
Row 4: k3, k4, yo, k1, yo, k4, yo, k1, yo, k7, yo, k1, yo, k4, yo, k1, yo, k4, k2tog, yo, k1 (buttonhole row)
Row 5: k3, p35, k3
Row 6: k3, k5, yo, k1, yo, k6, yo, k1, yo, k9, yo, k1, yo, k6, yo, k1, yo, k5, k3
Row 7: k3, p43, k3
Row 8: k3, k6, yo, k1, yo, k8, yo, k1, yo, k11, yo, k1, yo, k8, yo, k1, yo, k6, k3
Row 9: k3, p51, k3
Row 10: k3, k7, yo, k1, yo, k10, yo, k1, yo, k13, yo, k1, yo, k10, yo, k1, yo, k7, k3
Row 11: k3, p59, k3
Row 12: k3, k8, yo, k1, yo, k12, yo, k1, yo, k15, yo, k1, yo, k12, yo, k1, yo, k8, k3
Row 13: k3, p67, k3
Row 14: k3, k9, BO 16 sts (sleeve), k17, BO 16 sts (sleeve), k9, k2tog, yo, k1 (buttonhole row) (43)
Row 15: k3, p35, k3
Row 16: k3, (k2tog, yo) × 17, k1, k3
Row 17: k3, p35, k3
Finishing: BO all stitches. Crochet along the bottom edge: (3 ch, skip 1 st, 1 sc) repeat to end. Sew on 2 buttons at the button band, plus 1 decorative button at the center front.
Knitted Skirt
Yarn: brilliant red | Needles: US size 0 (2.0mm) | Cast on 46 stitches (44 + 2 selvedge stitches)
The first and last 2 stitches form the button band and are knitted on every row.
Rows 1–2: k44
Row 3: k42, yo, k2tog (buttonhole)
Row 4: k44
Row 5: k2, (kfb — work first into the back loop, then the front loop of the same stitch) × 40, k2 (84)
Row 6: k2, p80, k2
Row 7: k84
Row 8: k2, p80, k2
Row 9: k84
Row 10: k2, p80, k2
Row 11: k82, yo, k2tog (buttonhole)
Row 12: k2, p80, k2
Row 13: k84
Row 14: k2, p80, k2
Row 15: k2, (k2tog, yo) × 40, k2
Row 16: k2, p80, k2
Finishing: BO all stitches. Crochet along the bottom edge: (3 ch, skip 1 st, 1 sc) repeat to end. Sew on 2 buttons at the button band.
Knitted Hat
Yarn: sage green (rows 1–2) + brilliant red (rows 3–36) | Needles: US size 0 (2.0mm) | Cast on 68 stitches (66 + 2 selvedge stitches)
Begin with sage green.
Rows 1–2: k66 — sage green
Rows 3–24: stockinette stitch (St st) — switch to brilliant red
Row 25: (k4, k2tog) × 11 (55)
Row 26: p55
Row 27: (k4, k2tog) × 9, k1 (46)
Row 28: p46
Row 29: (k4, k2tog) × 7, k4 (39)
Row 30: p39
Row 31: (k4, k2tog) × 6, k3 (33)
Row 32: p33
Row 33: (k2, k2tog) × 8, k1 (25)
Row 34: p25
Row 35: (k2, k2tog) × 6, k1 (19)
Row 36: p19
Finishing: Thread yarn through the remaining stitches with a tapestry needle and draw tight to close the crown. Seam the hat at the back.
That two-row sage green brim peeking out at the bottom of the brilliant red body — the softest, sweetest color detail. This is the part that makes the hat feel considered rather than simple.
Assembly
- Arms: Sew both arms to the body using a yarn joint — this allows a little movement and makes the doll feel poseable and alive rather than stiff.
- Wig: Place the wig cap on the head, aligning the crowns carefully. Pin in place. Arrange the bangs with 2 strands swept to one side and the rest swept to the opposite side. Sew down the bottom row first, then work the strands from the second and third rows into the gaps. Attach the last strands near the crown, leaving approx. ⅜ in (1 cm) from center.
- Ladybug Head: Lightly stuff with fiberfill. Sew onto the hat at center, positioned along the edge of the green stripe so it sits right at the hat front.
- Ladybug Nose: Sew the small red nose piece onto the center front of the ladybug head.
- Hat Tie: Ch 45 (or long enough to tie under the doll’s chin), return with sl st to form a neat cord. Sew to the center of the hat from front to back.
- Antennae: Thread beading wire (approx. 3.9–4.3 in / 10–11 cm) through small beads, fold in half, and twist together. Wrap tightly with black yarn secured with a small drop of glue. Insert into the top of the ladybug head so they curve gently outward.
- Polka Dots: Glue small black half-beads onto the hat surface and onto the slippers for the ladybug spot detail. Place them asymmetrically — that’s how real ladybugs look, and somehow it’s even cuter.
- Cheeks: Sew the two tiny blush pink circles onto the ladybug head, one on each side just below and to the outside of the eyes.
For more guidance on getting every sewn joint exactly right, our guide to sewing amigurumi parts together is a wonderful reference — especially helpful for the arm joints and for positioning the wig so it sits naturally on the head.
Making It Extra Cute — The Details That Make This Ladybug Amigurumi Irresistible
This is the section that separates a finished project from one that makes people actually gasp when they pick it up. Every detail here takes minutes and adds years of personality.
The Doll’s Face
Safety eyes: The doll’s safety eyes install between rows 18 and 19 of the head, with 5 stitches between them. Before you press those washers in — hold her under a good lamp and look at her face straight-on. Are the eyes level? Is the spacing right? Does she have a face yet? When they’re positioned just so, she absolutely does. Once those washers click, there’s no going back, so savor this moment. The transformation from crocheted ball to little person is the part where the magic happens.
Embroidered nose: Using the body yarn, embroider a small, simple nose between and just below the eyes — a few satin stitches in a tiny oval shape is all it takes. Subtle and perfect.
Mouth and eyelashes: This is where the black iris thread or embroidery floss earns its place. A small upward-curving stitch for the mouth, and three to four delicate lashes fanning upward from above each eye. Five minutes. Enormous impact.
Rosy cheeks: Using a pink chalk pencil, a touch of matte cosmetic blush, or tiny embroidered circular stitches in soft pink yarn, add a gentle blush circle to each of the doll’s cheeks. This single detail is what makes people reach for her first when she’s sitting on a shelf. Okay but those cheeks though.
The Ladybug’s Face
The ladybug’s safety eyes are glued into position — take a moment to check their placement and spacing before the adhesive sets. Then use white embroidery thread to stitch small white highlights around each eye, giving that expressive, glossy bug-eye quality. Embroider the mouth in soft pink thread — a tiny upward curve to match the doll’s own happy expression. The two blush pink cheek circles sewn on below the eyes are the last thing that goes on, and they are EVERYTHING.
The Antennae
Wrap the wire slowly and snugly with black yarn, keeping even tension the whole way, and add a tiny drop of glue at each end to hold the wrap in place before it dries. The bead tips give a jeweled, finished quality that elevates the whole hat. Curve the antennae gently outward and upward as you insert them — a slight curve looks far more natural than straight lines. Then attach the crisp white bow to one antenna. That bow is the bow. I can’t even handle how cute it is.
Color Palette Variations
The classic brilliant red is everything, but imagine her in a dusty lavender hat with white polka dots — a fantasy ladybug in the sweetest pastel. Or a pale mint hat with soft yellow spots. Or blush pink with gold. The knitted outfit translates beautifully to almost any color combination, and the warm beige doll reads well against every palette. A trio of three in red, lavender, and mint, lined up on a windowsill? That’s the goal. That’s always the goal.
Chloe’s Final Look
I’ve been staring at this finished ladybug amigurumi for an embarrassingly long time and I regret absolutely nothing. The way those bead antennae catch the light, the white bow sitting perfectly on one antenna, the tiny glossy eyes on the bug head, the rosy cheeks — she is just completely precious. Put her knitted cardigan and red skirt on and she looks like a tiny heirloom, the kind of thing you’d keep in a glass cabinet. Make her in classic red and line her up with a lavender version and a mint version on a shelf somewhere, and then send me a photo immediately. 🩷
What yarn is best for this ladybug amigurumi?
Use a smooth DK or Light Worsted (weight 3) yarn for the doll’s body — YarnArt Jeans in beige or a similar tightly plied option gives the cleanest stitch definition at small hook sizes. For the knitted clothing and accessories, choose any smooth DK or Sport weight yarn with good stitch clarity so the tiny eyelet and stockinette rows show up crisply.
How long does it take to crochet this ladybug amigurumi?
Plan for 12–18 hours in total, spread comfortably over several sessions. The wig strand work and the knitted cardigan, skirt, and hat are the most time-intensive steps — the finishing details (antennae, embroidery, polka dots) are quick and enormously satisfying.
Can beginners make this ladybug amigurumi pattern?
This pattern is rated Advanced because it combines crochet and knitting techniques, uses hook sizes as small as 1.75mm, and requires detail work such as bead wire antennae and embroidery. It is best suited for crafters already confident with amigurumi construction and basic flat knitting.