Free Lion Amigurumi Crochet Pattern — Step-by-Step Instructions
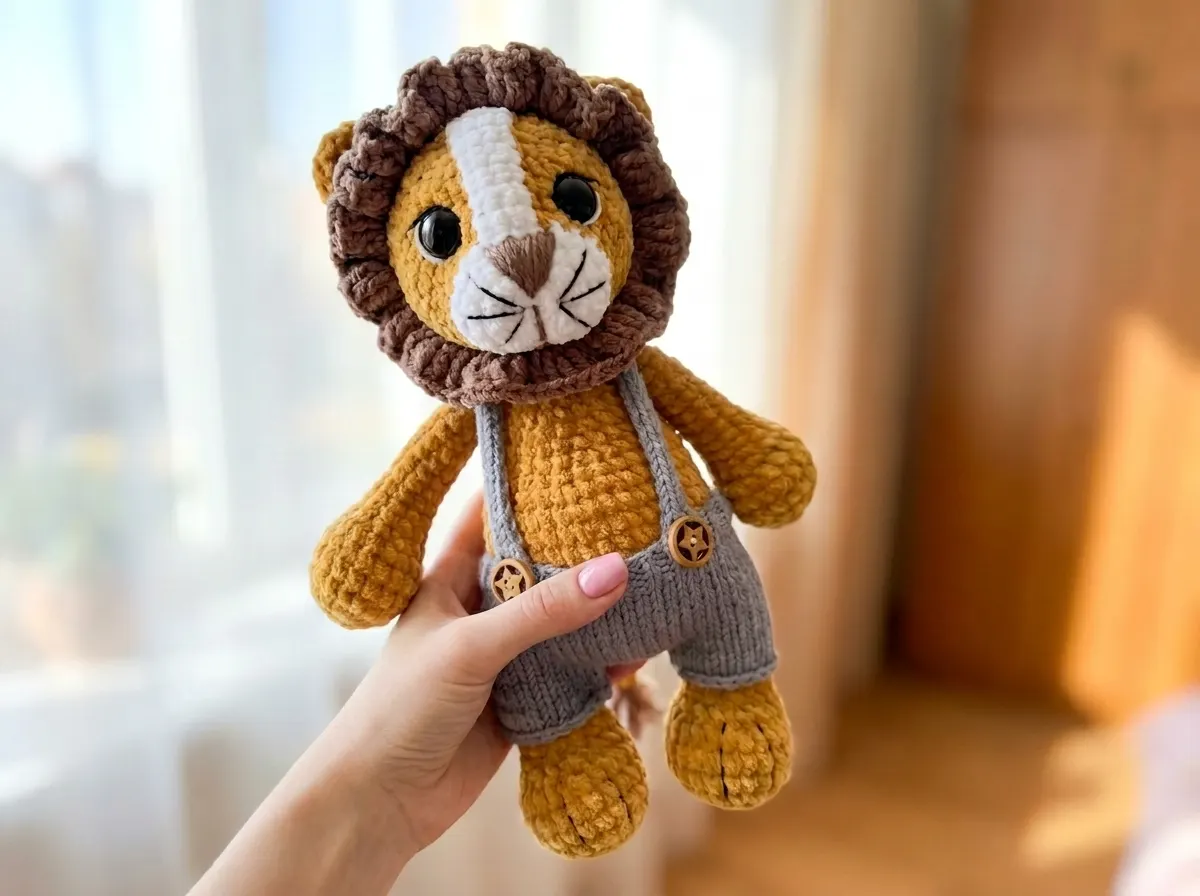
This lion amigurumi has been sitting in my queue for a long time, and I’m so glad I finally made time for him — the color-change muzzle on the head alone is worth the effort. I designed this writeup around the original construction, which integrates the legs, arms, and tail directly into the body as you work — no guesswork on placement. Every stitch count has been verified. Fair warning: the shorts are knitted, not crocheted, so this one asks a little more of you. If you’re comfortable with both crafts, this project is deeply satisfying.
📋 Pattern Quick Stats
- Difficulty: Advanced
- Finished Size: ~11.75 in (30 cm)
- Crochet Hook Size: E/4 (3.5 mm)
- Knitting Needle Size: US 2–3 (3.0 mm)
- Yarn Weight: Bulky (5) chenille/velvet (main body); DK/Light Worsted (3) wool-blend (shorts)
- Techniques Used: magic ring, color changes, invisible decrease, integrated limb attachment, dc, tr, basic knitting (shorts)
- Estimated Time: 10–16 hours
Materials for This Lion Amigurumi
- Bulky (5) chenille/velvet yarn — mustard: Bernat Baby Velvet or Premier Parfait are both solid US alternatives. You’ll need this for the body, head, arms, legs, and ears.
- Bulky (5) chenille/velvet yarn — white: Same brand as above. Used only for the muzzle panel on the head.
- Bulky (5) yarn — brown: Any similar held-double yarn works for the mane and tail tassel. The ruffled mane is worked in double crochet and treble crochet, so a yarn that has some drape and body will give you the best result.
- Worsted (4) cotton yarn — black: For embroidering claws, whiskers, lashes, and eyebrows. A smooth, tightly twisted cotton like Paintbox Simply DK Cotton or Lion Brand 24/7 Cotton in black will give you clean lines.
- Worsted (4) cotton yarn — mustard: For the white-stripe sculpting on the head. A small amount — one skein is more than enough.
- DK/Light Worsted (3) wool-blend yarn — any color: For the knitted shorts. Alize Lanagold (240 m/100 g) is the original; any wool-acrylic blend in the same weight will work. I’d go with something with a little stretch so the shorts sit well on the body.
- Hook: E/4 (3.5 mm)
- Knitting needles: US 2–3 (3.0 mm) — straight needles for flat rows, double-pointed needles (DPNs) and a short circular for working the legs in the round
- 20 mm safety eyes (×2)
- Polyfill stuffing — Poly-Fil by Fairfield, available at Joann, Michaels, and Hobby Lobby
- Tapestry needle — you’ll need this for assembly, face sculpting, and weaving in ends
- Stitch markers
- Scissors
- 3 buttons, 15 mm — for the shorts suspenders
The chenille/velvet yarn in this pattern is classified as Bulky (5) on the Craft Yarn Council yarn weight system. If you’re substituting, match the weight category first — chenille and velvet yarns behave very differently from standard acrylic, and the dense stitch definition is part of what makes this lion’s body look so solid.
Abbreviations Used in This Lion Amigurumi Pattern
| Abbreviation | Meaning |
|---|---|
| sc | single crochet |
| inc | increase — 2 sc worked into the same stitch |
| dec | decrease |
| mr | magic ring |
| ch | chain |
| sl st | slip stitch |
| dc | double crochet |
| tr | treble crochet |
| BLO | back loop only |
| FO | fasten off |
| st(s) | stitch(es) |
Knitting abbreviations (shorts only): k = knit; p = purl; yo = yarn over; k2tog = knit 2 together; edge st = selvedge/edge stitch; CO = cast on; BO = bind off.
Special Techniques for This Lion Amigurumi
Before you cast on or chain your first stitch, I’d recommend getting comfortable with a few techniques that come up repeatedly in this pattern.
Magic ring: Every crocheted part in this lion starts with a magic ring, which closes the center completely so no hole shows through. If you’ve never made one before, or if yours tend to loosen over time, our step-by-step magic ring tutorial walks you through it with close-up detail.
Invisible decrease: The pattern calls for “dec” throughout. I always work my decreases as invisible decreases — inserting the hook through the front loops only of the next two stitches simultaneously, rather than through both loops. On a velvet or chenille yarn, the difference is subtle, but on the legs and arms where the fabric is tubular and visible, it keeps the surface looking clean. Our complete invisible decrease tutorial shows exactly how it’s done.
Integrated limb attachment: The legs, arms, and tail are all crocheted and finished separately, then held against the body and worked in during specific rows. This locks them in permanently and eliminates wobbly limb syndrome. Read the body section carefully before you start — it helps to have all parts finished and ready before you begin the body.
Safety eyes: The 20 mm safety eyes go in during the head construction — specifically between Rows 8 and 9, with 10–11 stitches between them. Once the washer is locked, they cannot be removed safely, so get the placement right before you press them in. Our guide on how to attach safety eyes covers sizing, placement, and the locking mechanism in detail.
⚠️ A note on safety: If this lion is intended for a child under 3, skip the plastic safety eyes entirely and embroider the eyes instead. Plastic eyes with washers are not safe for very young children. The U.S. Consumer Product Safety Commission has guidelines on toy safety standards that are worth reviewing before gifting any handmade toy.
The Pattern
Arms (×2)
Yarn: mustard chenille | Start: magic ring
Row 1: 6 sc in mr (6)
Row 2: 6 inc (12)
Row 3: (1 sc, 1 inc) × 6 (18)
Rows 4–6: 18 sc, no change (18)
Row 7: (1 sc, 1 dec) × 6 (12)
Rows 8–19: 12 sc, no change (12)
Row 20: Fold arm flat and sc 5 across both layers (5)
FO, cut yarn. Stuff only the rounded tip of the arm — the tube above stays flat for a cleaner attachment to the body.
Legs (×2)
Yarn: mustard chenille | Start: magic ring
Row 1: 6 sc in mr (6)
Row 2: 6 inc (12)
Row 3: (1 sc, 1 inc) × 6 (18)
Row 4: (2 sc, 1 inc) × 6 (24)
Rows 5–7: 24 sc, no change (24)
Row 8: 6 sc, 6 dec, 6 sc (18)
Row 9: 6 sc, 3 dec, 6 sc (15)
Row 10: 5 sc, 2 dec, 6 sc (13)
Rows 11–18: 13 sc, no change (13)
Row 19: Fold leg flat and sc across both layers
FO, cut yarn. Stuff the leg firmly. Using black yarn and a tapestry needle, embroider the claws on the foot.
💡 Emma’s Tip: The leg tube has 13 stitches at the fold, which is an odd number. Don’t stress about the exact count at Row 19 — just sc cleanly across the folded layers. The leg gets locked into the body during Row 8 of the body, and placement matters far more than a perfectly even fold.
Ears (×2)
Yarn: mustard chenille | Start: magic ring
Row 1: 6 sc in mr (6)
Row 2: 6 inc (12)
Row 3: (1 sc, 1 inc) × 6 (18)
Rows 4–5: 18 sc, no change (18)
Row 6: Fold ear flat and sc 8 across both layers (8)
FO, cut yarn. The ears attach to the head during Row 15 — set them aside and have them ready.
Head
Yarn: white and mustard chenille | Start: magic ring in white
💡 Color management: Begin with white yarn and introduce mustard at Row 6 as indicated. Do not cut the white yarn until Row 13 — carry it loosely along the inside. For a clean color transition, work to the change point, draw up the last loop of the current stitch, then switch to the new color and complete the stitch. This keeps the boundary between mustard and white crisp.
Row 1: 6 sc in mr [white] (6)
Row 2: 6 inc [white] (12)
Row 3: (1 sc, 1 inc) × 6 [white] (18)
Row 4: (2 sc, 1 inc) × 6 [white] (24)
Row 5: (11 sc, 1 inc) × 2 [white] (26)
Row 6: 4 sc, 1 inc, 5 sc, 1 inc [mustard]; 4 sc [white]; 1 inc, 4 sc, 1 inc, 5 sc [mustard] (30)
Row 7: (3 sc, 1 inc) × 3, 1 sc [mustard]; 4 sc [white]; 1 sc, (1 inc, 3 sc) × 3 [mustard] (36)
Row 8: (4 sc, 1 inc) × 3, 1 sc [mustard]; 4 sc [white]; 1 sc, (1 inc, 4 sc) × 3 [mustard] (42)
📌 Safety eye placement: Insert the 20 mm safety eyes between Rows 8 and 9, with 10–11 stitches between them. Get this right now — once you continue, you can’t remove them without damaging the fabric.
Rows 9–13: 19 sc [mustard]; 4 sc [white]; 19 sc [mustard] (42)
Row 14: 42 sc [mustard] — work all the way around in mustard, closing off the white panel (42)
Row 15: 10 sc, sc 8 sts together with ear, 6 sc, sc 8 sts together with ear, 10 sc (42)
💡 Emma’s Tip: Row 15 is where the ears get locked in. Hold each ear flat against the head, flap facing inward, and sc through both the head stitches and the ear’s folded edge simultaneously. Take your time positioning them symmetrically before you commit. I pin mine in place first.
Row 16: (5 sc, dec) × 6 (36)
Row 17: (4 sc, dec) × 6 (30)
Row 18: (3 sc, dec) × 6 (24)
Row 19: (2 sc, dec) × 6 (18)
Row 20: (1 sc, dec) × 6 (12)
Row 21: 6 dec (6)
Stuff the head firmly as you close it down, keeping the muzzle area (the white panel) slightly lighter so it holds a gentle rounded shape without distorting. Close the opening and FO.
Tail
Yarn: mustard chenille + brown semi-wool | Start: chain
Fold a length of mustard chenille yarn in half. Lay the brown yarn at the center fold point. Chain 17 with the brown yarn held together with the mustard. Tie a knot at the end to secure.
Tassel: Cut 6–7 strands of brown yarn, each approximately 8 in (20 cm) long, plus 1 strand of mustard yarn approximately 39 in (100 cm) long. Use these to form a tassel at the knotted end of the tail. The mustard strand wraps and secures the bundle.
Body
Yarn: mustard chenille | Start: magic ring
📌 Before you start the body: Have both legs (finished and stuffed), both arms (finished with tips stuffed), and the tail all ready. They get worked in at specific rows. Read Rows 8 and 23 before you begin so nothing catches you off guard mid-round.
Row 1: 6 sc in mr (6)
Row 2: 6 inc (12)
Row 3: (1 sc, 1 inc) × 6 (18)
Row 4: (2 sc, 1 inc) × 6 (24)
Row 5: (3 sc, 1 inc) × 6 (30)
Row 6: (4 sc, 1 inc) × 6 (36)
Row 7: (5 sc, 1 inc) × 6 (42)
Row 8: 7 sc, hold 1st leg against body and sc 6 across, 15 sc, hold 2nd leg against body and sc 6 across, 7 sc, hold tail against body and sc 1 (42)
Rows 9–13: 42 sc, no change (42)
💡 Stuffing the body: I always begin adding stuffing gradually around Row 9–10, before the shaping rows start. Waiting too long makes it nearly impossible to get an even, firm fill. Our full guide on how to stuff amigurumi has practical tips for getting a smooth, lump-free result.
Row 14: 12 sc, (1 sc, 1 dec) × 6, 12 sc (36)
Row 15: 36 sc (36)
Row 16: (4 sc, 1 dec) × 6 (30)
Row 17: 30 sc (30)
Row 18: (3 sc, 1 dec) × 6 (24)
Row 19: 24 sc (24)
Row 20: (2 sc, 1 dec) × 6 (18)
Rows 21–22: 18 sc (18)
Row 23: 2 sc, hold 1st arm against body and sc 5 across, 5 sc, hold 2nd arm against body and sc 5 across, 1 sc (18)
Rows 24–25: 18 sc and 1 sl st (18)
FO, cut yarn. Finish stuffing the body firmly before closing completely.
Mane
Yarn: brown semi-wool (or similar Bulky (5) yarn) | Start: chain
Row 1: Ch 50, join into a round (50)
Row 2: Ch 4 (counts as first tr), work 2 more tr in same stitch, then 3 tr in each remaining 49 stitches (150)
Join with a sl st. Cut yarn, leaving a 16–20 in (40–50 cm) tail for sewing. Before you sew the mane permanently to the head, fit it on first and check that it sits where you want it. The lower edge of the mane should sit close to the muzzle — this placement also makes the head-to-body join cleaner.
Shorts — Knitted
Yarn: DK/Light Worsted (3) wool-blend | Needles: US 2–3 (3.0 mm) straight, DPNs, and short circular
💡 Emma’s Note on the Shorts: This is the one section of the pattern that requires knitting. If you’re a crochet-only maker, it’s genuinely worth learning the basics just for this — the ribbed waistband and the stockinette body give the shorts a finished, tailored look that no crochet stitch quite replicates at this scale. That said, if knitting isn’t in your toolkit right now, a simple crocheted tube works as a substitute.
Row 1: CO 56 sts (56)
Row 2: 1×1 ribbing (k1, p1) (56)
Row 3: Buttonhole row — edge st, k1, yo, k2tog, continue in pattern to end (56)
Row 4: Continue in ribbing (work yo without twisting) (56)
Row 5: Edge st, k54, p1 (56)
Row 6: Edge st, p55 (56)
Row 7: Edge st, k54, p1 (56)
Row 8: Edge st, p55 (56)
Row 9: Edge st, k54, p1 (56)
Row 10: Edge st, p55 (56)
Row 11: Edge st, k54, p1 (56)
Row 12: Edge st, p55 (56)
Row 13: Transfer sts to 3–4 DPNs, knit and join in the round (56)
Rows 14–20: Knit 56 sts in the round (56)
Row 21: K53, BO 3 sts before marker
Row 22: BO 3 sts after marker — 6 sts total bound off (50)
Row 23 (Leg 1): Count 22 sts, knit (22)
Rows 24–27: Knit 22 sts in the round (22)
Row 28: BO all sts loosely (22)
Leg 2: Join yarn at the crotch opening. BO 6 more sts (crotch gusset), then work the remaining 22 sts the same as Leg 1 — Rows 23 through 28.
📌 Edge stitch reminder: At the beginning of each flat (turning) row, always slip the edge stitch purlwise. At the end of each flat row, work the edge stitch as a purl. This gives the waistband a clean, stable selvedge edge.
Suspenders (×2): CO 4 sts. Work flat in rows for 44 rows. On Row 45, make a buttonhole: edge st, k1, yo, k2tog. Row 46 — purl. Row 47 — BO all sts.
Assembly
- Fit the mane onto the head and confirm placement — the lower edge of the mane should sit close to the muzzle. Sew the mane to the head securely, working around the full circumference.
- Sew the head to the body. Having the mane already attached helps you gauge the angle — the head should sit upright, centered on the body’s neck opening.
- Sew the suspenders onto the shorts. Attach the 3 buttons — two at the front waistband for the suspenders, and one at the back buttonhole on the waistband ribbing.
💡 Emma’s Tip: Don’t rush the head attachment. I pin it in three or four places and stand the lion up before I commit to sewing. The angle you choose determines whether he looks alert or droopy, and it’s much easier to adjust a pin than to unpick a sewn seam through chenille.
Finishing Details — Face & Decoration
White Stripe Sculpting
Thread a tapestry needle with mustard cotton yarn. Insert the needle at the beginning of the white stripe panel and bring it out at the far end (right to left). Skip one row and repeat in the opposite direction (left to right). Pull gently to tighten slightly. Repeat upward along the entire white stripe. This technique softly cinches the panel and gives it a more three-dimensional, sculpted look against the mustard sections.
Muzzle Sculpting
Thread a tapestry needle with brown yarn. Insert from the center bottom of the muzzle, bring the needle out at the center tip of the nose, and return. Repeat twice, pulling gently to tighten. This pulls the nose tip slightly forward and gives the muzzle its characteristic rounded shape.
Nose
Embroider the nose with brown yarn, outlining a small triangular shape at the tip of the muzzle.
Face Details
Using black yarn, embroider the whiskers (3 strands per side, radiating outward from the muzzle), lashes (short upward strokes at the outer corners of each eye), and eyebrows (a single angled stitch above each eye). Using white yarn, add small highlight dots to the inside corner of each eye for the whites.
Eye Sculpting
Sculpt the area around each safety eye using your preferred needle sculpting method. A few carefully placed passes of thread can deepen the eye socket slightly and make the eyes look more set into the face rather than sitting flat on the surface.
Emma’s Note
I checked every stitch count in this pattern twice, and they all add up. The construction is clever — integrating the limbs directly into the body rounds means there’s no guessing about placement, and the result is a lion that holds together beautifully. The head is the most demanding part, between the color work and the ear attachment, but it’s also where all the character lives. Take your time there. And if the mane ends up a little wild and voluminous? That’s exactly right. Happy hooking. 🧶
What yarn is best for this lion amigurumi?
The body, head, and limbs are worked in Bulky (5) chenille or velvet yarn — Bernat Baby Velvet and Premier Parfait are both reliable US options. The density of chenille gives the lion a plush, solid look that standard acrylic doesn’t replicate at this scale.
How long does it take to crochet this lion amigurumi?
Most makers finish in 10 to 16 hours. The head, with its color-change muzzle and ear attachment, is the most time-consuming part; the knitted shorts add a separate session if you’re learning that technique.
Is this lion amigurumi suitable for beginners?
This pattern is rated Advanced. It combines crochet color work, integrated limb attachment, needle sculpting, and basic knitting for the shorts. Confident intermediates who are willing to learn one new technique (knitting) can tackle it, but it is not recommended as a first amigurumi project.