The Sweetest Little Amigurumi Keychain You’ll Ever Make
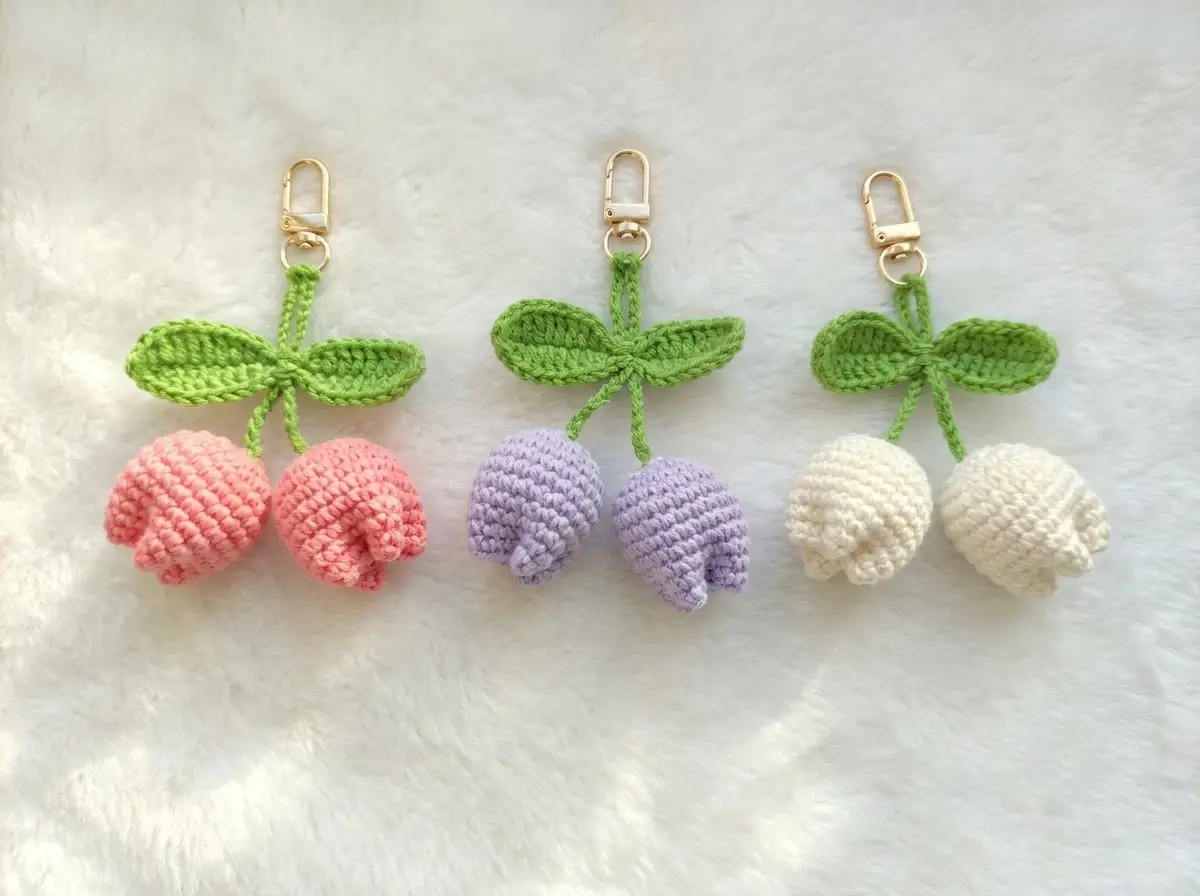
This free amigurumi keychain pattern creates the most precious tiny tulip charm — soft rounded petals, delicate curled leaves, and a neat little stem that clips right onto your bag or keys. It’s the kind of amigurumi keychain that makes people stop and ask, “Wait, did you make that?” The whole thing is worked in DK weight cotton at a tight gauge, so every stitch is crisp and defined. It’s a tiny project with a whole lot of heart. Let me show you how it comes together.
🩷 Pattern Highlights
- Cuteness Rating: 🩷🩷🩷🩷🩷
- Finished Size: approx. 2 in (5 cm) tulip body
- Difficulty: Beginner
- Hook Size: Steel 4 (2.0 mm)
- Yarn Palette: blush pink, dusty coral, or soft lavender for the tulip — sage green or mint for the leaves and stem
- Key Detail: a rounded petal shape with a sculpted, curling leaf — so satisfying to hold
- Estimated Time: 1–2 hours
Materials for This Amigurumi Keychain
- Yarn: YarnArt Jeans (US alternatives: Drops Muskat or Paintbox Simply DK Cotton) — classified as DK / Light Worsted (Weight 3) — smooth, tightly spun, and beautiful at this small gauge. Choose a soft blush pink, dusty coral, or dreamy lavender for the tulip body. For the leaves and stem, a sage green or cool mint is absolutely perfect.
- Hook: Steel 4 (2.0 mm) — this small hook is what gives the tulip that dense, polished look. It’s worth it.
- Keychain / carabiner clip: A small lobster clasp or carabiner-style clip in gold or silver — gold pairs so sweetly with blush pink.
- Stuffing: Polyester fiberfill (Poly-Fil by Fairfield, available at Joann, Michaels, and Hobby Lobby) — just a small pinch is all you need.
- Tapestry needle: A blunt yarn needle for sewing parts together and weaving in ends.
- Scissors
Abbreviations Used in This Amigurumi Keychain Pattern
| Abbreviation | Meaning |
|---|---|
| mr | magic ring |
| ch | chain |
| sc | single crochet |
| hdc | half double crochet |
| dc | double crochet |
| sl st | slip stitch |
| inc | increase — 2 sc worked into the same stitch |
Before You Begin — A Few Details That Make This Amigurumi Keychain Extra Special
Before you jump in, a couple of small things that’ll make a big difference in how this tiny tulip turns out.
Your magic ring is the foundation of everything. The tulip body starts with a magic ring, and because you’ll be threading the stem through that center opening later, you want it neat and pulled snug — but not so tight that the hole closes entirely. If you’ve never worked a magic ring before, our guide to the amigurumi magic ring walks through exactly how to get that center opening just right.
Go tight on your gauge. With a 2.0mm hook and DK weight cotton, you’re already set up for a dense fabric — but keep your tension firm throughout the tulip body. That snug stitching is what gives the petals their satisfying, sculpted roundness. Loose stitches at this size make the shape look a little wobbly, and this flower deserves to look its best.
Stuff lightly and close gently. The tulip only needs the tiniest pinch of polyfill — just enough to give it a soft, rounded shape without stretching the stitches. Our guide to stuffing amigurumi has the best tips on controlling the amount so the shape stays sweet and even. You’ll sew the top closed at four points, which shapes the petals naturally.
🩷 Chloe’s Detail Tip: For the leaves, the stitch variety changes quickly — sc, hdc, dc, back and forth — so read through Row 1 of the Leaves section before you pick up your hook. Once you see the rhythm of it, it flows really beautifully and makes the most perfect curled leaf shape.
Amigurumi Keychain Pattern — Tulip Body
Tulip (×1)
Yarn color: blush pink, dusty coral, soft lavender — or any petal color that makes you smile
Starting method: magic ring
Row 1: 6 sc in mr (6)
Row 2: inc × 6 (12)
Row 3: (1 sc, inc) × 6 (18)
Row 4: (2 sc, inc) × 6 (24)
Rows 5–11: 24 sc (7 rows even) (24)
This is the moment. After Row 4, you’ve got a perfect little circle of 24 stitches — already so round and neat. As you work Rows 5 through 11 straight with no shaping, the sides start to rise up and you can see the tulip forming. By Row 11, it looks like a tiny cup just waiting to bloom. So satisfying.
Finishing: Cut yarn, leaving a long tail for sewing. Do not fasten off completely — you’ll need that tail to sew the top closed.
If you’d like a refresher on neatly finishing your yarn before assembly, our guide to fastening off amigurumi covers how to leave a tail the right length for sewing.
Amigurumi Keychain Pattern — Leaves and Stem
Leaves (×1)
Yarn color: sage green or soft mint
Starting method: foundation chain of 12 ch
Row 1: Ch 12. Starting from the 2nd ch from hook: inc, hdc, dc, hdc, sc, sl st, sc, hdc, dc, hdc, 3 sc in the last stitch; continuing along the other side of the foundation chain: hdc, dc, hdc, sc, sl st, sc, hdc, dc, hdc, sc (24)
🩷 Chloe’s Detail Tip: That “3 sc in the last stitch” at the tip of the chain is what creates the little pointed tip of the leaf — don’t skip it. And when you work back along the other side of the chain, you’re essentially mirroring the first side. Once you finish, you’ll have the most perfect oval leaf shape with gently scalloped edges. It’s really lovely.
Finishing: Weave in the starting tail. Leave the working yarn tail for sewing to the stem.
Stem (×1)
Yarn color: sage green or soft mint — matching the leaves
Starting method: foundation chain
Row 1: Ch 40 (40)
Finishing: Leave both tails long — one for attaching to the carabiner, one for threading and sewing to the tulip.
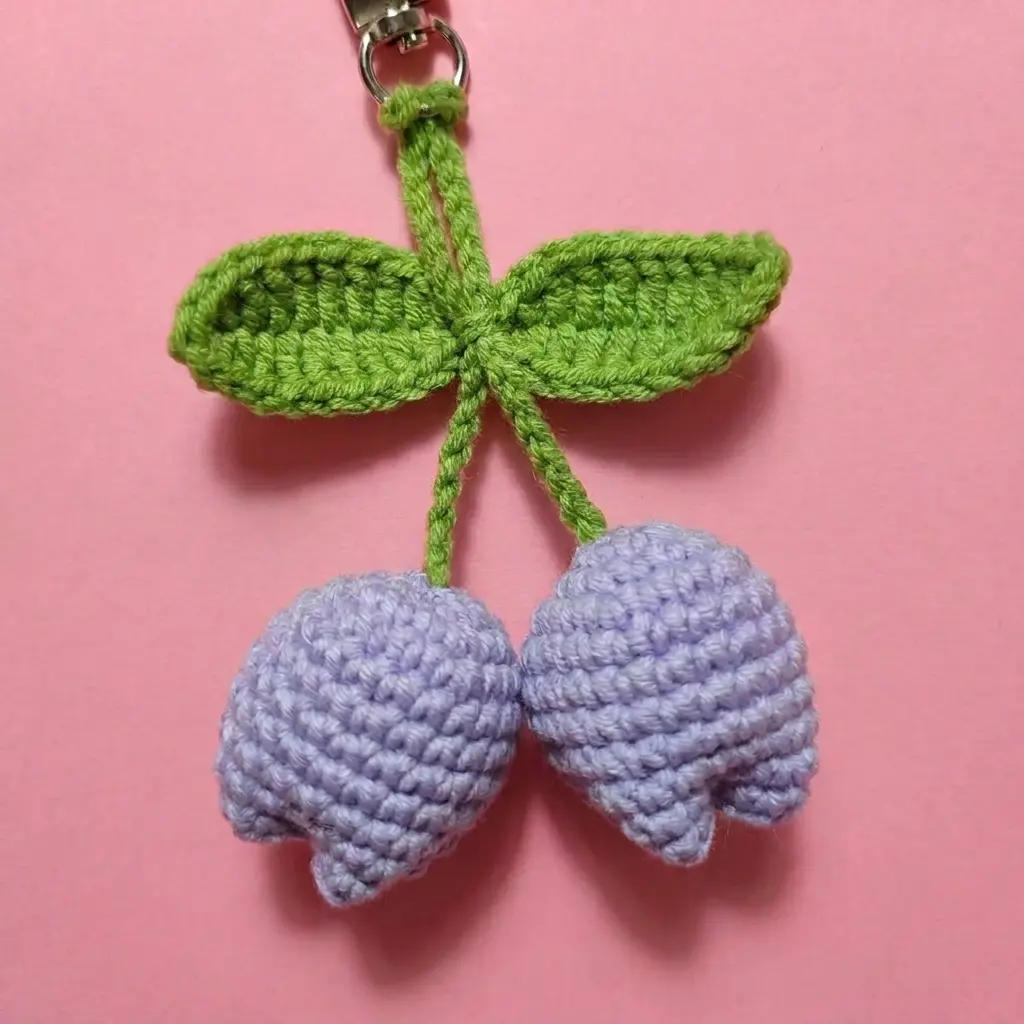
The stem is beautifully simple — just a chain of 40. That length threads neatly through the carabiner clip and gives the tulip a graceful, drooping hang when it’s on your bag. Very chic.
Assembly
- Stuff the tulip lightly. Add just a small pinch of polyfill through the open top — enough to give the body a soft, rounded shape. Don’t overstuff. The top will be sewn closed, so you want gentle fullness, not a tight round ball.
- Sew the tulip closed at 4 points. Using the long yarn tail and your tapestry needle, gather the top edge at 4 evenly spaced points and pull them together to close. This creates the natural petal division at the top of the tulip. Secure with a few small stitches and weave in the end.
- Attach the stem to the carabiner. Thread one end of the chain stem through the carabiner clip loop and tie it off securely, or loop and knot it through.
- Thread the stem through the magic ring opening. From the bottom of the tulip, push the free end of the stem up through the center magic ring opening so it emerges at the top.
- Sew the stem to the tulip. Pull the stem snug to the correct length (you want the tulip to hang at a natural height from the clip), then secure the stem to the base of the tulip with several whipstitches around the magic ring. Weave in all ends.
- Sew the leaves to the stem. Position the leaf piece against the stem just below the tulip body — centered and flat against the stem. Sew it in place with a few small stitches through the center of the leaf piece. Adjust the angle so the leaf tips point slightly outward on each side.
Making It Extra Cute — Finishing Details for Your Amigurumi Keychain
Okay, this is the part I want to talk about most. This tiny tulip doesn’t have safety eyes, but that does not mean the finishing details don’t matter. If anything, they matter even more — because the color combinations and the final shaping are what give this little keychain its whole personality.
Color pairings that are absolutely dreamy:
- Blush pink tulip + sage green stem and leaves — this is the classic. So soft. So right.
- Pale lavender tulip + mint green stem — this combo is giving cottagecore in the best possible way.
- Dusty coral tulip + olive green stem — a little warmer, a little vintage, unexpectedly gorgeous.
- Soft yellow tulip + forest green stem — sunshine in your pocket.
Make a bouquet set. Work three tulip keychains in different pastel colors — blush, lavender, and yellow — and clip them all onto the same carabiner. Line them up in a little bunch and it’s the cutest thing you’ve ever seen dangling from a tote bag. I cannot be responsible for the number of compliments you’ll receive.
Getting the leaves right. When you sew the leaf piece to the stem, take a moment to shape it with your fingers first. The leaf will naturally want to curl a little at the edges — lean into that. Gently pinch the tips upward so they have a slight lift. It makes the whole piece look more dimensional and alive.
Add embroidered cheeks. Okay — I know this is a tulip and not a character, but hear me out. A tiny pair of embroidered pink blush circles on the tulip body? Two small satin stitch dots in a soft dusty rose, right on the lower third of the petal body? It takes thirty seconds and it makes the tulip look like it has the sweetest little face. It becomes a kawaii flower instantly. This is optional but I personally cannot make this pattern without adding them.
🩷 Chloe’s Detail Tip: For embroidered cheeks on small pieces like this, use a single strand of a slightly darker pink yarn (or even embroidery floss) and work 3–4 satin stitches in a small oval shape. Keep the oval tiny — about the width of 2 stitches. Two of those, evenly spaced on the lower front of the tulip, and the whole thing transforms into the most precious little character.
Gold vs. silver hardware. The carabiner color matters more than you’d think. Gold hardware with a blush or coral tulip looks warm and luxe — like a little botanical jewelry piece. Silver hardware with lavender or mint reads cooler and more delicate. Neither is wrong. Both are wonderful. Just match the vibe you’re going for.
Mini accessories. If you want to go the extra mile, add a tiny bow at the base of the tulip where the stem meets the body — just a small piece of satin ribbon tied in a knot. In blush pink or ivory, it takes this from cute to absolutely precious.
Chloe’s Final Look
I’ve been holding this finished little tulip up to the light for the past five minutes and I genuinely cannot get over how sweet it is. The rounded petal body, the curled leaf sitting perfectly below it, the way it swings gently when you clip it to your bag — it’s everything a tiny keychain should be. In blush pink with sage green leaves and gold hardware, it looks like something you’d find in the most adorable little craft boutique. Make a few in different colors and keep them all. You’ve earned it. 🩷
How long does it take to crochet this amigurumi keychain?
Most crocheters complete this tiny tulip keychain in 1 to 2 hours, making it an ideal quick project for an afternoon crafting session.
Can beginners make this amigurumi keychain pattern?
Yes — this pattern is rated Beginner. The only techniques required are single crochet, increases, a magic ring, and basic assembly. All foundational skills are covered in AmiLoops tutorials.
What yarn is best for this tulip keychain?
DK weight cotton yarn such as YarnArt Jeans, Drops Muskat, or Paintbox Simply DK Cotton works best. Cotton holds its shape at the tight 2.0 mm gauge and gives the petals a crisp, polished finish.