Free Crochet Gnome Pattern Amigurumi — Meet Sille
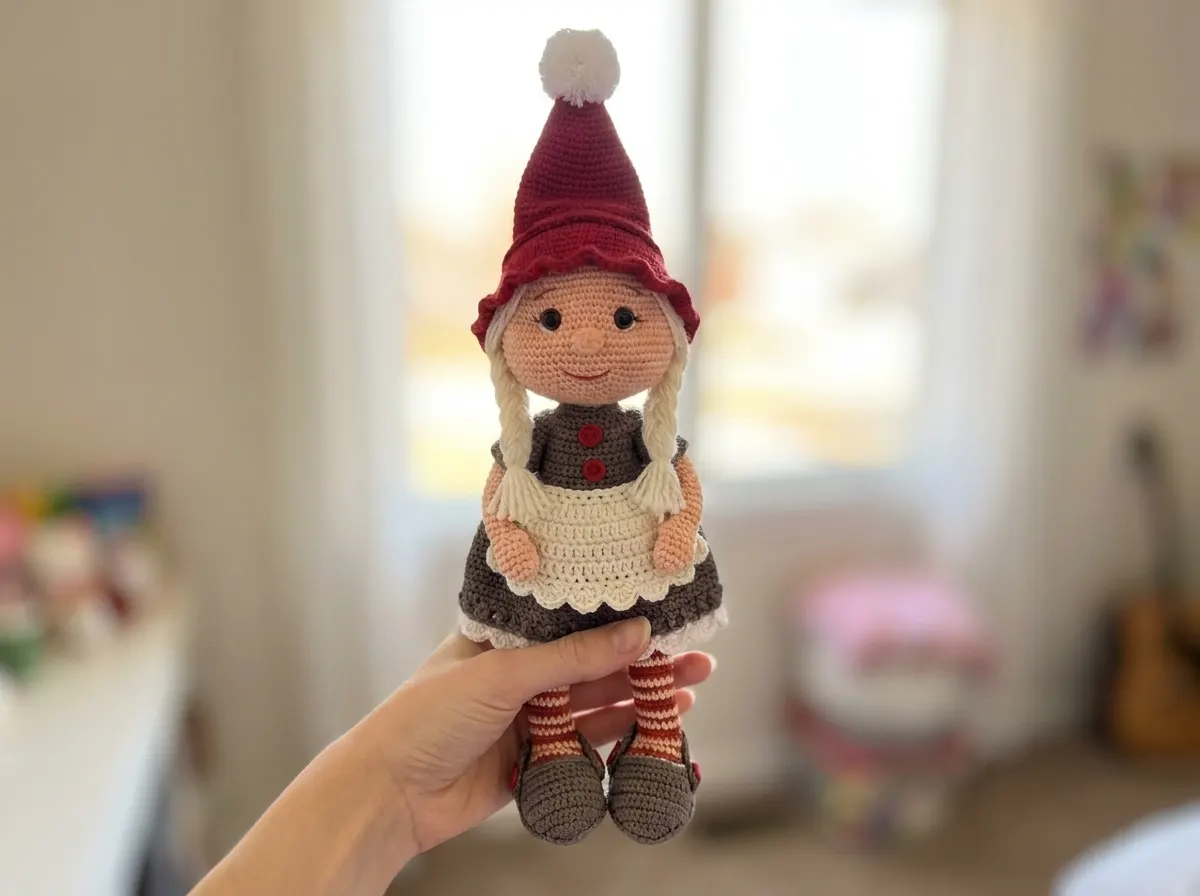
This free crochet gnome pattern amigurumi brings to life a round-bellied, rosy-cheeked gnome with braided white pigtails and the most serious hat you’ve ever seen on someone under twelve inches tall. I named mine Sille the moment I finished the body — something about the way she sits, steady and patient, as though she’s been waiting in that exact spot for a very long time. If you’ve been wanting to make something that feels like it walked in from a Scandinavian folk tale, this is where you start.
📖 Meet Sille
- 🌟 Personality: patient, warm, quietly watchful
- 🎨 Color Palette: warm peach skin, deep Christmas red dress and hat, dusty gray-brown boots, crisp ivory apron and snowy white pigtails
- 📏 Size: 10.6 in (27 cm) tall with hat (seated)
- 🪝 Hook: 2.5 mm (approx. US C/2)
- ⏱️ Time: 15–20 hours
- ✨ Signature Detail: braided white pigtails, a dramatically ruffled hat brim, and a tiny ivory apron with tied waist straps
- 💡 Difficulty: Intermediate
Free Crochet Gnome Pattern Amigurumi: What You’ll Need
Sille takes her materials seriously, and so do we. The cotton yarns give her a smooth, matte finish that reads as storybook rather than toy — which is exactly the quality we’re after. She’s built with a weighted base, wire-supported limbs, and cardboard-reinforced feet, which means she sits with a settled, grounded permanence that lighter amigurumi simply don’t have.
Yarn
- Warm Ivory White — Sport/DK (CYCA 2–3) cotton, approx. 30 g (apron)
- Soft Blush Peach — Sport/DK (CYCA 2–3) cotton, approx. 100 g (skin: arms and head/neck)
- Deep Christmas Red — Sport/DK (CYCA 2–3) cotton, approx. 100 g (dress body and hat)
- Dusty Gray-Brown — Sport/DK (CYCA 2–3) cotton, approx. 50 g (boots and legs)
- White Fluffy Yarn — long-pile acrylic, small amount (pompom only)
Scheepjes Catona is the original yarn choice here, and it earns it — the smooth, matte quality of mercerized cotton is what gives Sille her particular storybook gravity. It falls into the Sport / DK weight range (CYCA 2–3) — fine enough for the clean stitch definition that a character this detailed requires, and sturdy enough to hold her shape over time. If Scheepjes isn’t available locally, any smooth mercerized cotton in the same weight will serve her well.
Tools & Notions
- 2.5 mm crochet hook (approx. US C/2)
- 1 pair of brown 10 mm safety eyes
- Tapestry needle and scissors
- Polyfill stuffing
- 120 g plastic pellets in a nylon stocking (for weighted lower body)
- Sturdy cardboard cut into insoles (for feet)
- Approx. 40 in (102 cm) of wire for arms and legs
- 4 wire pieces, approx. 6 in (15 cm) each, for neck support
- 5 small red buttons, 11 mm diameter
- White lace trim, approx. 1 in (2.5 cm) wide
✨ Sophie’s Note: The pellet-filled base is one of Sille’s most important qualities — she sits with a real, settled weight that gives her presence on a shelf. Fill the nylon stocking before you begin the body, so it’s ready to slip in at exactly the right moment. That moment matters.
Abbreviations
| Abbreviation | Meaning |
|---|---|
| mr | magic ring |
| ch | chain |
| sc | single crochet |
| inc | increase (2 sc in same stitch) |
| dec | decrease (invisible decrease method recommended — see technique notes) |
| sl st | slip stitch |
| hdc | half double crochet |
| dc | double crochet |
| BLO | back loop only |
| FLO | front loop only |
| ( ) | total stitch count at end of row |
Before the Story Begins — A Few Things Worth Knowing
Sille is not a small project. She has wire in her limbs, pellets in her belly, cardboard in her feet, and a hat that takes nearly as long as the body itself. Each of those elements is there for a reason, and understanding them before you begin will make the process feel like building a character — which is exactly what it is.
The magic ring. Almost every part of Sille starts with a magic ring — the arms, the body, the nose, the hat. It’s an adjustable loop that closes completely at the center, leaving no visible hole, and it’s the foundation everything else rests on. If you haven’t worked one before, our magic ring tutorial walks through it carefully and clearly — it’s simpler than it looks, and it’s worth getting comfortable with before you begin.
The invisible decrease. Wherever “dec” appears in this pattern, use the invisible decrease: insert your hook through the front loops only of the next two stitches simultaneously, yarn over, pull through, yarn over, pull through two loops. The standard decrease (sc2tog) creates a visible gap at the surface — on a character as carefully constructed as Sille, that gap is noticeable, and it matters. The invisible method keeps her skin smooth and unbroken.
The safety eyes. The eyes go in before the head is fully closed, and once the locking washer is in place, they are permanent. This is not a step to rush. Our guide to attaching safety eyes covers sizing, placement, and exactly how to position them for the expression you want. For Sille, the eyes are placed between rows 61 and 62, approximately 10–11 stitches apart. Hold the head in your hands before you press anything into place and look at her straight on. Try the eyes slightly higher. Try them a stitch closer together. The difference between a thoughtful gnome and a startled one lives in that one stitch of difference.
The Free Crochet Gnome Pattern Amigurumi — Row by Row
Legs (×2) — Dusty Gray-Brown
The feet are worked flat from a chain foundation, shaped into a boot sole, then drawn up into a narrow leg. The cardboard insole is inserted early — before the ankle shaping begins — and it’s what keeps Sille’s boots looking like boots and not like little collapsed socks.
Starting Method: chain 7
Row 1: Starting from the 2nd ch from hook: 5 sc, 3 sc in last ch. Working along the other side of the chain: 4 sc, inc (14)
Row 2: inc, 4 sc, 3 inc, 4 sc, 2 inc (20)
Row 3: 1 sc, inc, 4 sc, (1 sc, inc) × 3, 4 sc, (1 sc, inc) × 2 (26)
Row 4: 2 sc, inc, 4 sc, (2 sc, inc) × 3, 4 sc, (2 sc, inc) × 2 (32)
Row 5: 32 sc in BLO (32)
Rows 6–8: 32 sc (3 rows) (32)
✨ Sophie’s Note: Cut your cardboard insole now — before the ankle shaping begins — and slide it snugly into the sole. This is what gives the foot its flat, planted quality. A gnome who sits steadily deserves a solid foundation.
Row 9: 6 sc, 10 dec, 6 sc (22)
Row 10: 6 sc, 5 dec, 6 sc (17)
Row 11: 17 sc (17)
Rows 12–25: 17 sc (14 rows) (17)
Finishing: Stuff the lower foot firmly; leave the lower leg lightly stuffed. Leave a yarn tail for sewing. Make two.
Arms (×2) — Soft Blush Peach, then Deep Christmas Red
The arm begins as a small round hand — smooth and barely-closed, like a fist just unclenched. The red sleeve begins at row 9 with a color change, and the cuff is worked back into the front loops of that same row at the end. It’s a small architectural detail, but it’s the difference between an arm and a sleeve.
Starting Method: magic ring
Row 1: 6 sc in mr [Peach] (6)
Row 2: 6 inc (12)
Row 3: (1 sc, inc) × 6 (18)
Rows 4–6: 18 sc (3 rows) (18)
Row 7: (4 sc, dec) × 3 (15)
Row 8: 15 sc (15)
✨ Sophie’s Note: Change to Deep Christmas Red here. The color shift marks the wrist — the place where skin becomes sleeve. The front loops you’re leaving behind in Row 9 will come back at the end to form the cuff.
Row 9: 15 sc in BLO (15)
Rows 10–29: 15 sc (20 rows) (15)
Sleeve cuff: Working into the FLO of Row 9, attach Red yarn and work (2 sc, inc) × 5 (20), then 2 rows of 20 sc. Fasten off. Make two.
Body & Head (×1) — Deep Christmas Red, then Soft Blush Peach
The body and head are worked as one continuous piece — a long, unbroken spiral beginning at the hem of the red dress and ending at the crown of the head. The widest point is the belly, at 72 stitches, and it is generous and round. Gnomes do not apologize for their proportions. Neither should you.
Starting Method: magic ring
Row 1: 6 sc in mr (6)
Row 2: 6 inc (12)
Row 3: (1 sc, inc) × 6 (18)
Row 4: (2 sc, inc) × 6 (24)
Row 5: (3 sc, inc) × 6 (30)
Row 6: (4 sc, inc) × 6 (36)
Row 7: (5 sc, inc) × 6 (42)
Row 8: (6 sc, inc) × 6 (48)
Row 9: (7 sc, inc) × 6 (54)
Row 10: (8 sc, inc) × 6 (60)
Row 11: (9 sc, inc) × 6 (66)
Row 12: (10 sc, inc) × 6 (72)
Row 13: 72 sc in BLO (72)
Rows 14–23: 72 sc (10 rows) (72)
Row 24: (10 sc, dec) × 6 (66)
Rows 25–26: 66 sc (2 rows) (66)
Row 27: (9 sc, dec) × 6 (60)
Rows 28–29: 60 sc (2 rows) (60)
Row 30: (8 sc, dec) × 6 (54)
Rows 31–32: 54 sc (2 rows) (54)
Row 33: (7 sc, dec) × 6 (48)
Rows 34–35: 48 sc (2 rows) (48)
Row 36: (6 sc, dec) × 6 (42)
Rows 37–38: 42 sc (2 rows) (42)
Row 39: (5 sc, dec) × 6 (36)
Rows 40–41: 36 sc (2 rows) (36)
✨ Sophie’s Note: Before continuing — this is the moment to slide the pellet-filled nylon stocking into the base of the body. Nestle it down at the bottom, then stuff firmly around and above it as you continue shaping. You’ll feel the weight of her settle into your hands. That’s exactly right.
Row 42: (4 sc, dec) × 6 (30)
Row 43: 30 sc (30)
Row 44: (3 sc, dec) × 6 (24)
Row 45: 24 sc (24)
✨ Sophie’s Note: Change to Soft Blush Peach here. The red closes. The neck begins. Something is about to emerge.
Row 46: 24 sc in BLO (24)
Rows 47–50: 24 sc (4 rows) (24)
Head — continued in Soft Blush Peach
This is where the body becomes a character. The head expands quickly and generously — Sille has a full, round face, the kind that reads as warm and a little amused even from a distance. Work these rows with care. The face you are building right now is the face she will have forever.
Row 51: 24 inc (48)
Row 52: (7 sc, inc) × 6 (54)
Row 53: (8 sc, inc) × 6 (60)
Row 54: (9 sc, inc) × 6 (66)
Rows 55–69: 66 sc (15 rows) (66)
✨ Sophie’s Note: Attach the safety eyes between rows 61 and 62, approximately 10–11 stitches apart. Before you press anything into place, hold the head in both hands and look at her straight on. Move the eyes one stitch higher. Try them a single stitch closer together. A thoughtful expression and a startled one are separated by very little. Our guide to attaching safety eyes walks through positioning in detail — read it before you make anything permanent. After the eyes, insert the neck wire through the body before closing the head.
Row 70: (9 sc, dec) × 6 (60)
Row 71: (8 sc, dec) × 6 (54)
Row 72: (7 sc, dec) × 6 (48)
Row 73: (6 sc, dec) × 6 (42)
Row 74: (5 sc, dec) × 6 (36)
Row 75: (4 sc, dec) × 6 (30)
Row 76: (3 sc, dec) × 6 (24)
Row 77: (2 sc, dec) × 6 (18)
Row 78: (1 sc, dec) × 6 (12)
Row 79: 6 dec (6)
Fasten off and close the opening with a tapestry needle, drawing the yarn through the remaining loops. Weave in the end.
Nose (×1) — Soft Blush Peach
A gnome’s nose is not a small feature — it is a character statement. Sille’s nose is round and full and entirely unapologetic. Crocheted separately and sewn on, it gives the face its quietly amused tilt, as though she’s heard this story before but is willing to listen again.
Starting Method: magic ring
Row 1: 6 sc in mr (6)
Row 2: 6 inc (12)
Row 3: (1 sc, inc) × 6 (18)
Rows 4–6: 18 sc (3 rows) (18)
Row 7: (1 sc, dec) × 6 (12)
Stuff lightly and leave a long yarn tail for sewing.
Hat (×1) — Deep Christmas Red
The hat is the longest individual piece in this pattern, and the most theatrical. It grows slowly from the very tip of the point, widening row by careful row until it reaches that magnificent ruffled brim. The ruffle at row 41 is worked into the front loops only with a combination of increases so aggressive the stitch count nearly triples in a single round. It is extravagant. It is completely right for Sille.
Starting Method: magic ring
Row 1: 6 sc in mr (6)
Row 2: 6 sc (6)
Row 3: (1 sc, inc) × 3 (9)
Rows 4–5: 9 sc (9)
Row 6: (2 sc, inc) × 3 (12)
Rows 7–8: 12 sc (12)
Row 9: (3 sc, inc) × 3 (15)
Rows 10–11: 15 sc (15)
Row 12: (4 sc, inc) × 3 (18)
Rows 13–14: 18 sc (18)
Row 15: (5 sc, inc) × 3 (21)
Rows 16–17: 21 sc (21)
Row 18: (6 sc, inc) × 3 (24)
Rows 19–20: 24 sc (24)
Row 21: (7 sc, inc) × 3 (27)
Rows 22–23: 27 sc (27)
Row 24: (8 sc, inc) × 3 (30)
Rows 25–26: 30 sc (30)
Row 27: (4 sc, inc) × 6 (36)
Row 28: 36 sc (36)
Row 29: (5 sc, inc) × 6 (42)
Row 30: 42 sc (42)
Row 31: (6 sc, inc) × 6 (48)
Row 32: (7 sc, inc) × 6 (54)
Rows 33–34: 54 sc (54)
Row 35: (8 sc, inc) × 6 (60)
Row 36: 60 sc (60)
Row 37: (9 sc, inc) × 6 (66)
Row 38: 66 sc (66)
Row 39: (10 sc, inc) × 6 (72)
Row 40: 72 sc (72)
Row 41: In FLO: (2 inc, 3 sc in 1 st) × 24 (168)
✨ Sophie’s Note: Row 41 is the ruffle, and it will look alarming while you’re working it. The stitch count climbs to 168 in one round, and the brim will begin to ripple and fold in your hands — that’s exactly what it’s supposed to do. Set the finished hat down and look at it. It is magnificent. No regrets about the time it took.
Sille’s Apron (×1) — Warm Ivory White
The apron is worked flat in turning rows — a clean rectangle that tapers to a narrow waist. The sc border gives it a defined edge, and the chain ties hold it in place around Sille’s middle. It’s a small thing, but it gives her a purpose. She looks, once the apron is on, like someone who has places to be and things to oversee.
Starting Method: chain 21
Rows 1–14: 20 sc in turning rows (20)
Row 15: dec, 16 sc, dec (18)
Row 16: dec, 14 sc, dec (16)
Row 17: dec, 12 sc, dec (14)
Row 18: dec, 10 sc, dec (12)
Work a single crochet edging around the entire apron border. For the tie straps, attach yarn at each side of the waistband and work a chain long enough to wrap and tie at Sille’s back. Weave in all ends.
Bringing Sille Together — Assembly
This is the moment the separate pieces stop being pieces. Our guide to sewing amigurumi parts covers the practical side of attachment — needle technique, stitch choice, and hiding yarn tails. What I’ll add here is the more important observation: the positioning of every element shapes who she is. Sille’s personality lives in the small decisions you make during assembly.
- Sew the nose to the center of the face, with the lower edge of the nose aligned to approximately row 58. Stuff lightly before closing. This is the moment the face begins to have an expression.
- Sew the arms to the body at rows 44–45. Thread the wire through the body and into the arms before sewing closed. The wire allows gentle repositioning — arms slightly forward, slightly lowered — as you arrange her final pose.
- Sew the legs to the bottom of the body at row 13 (where the BLO round was worked), positioning them symmetrically so Sille sits stably and flat. The cardboard insoles in the feet will keep them level.
- Sew the lace trim along the bottom hem of the dress.
- Attach the apron at approximately rows 36–38 of the body, at the waist. Tie the straps at the back.
- Sew the 5 red buttons along the center front of the dress, evenly spaced. This single detail gives the dress its dignity.
- Place the hat on the head. A few small stitches at the sides will keep it settled in place — or leave it removable if you’d like to adjust the tilt later. A slight angle to the left gives her a particular air of authority. A slight angle to the right makes her look like she’s just thought of something.
The Details That Make Her Sille
The pattern is finished. What comes next is the part I spend the most time on.
- The pompom: Make a small white pompom from the fluffy long-pile yarn and sew it to the very tip of the hat. It should be round and a little too cheerful for the hat’s gravitas. That contrast is the point.
- The eyelashes and eyebrows: Embroider these with thin dark thread — a few careful strokes above and below each safety eye. The eyebrows especially will define her whole expression. Arched slightly and she looks curious; kept low and straight and she looks like she’s thinking something over. I always make the eyebrows last, after I’ve lived with the face for a while.
- The blush: A small amount of dry pastel powder or blush applied to the cheeks with a clean dry brush softens the face in a way nothing else quite manages. Start lighter than you think you need to. You can always add more; you cannot take it back.
- The pigtails: Braid lengths of white yarn into two even pigtails and attach them under the brim of the hat, one on either side of the head. The placement — where the hat edge meets the hair — takes patience to get right, and it is absolutely worth every minute you spend on it. I always spend more time on the pigtails than I expect to. I have no complaints about this.
Meet Sille
Sille is sitting on my bookshelf right now, between a small ceramic mushroom and a collection of field guides to northern woodlands. Her hat is tilted very slightly to the left. Her pigtails are even and white. She has the expression of someone who knows exactly what’s going on and has decided not to comment on it just yet — that particular quality of patience that the very best amigurumi have, where they seem less like objects and more like small presences occupying their corner of the room. That is what this free crochet gnome pattern amigurumi is capable of giving you. Name yours. Put her somewhere she’ll be seen — on a mantelpiece, next to a reading lamp, on the shelf that holds the things you actually care about. She will keep very good watch over all of it. 🧶
What yarn is best for this gnome amigurumi?
The pattern was designed with Scheepjes Catona, a smooth mercerized cotton in sport/DK weight (CYCA 2–3). Any smooth mercerized cotton in the same weight will produce the same clean, matte storybook finish.
How long does it take to crochet this gnome pattern?
Sille takes approximately 15–20 hours to complete. The hat and pigtail assembly are the most time-intensive steps, so expect to work across several sessions.
Can beginners make this gnome amigurumi?
This is an intermediate pattern. It involves a wire armature, a weighted pellet base, cardboard-reinforced feet, and multi-part assembly — techniques that require some prior amigurumi experience to handle confidently.