Free Crochet Pumpkin Amigurumi — Squishy Velvet Plush
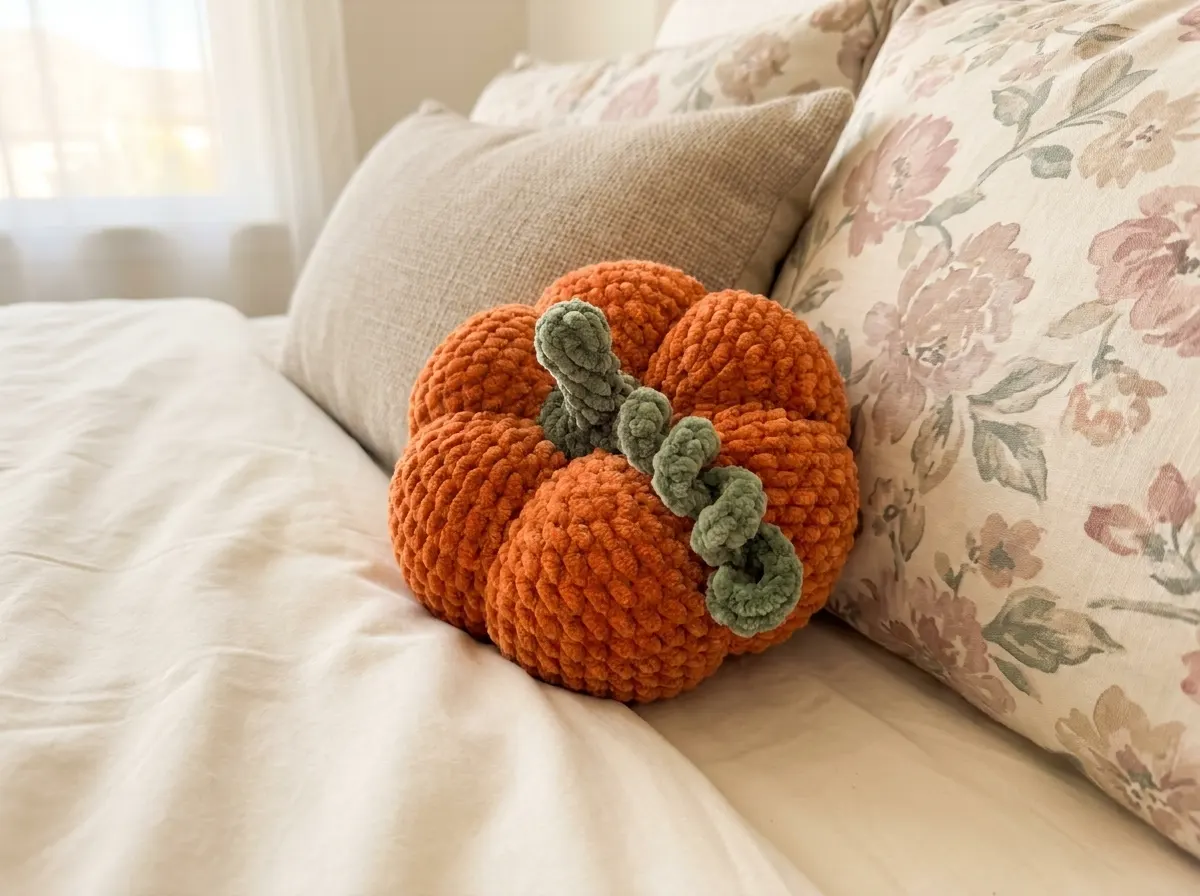
This free pumpkin amigurumi pattern creates the most irresistibly squishy little gourd you’ve ever held in your hands — soft as a cloud, perfectly round, with those deeply satisfying segment lines that make a pumpkin look like a pumpkin. Made in plush chenille yarn, it has an almost velvet-soft texture that makes you want to keep squishing it forever. The rosy blush and tiny curling tendril are everything. This is the one. Let’s make it.
🩷 Pattern Highlights
- Cuteness Rating: 🩷🩷🩷🩷🩷
- Finished Size: 5.9 in (15 cm) diameter
- Difficulty: Intermediate
- Hook Size: G/6 (4.0 mm)
- Yarn Palette: warm pumpkin orange, sage green, golden brown — or try peachy blush, mint green, and ivory for the most kawaii pastel version
- Key Detail: hand-stitched segment lines that pull the shape into that perfect rosy pumpkin silhouette
- Estimated Time: 3–5 hours
Materials for Your Pumpkin Amigurumi
The chenille yarn is what makes this one so special — it’s almost impossibly soft and catches the light in a way that makes the finished pumpkin look like something from a cozy autumn dream.
- Main color yarn: Bulky (5) chenille-style plush yarn in your choice of pumpkin orange, warm terracotta, peachy blush, or soft sage. US alternatives include Bernat Baby Velvet or Premier Parfait — both have that dreamy velvet finish. You can find these at Joann, Michaels, or Hobby Lobby.
- Stem yarn: A contrasting earthy tone — warm brown, sage green, or for a kawaii twist, mint green or dusty olive
- Tendril yarn: The same color as your stems, or a slightly lighter shade for a delicate look
- Hook: G/6 (4.0 mm)
- Long tapestry needle — this one is essential for the segment lines; a regular needle won’t give you the reach you need
- Strong thread (approximately 59 in / 150 cm) — for creating the pumpkin segments after stuffing
- Polyfill stuffing — Poly-Fil by Fairfield is wonderful and widely available
- Stitch marker — non-negotiable for tracking your spiral rounds
- Optional: 9mm or 12mm black safety eyes + embroidery thread in blush pink, if you want to give your pumpkin a little kawaii face
This yarn is classified as Bulky (5) on the Craft Yarn Council weight system — that extra weight is exactly what gives this pumpkin its satisfying roundness and that velvety, almost plushy surface texture.
Abbreviations Used in This Pumpkin Amigurumi Pattern
| Abbreviation | Meaning |
|---|---|
| sc | single crochet |
| inc | increase (2 sc in the same stitch) |
| inv dec | invisible decrease (insert hook through front loops only of next 2 stitches simultaneously) |
| ch | chain |
| mr | magic ring |
🩷 Chloe’s Detail Tip: The original pattern uses a standard decrease, but here at AmiLoops we always use the invisible decrease (inv dec) — it keeps those edges so much cleaner, especially on a piece this round where every little bump shows. Even in plush yarn, the inv dec gives you a smoother, rounder finish that photographs beautifully.
Before You Begin — Little Details That Make All the Difference
If you’ve never worked with chenille or plush yarn before, welcome to your new obsession. It crochets up a little differently than cotton or acrylic — the fibers are soft and slightly clingy, which actually helps your stitches grip each other and gives you a wonderfully dense fabric that holds its shape beautifully when stuffed. The one thing to watch: it can be a tiny bit harder to see your stitch placement, so slow down a little and feel for each stitch head with your hook tip. You’ll get used to it after a row or two.
If you’re brand new to working in continuous spiral rounds — which is the heart of how amigurumi is made — our magic ring tutorial will walk you through the perfect adjustable start that closes completely with no hole in the center. It’s the single best thing you can do for round amigurumi like this pumpkin.
And if any part of this feels new to you, the complete beginner’s guide to amigurumi covers everything from your first stitch to your first finished piece — it’s a lovely place to start.
🩷 Chloe’s Detail Tip: Place your stitch marker at the beginning of each round and move it up as you go. In plush yarn it can be surprisingly easy to lose track of where your round starts — the marker is your little anchor. I use a pink locking stitch marker and it makes me happy every single time I clip it in.
Pumpkin Amigurumi Pattern
Part 1: Pumpkin Body (×1)
Yarn color: main color (pumpkin orange, terracotta, peachy blush — your choice!)
Start with your magic ring and work in continuous rounds. This is where that beautiful round shape begins to form — keep your tension consistent and snug to get that perfect sphere.
Row 1: 6 sc in mr (6)
Row 2: inc × 6 (12)
Row 3: (1 sc, inc) × 6 (18)
Row 4: (2 sc, inc) × 6 (24)
Row 5: (3 sc, inc) × 6 (30)
Row 6: (4 sc, inc) × 6 (36)
Row 7: (5 sc, inc) × 6 (42)
Row 8: (6 sc, inc) × 6 (48)
Row 9: (7 sc, inc) × 6 (54)
Row 10: (8 sc, inc) × 6 (60)
Row 11: (9 sc, inc) × 6 (66)
Row 12: (10 sc, inc) × 6 (72)
This is the most satisfying moment — by Row 12 you have this gorgeous, wide flat circle. The chenille yarn makes it look like a little velvet disc. Take a moment to admire it. I always do.
Rows 13–22: 72 sc (work 10 rows straight) (72)
These ten steady rows are where your flat circle becomes a bowl, then a dome. Around Row 17 or 18 you’ll notice the sides starting to curve inward at the top — that’s the pumpkin shape coming to life. So satisfying to watch it happen.
Row 23: (10 sc, inv dec) × 6 (66)
Row 24: (9 sc, inv dec) × 6 (60)
Row 25: (8 sc, inv dec) × 6 (54)
Row 26: (7 sc, inv dec) × 6 (48)
🩷 Stuff before Row 29! Before you continue to Row 27, begin stuffing your pumpkin. Add the polyfill gradually, shaping as you go — you want it firm enough to hold that gorgeous round shape but not so tight that it distorts the stitches. Check the shape from all sides as you stuff. This is the part that determines everything about how beautiful your finished pumpkin looks, so take your time here. Our guide to stuffing amigurumi has all the tips for getting that perfect, smooth roundness.
Row 27: (4 sc, inv dec) × 8 (40)
Row 28: (3 sc, inv dec) × 8 (32)
Row 29: (2 sc, inv dec) × 8 (24)
Row 30: (1 sc, inv dec) × 8 (16)
Row 31: inv dec × 8 (8)
Fasten off, leaving a long tail for sewing. Thread your tapestry needle and weave through the remaining 8 stitches to close the top opening completely. That little dimple at the top is exactly where your stem will sit — perfect.
Part 2: Bottom Stem (×1)
Yarn color: brown, sage green, or your stem color
This tiny little nub sits at the base of your pumpkin and adds that authentic, whimsical touch — like your pumpkin was just plucked fresh from the patch.
Row 1: 6 sc in mr (6)
Fasten off, leaving a tail for sewing. This small circle will be sewn to the bottom of the pumpkin body.
Part 3: Top Stem (×1)
Yarn color: same as bottom stem
The top stem has a lovely little flared base that sits so prettily against the top of the pumpkin — like a little crown.
Row 1: 6 sc in mr (6)
Rows 2–6: 6 sc (work 5 rows straight) (6)
Row 7: inc × 6 (12)
Row 8: (1 sc, inc) × 6 (18)
Fasten off, leaving a long tail for sewing. The narrow tube of Rows 1–6 becomes the stem, and the flared base of Rows 7–8 gives you a beautiful attachment point that blends into the top of the pumpkin so naturally.
Part 4: Tendril (×1)
Yarn color: same as stems, or a lighter complementary shade
This is the little detail that takes your pumpkin from cute to deeply precious. When you work 2 sc into every chain, the extra stitches have nowhere to go but curl — and they create the sweetest natural spiral all by themselves. Magic.
Row 1: Ch 20, starting from the 2nd ch from hook, work 2 sc in each ch across (38)
Fasten off, leaving a tail for attaching. Watch it curl up as soon as you finish — it will make you gasp a little. I promise.
Assembling Your Pumpkin Amigurumi
- Create the segment lines first. This is the signature step that transforms a round ball into an unmistakable pumpkin. Thread your long tapestry needle with a doubled strand of strong thread, approximately 59 in (150 cm) total. Use the increase points along the bottom edge and the decrease points along the top edge as your reference guides — these mark the natural division lines of your 6 segments. Bring the needle down from the top dimple, through the center of the pumpkin body, and out through the bottom dimple, pulling with gentle, even tension to create one indented line. Repeat this for all 6 segments, working your way around evenly. The more consistent your tension, the more beautifully defined the segments will be.
- Attach the bottom stem. Position the small circular bottom stem over the bottom dimple of the pumpkin (where your segment lines converge). Sew neatly around the edge using your tapestry needle and matching yarn, keeping stitches small and even.
- Attach the top stem. Sit the flared base of the top stem over the top dimple and sew around the flared edge. The narrow tube of the stem should point upward at a slight natural angle — not perfectly straight up, just gently tilted like a real pumpkin stem. That tiny imperfection makes it look more organic and adorable.
- Attach the tendril. Sew the base of the curling tendril to the top of the pumpkin, right next to the stem. Let it coil freely — don’t flatten it or press it down. It should look like it’s just been freed from the vine.
Making Your Pumpkin Amigurumi Extra Cute — Finishing Details
Okay. This is the part I’ve been waiting to talk to you about. Because a pumpkin is already adorable — but a kawaii pumpkin? That’s a whole different level of precious. Here’s how I finish mine.
Add a kawaii face (optional but highly recommended): Even though pumpkins don’t have faces in nature, kawaii style says they absolutely should. I place two 9mm or 12mm black glossy safety eyes just below the center of the pumpkin’s front face, slightly closer together than you might think — the closer placement creates that wide-eyed, innocent expression that makes your heart melt. Position them, then step back and look from directly in front before pressing the washers in. Once they click, they are staying forever, so take the extra moment to make sure they’re perfectly level.
🩷 Chloe’s Detail Tip: Before you commit to safety eye placement, hold the pumpkin at arm’s length and squint at it. I know that sounds silly but it really works — your eye naturally picks up asymmetry at a distance that you can’t always catch up close. If one eye looks even slightly higher than the other, adjust now. Perfect symmetry = peak cuteness.
Embroider the blush cheeks: This is my absolute favorite finishing step and I genuinely believe no kawaii piece is complete without it. Thread a tapestry needle with soft pink or dusty rose embroidery floss (3–4 strands for a delicate, matte finish). Just below and to the outside of each eye, embroider a small cluster of tiny straight stitches in a subtle circular shape — not perfectly round, not too big, just a soft rosy suggestion of a blush. The color contrast against the warm orange or terracotta of the pumpkin is breathtaking. On a pastel pink version? Even more so.
Embroider a tiny mouth (optional): A small curved smile in dark brown or black embroidery floss sits just below the eyes and between the cheeks. Keep it tiny and simple — a gentle U-shape that says “I am the happiest little pumpkin in the whole patch.”
Color variations that will make you want to make six of these:
- Classic harvest: warm burnt orange body, brown stem, sage tendril
- Kawaii pastel: peachy blush body, mint green stem, ivory tendril — so sweet I can’t even handle it
- Autumn fairy: soft terracotta body, dusty olive stem, gold tendril
- Spooky cute: pale lavender or dusty lilac body, charcoal stem — give this one a little jack-o-lantern face embroidered in orange
- Winter white: creamy ivory body, sage green stem, soft gold tendril — unexpected and gorgeous
Display ideas: Line up three in different sizes (make the body one size smaller by stopping increases at Row 9 instead of Row 12 for a mini version) and arrange them on a windowsill with some dried leaves. Or tuck them into a little wicker basket. Or just hold one in your palm and stare at it for a while. All valid choices.
Chloe’s Final Look
I’ve made this pumpkin in four different colors now and every single time I finish the segment lines and watch it transform from a ball into an actual little gourd, I feel the same rush of delight. The chenille yarn catches the light so softly, the tendril curls exactly right, and if you’ve added the blush cheeks — well. There’s nothing cuter than a pumpkin amigurumi that’s looking back at you with those little rosy cheeks and shiny eyes. Try the peachy blush version with mint green stems if you want the most achingly sweet pastel autumn piece you’ve ever made. You’ll be so glad you did. 🩷
What yarn is best for this pumpkin amigurumi?
Bulky (5) chenille-style plush yarn — such as Bernat Baby Velvet or Premier Parfait — gives this pumpkin amigurumi its signature squishy, velvety texture. It’s widely available at Joann, Michaels, and Hobby Lobby.
How long does it take to crochet this pumpkin amigurumi?
Most crocheters complete this pumpkin amigurumi in 3–5 hours. The pumpkin body takes the most time; the stems, tendril, and finishing details add roughly 30–60 minutes depending on your pace.
Can beginners make this pumpkin amigurumi pattern?
This pattern is rated intermediate — it uses standard amigurumi construction (magic ring, increases, and invisible decreases) with the added step of hand-stitched segment lines. Beginners comfortable with continuous spiral rounds can succeed with support from the site’s beginner’s amigurumi guide.