Free Crochet Frog Amigurumi Keychain Pattern — Scrap-Friendly Mini
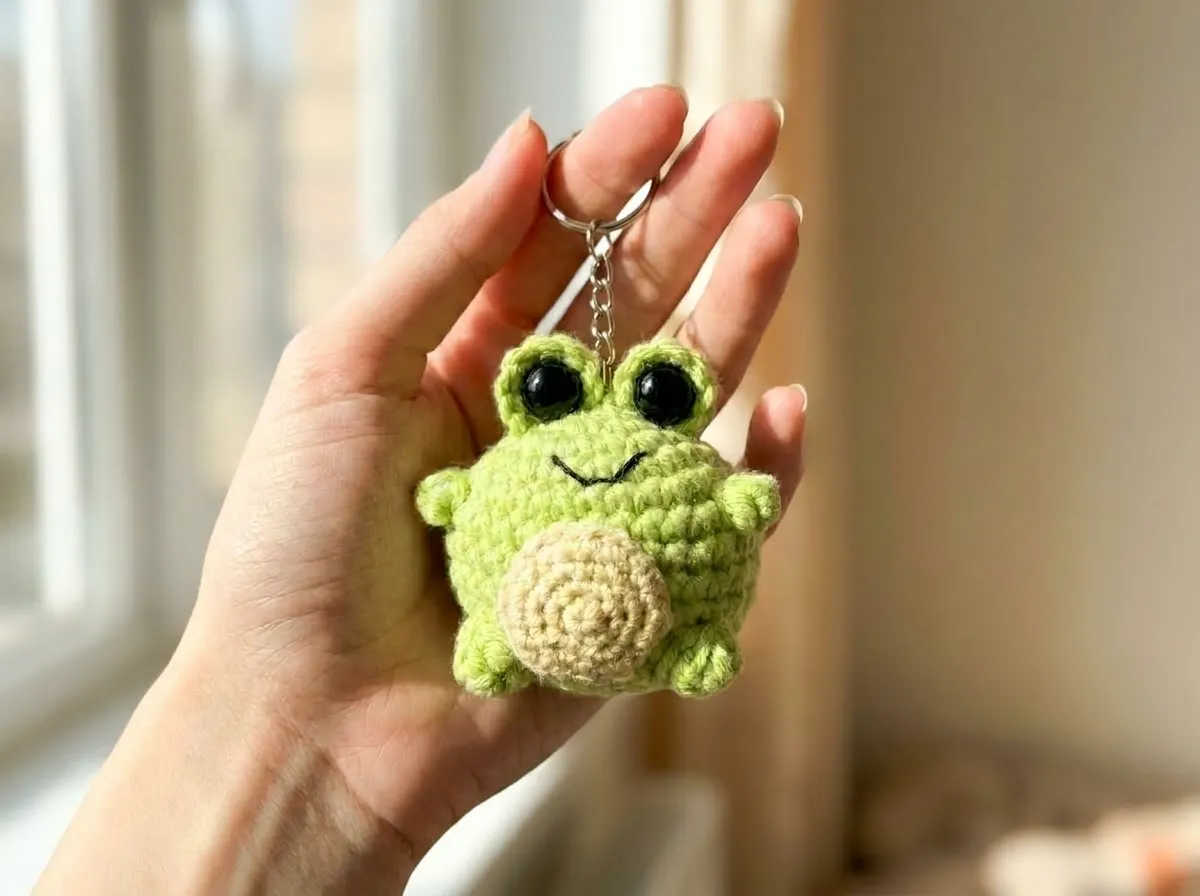
This free crochet frog amigurumi keychain pattern uses less than 65 yards of yarn total — most of it green DK scraps you probably already have sitting in your basket. This amigurumi keychain free pattern comes with two leg options, a sweet little belly detail worked in Iris thread, and finishes in under two hours. Grab whatever green is nearest to you. Let’s go.
🧶 What You’ll Need From Your Stash
- 💰 Yarn Needed: ~50 yards total (green DK ~35 yds for body + eyes, light yellow Iris thread ~15 yds for belly)
- 🎨 Colors: green (any DK or light worsted), light yellow (Iris thread or similar fine cotton thread), black (small amount for embroidery)
- 🪝 Hook: B/1 (2.25mm) for body and eyes — 1.5mm for belly (Iris thread)
- ⏱️ Time: 1.5–2 hours
- 📏 Finished Size: approximately 2–2.5 in (5–6 cm) tall
- 💡 Difficulty: Beginner-Intermediate
- 🎁 Great For: keychains, bag charms, zipper pulls, handmade gifts, market bundles
Materials for This Amigurumi Keychain Free Pattern
The whole point of this frog is that it costs almost nothing to make. Here’s exactly what you need:
- Green DK or Light Worsted yarn (CYCA 3) — approximately 35–40 yards for the body and eyes. YarnArt Jeans is the original, but any DK cotton or cotton-blend works. Drops Muskat, Paintbox Simply DK Cotton, or honestly whatever green DK you’ve had sitting around since last spring. This is a scrap project.
- Light yellow Iris thread or fine cotton thread — approximately 15 yards for the belly. Iris thread is very fine (similar to size 10 crochet thread). If you don’t have it, a small amount of any light fingering or thread-weight cotton in cream or pale yellow works fine.
- Black embroidery floss — a small amount for any decorative detail. You need practically nothing.
- Two black beads, 8mm diameter — these serve as the frog’s eyes under the crocheted eye caps.
- Polyfill stuffing — a small pinch. Seriously, one small handful from your bag does it.
- Hook B/1 (2.25mm) — main hook for body and eyes
- Hook 1.5mm — for the Iris thread belly only
- Tapestry needle — for sewing parts together and weaving in ends
- Stitch marker — to track your round beginnings
- Keychain ring or lobster clasp — to finish it as a functional keychain
🧶 Scrap Check: The body and eyes together use roughly 35–40 yards of green DK. If you’ve got any leftover DK cotton from a previous project — even a short end from a skein — check the yardage. Anything over 40 yards and you’re covered with room to spare.
A note on the beads: because these are 8mm plastic or glass beads rather than safety-locked eyes, this frog keychain is best suited for adult use or older children. For toys made for young children, check the U.S. Consumer Product Safety Commission (CPSC) guidelines on small parts in toys before choosing your eye finish.
Abbreviations
| Abbreviation | Meaning |
|---|---|
| sc | single crochet |
| dc | double crochet |
| tr | treble crochet |
| inc | increase — 2 sc worked into the same stitch |
| dec | decrease — insert hook in next st, pull up loop, insert in following st, pull up loop, yarn over, pull through all 3 loops |
| ch | chain |
| puff st (3 tr) | puff stitch made of 3 treble crochets: [yarn over, insert hook, pull up loop, yarn over, pull through 2 loops] × 3 in the same stitch, yarn over, pull through all 7 loops. Creates a rounded raised bump — these are the frog’s arms and legs in Option 1. |
| puff st (4 tr) | same as above but with 4 treble crochets — larger bump, used in Row 11 Option 1 |
| BLO | back loop only — insert hook through only the back loop of the stitch |
| mr | magic ring |
Smart Crafter Tips for Your Amigurumi Keychain Free Pattern
Pick your leg option before you start. This pattern offers two ways to form the frog’s legs. Option 1 uses puff stitches (clusters of treble crochets worked right into the body) to create rounded, simple bumps for arms and legs. Option 2 uses a fan stitch — 5 dc worked into one stitch — then closes them together through the back loops on the following row to form distinct toe shapes. Option 1 is faster and more beginner-friendly. Option 2 gives you a more defined, character-forward frog with little toes. Both are worked the same through Row 9 — they only diverge at Row 10. If you’ve never made a puff stitch before, Option 1 is the one to start with.
Use the invisible decrease for a cleaner finish. The pattern calls for a standard dec (sc2tog), which gets the job done but can leave a small visible gap in the fabric. If you want tighter, neater decreases — especially on a piece this small where every stitch shows — swap in the invisible decrease instead. Our invisible decrease tutorial shows exactly how it works and why it matters on small-scale amigurumi.
Stitch marker every round, no exceptions. At 30 stitches across, it’s very easy to lose your place, especially when you’re navigating puff stitches or the fan section in Option 2. Mark your first stitch of every round and move the marker up as you go. It saves a lot of frogging.
🧶 Scrap Check: The belly is worked in Iris thread on a 1.5mm hook — it’s a quick, flat circle of 24 stitches. If you don’t own Iris thread, any leftover fingering weight cotton in cream or pale yellow does the same job. You need about 15 yards. That’s practically nothing.
First time starting a project from a magic ring? Our magic ring tutorial walks through it step by step — it’s quicker than it looks and makes all the difference in keeping the center hole closed tight.
The Pattern
Body — Option 1 (Puff Stitch Limbs)
Yarn: green DK | Hook: B/1 (2.25mm) | Start: magic ring | Make: 1
This option uses puff stitches directly in the body to form the frog’s arms and legs. The two puff stitches in Row 6 are the front legs; the two puff stitches in Row 11 are the back legs. This entire body piece uses approximately 30–35 yards of green yarn.
Row 1: 6 sc in mr (6)
Row 2: 6 inc (12)
Row 3: (sc, inc) × 6 (18)
Row 4: (sc, inc, sc) × 6 (24)
Row 5: (3 sc, inc) × 6 (30)
Row 6: 8 sc, puff st (3 tr), 12 sc, puff st (3 tr), 8 sc (30)
Row 7: 30 sc (30)
Row 8: 30 sc (30)
Row 9: 30 sc (30)
Row 10: (3 sc, dec) × 6 (24)
Row 11: (2 sc, dec) × 2, sc, puff st (4 tr), dec, 2 sc, dec, puff st (4 tr), sc, dec, 2 sc, dec (18)
Row 12: (sc, dec) × 6 (12)
Row 13: 12 sc (12)
Finishing: Stuff the body firmly through the open top, then close the opening and weave in ends.
Body — Option 2 (Fan Stitch Toes)
Yarn: green DK | Hook: B/1 (2.25mm) | Start: magic ring | Make: 1
Rows 1–9 are identical to Option 1. The difference starts at Row 10, where a fan stitch (5 dc worked into one stitch) creates the foundation for the frog’s toes. Row 11 then closes those fans together through the back loops, forming defined toe shapes. This version takes a little more attention on Rows 10 and 11 — read through both rows before you start them.
Row 1: 6 sc in mr (6)
Row 2: 6 inc (12)
Row 3: (sc, inc) × 6 (18)
Row 4: (sc, inc, sc) × 6 (24)
Row 5: (3 sc, inc) × 6 (30)
Row 6: 8 sc, puff st (3 tr), 12 sc, puff st (3 tr), 8 sc (30)
Row 7: 30 sc (30)
Row 8: 30 sc (30)
Row 9: 30 sc (30)
Row 10: (3 sc, dec) × 2, sc, 5 dc in one st, sc, dec, 3 sc, dec, 5 dc in one st, 2 sc, dec, 3 sc, dec (32)
Row 11: (2 sc, dec) × 2, sc, 5 sc together BLO, dec, 2 sc, dec, 5 sc together BLO, sc, dec, 2 sc, dec (18)
Row 12: (sc, dec) × 6 (12)
Row 13: 12 sc (12)
Finishing: Stuff the body firmly through the open top, then close the opening and weave in ends.
🧶 On “5 sc together BLO” in Row 11 (Option 2): This closes the 5-dc fan from Row 10 into a single gathered toe. Insert your hook through the back loop only of each of the 5 dc stitches, pulling up a loop as you go, then yarn over and pull through all 6 loops on your hook. It compresses neatly into a rounded toe shape. Take your time here — it’s fiddly once but looks great finished.
Eyes
Yarn: green DK | Hook: B/1 (2.25mm) | Start: magic ring | Make: 2
These small eye caps sit over the bead eyes and give the frog its raised, bulgy look. Each one uses about 2–3 yards of green yarn.
Row 1: 4 sc in mr, do not join, turn work (4)
Row 2: 4 inc (8)
Finishing: Leave a tail for sewing. Do not stuff.
Belly
Yarn: light yellow Iris thread | Hook: 1.5mm | Start: magic ring | Make: 1
A flat circular piece. This entire section uses about 15 yards of Iris thread — a tiny amount. If you’re substituting fingering weight cotton, the slightly thicker yarn still looks great and you may find it faster to work at this small size.
Row 1: 6 sc in mr (6)
Row 2: 6 inc (12)
Row 3: (sc, inc) × 6 (18)
Row 4: (sc, inc, sc) × 6 (24)
Finishing: Fasten off, leave a long tail for sewing onto the body.
Assembly
- Thread your tapestry needle with a length of black thread or embroidery floss.
- Sew the two 8mm black beads onto the top of the frog’s head, positioned approximately 0.5 in apart from each other.
- Place one crocheted eye cap over each bead, positioning the flat side down against the body. Sew each eye cap around its edges, anchoring it firmly over the bead. The bead peeks through the center of the cap and creates the classic raised frog-eye look.
- Center the yellow belly piece on the front of the body, roughly between the front leg puff stitches. Pin or hold in place before sewing.
- Sew the belly onto the body using small, even stitches around the entire edge. Match your thread to the belly color so the seam disappears.
- Attach a keychain ring or lobster clasp to the top of the body at the closing point. A simple lark’s head knot with a short length of yarn through the ring works if you don’t want any hardware — just knot it tight.
- Weave in all remaining ends.
💡 Assembly tip: Sew the beads on before attaching the eye caps — this lets you check the spacing and positioning while the beads are still easy to reposition. Once the eye cap is sewn over the bead, moving it is a pain. Get the bead placement right first, then cover them. For a clean finish on sewing amigurumi parts like this belly, our guide to sewing amigurumi parts together covers the invisible join technique that keeps seams tidy.
Stretch It Further — Make Your Scraps Work Harder
💡 Stretch It Further:
Make a color set. The body pattern is identical regardless of color — swap green for teal, sage, olive, or even a soft mint and you’ve got a whole frog family from scraps. Three frogs in different greens, bundled together on a small kraft tag, make a handmade gift set that costs almost nothing.
Try a different species. Change the belly color to orange and you’ve got a poison dart frog vibe. Use white yarn for the belly and a brighter lime green for the body and you’ve got something that looks like it belongs in a rainforest. Same pattern, completely different personality.
Skip the keychain hardware for a mini plush. If you stuff it a little more firmly and skip the ring attachment, this exact frog makes a tiny desk toy or shelf decoration. Bundle three in a small cloth bag with tissue and you’ve got an instant market item.
Total yarn cost estimate: Using leftover DK cotton and Iris thread scraps — under $1. If you’re buying new yarn just for this pattern, a single skein of DK cotton covers 8–10 frogs. Split the cost across the set and each frog costs pennies.
Mia’s Take
Two options, one tiny frog, under 65 yards total — that’s all this is. The puff stitch legs in Option 1 are faster and just as charming; the fan-toe version in Option 2 is worth trying once you’ve got one body under your belt. I’d make the first in Option 1 to learn the shape, then switch to Option 2 when you want to show off a little. Bundle three of these on a single keyring in different shades of green and you’ve got a gift that looks like it took way more effort than it did. That’s exactly the kind of math I’m here for. 🧶
What yarn works best for this frog amigurumi keychain pattern?
Any DK or light worsted cotton is ideal — YarnArt Jeans is the original, but Drops Muskat or Paintbox Simply DK Cotton are excellent alternatives. The belly uses Iris thread (size 10 crochet thread) or about 15 yards of any pale fingering-weight cotton.
How long does it take to crochet this frog keychain?
Most crocheters complete this pattern in 1.5 to 2 hours. Option 1 with puff-stitch limbs is slightly faster; Option 2 with fan-stitch toes adds a bit of extra time on rows 10 and 11.
Can beginners make this amigurumi keychain free pattern?
Yes — it’s rated Beginner-Intermediate. Option 1 is the easiest starting point; once you’ve made one frog that way, Option 2 introduces the fan stitch at a comfortable pace.