Crochet Monkey Amigurumi — Free Pattern with Full Step-by-Step Instructions
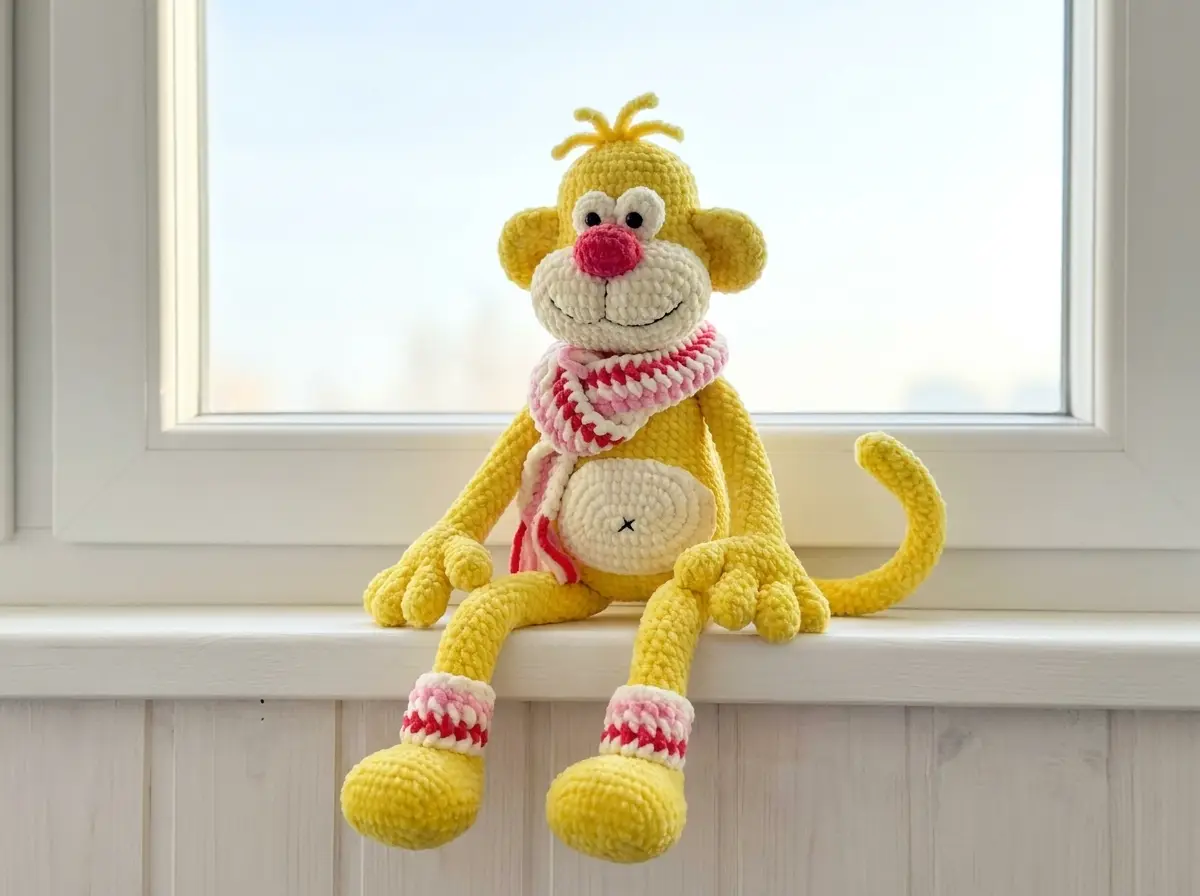
This monkey amigurumi free pattern has been one of the most rewarding builds I’ve worked through in a while — those articulated fingers, the curved tail, the little tufted hairstyle. There’s a lot going on, and every part of it is worth the effort. I’ve written out every row exactly as tested, so if your count is right, your monkey will be right. Grab your hook and let’s get started.
📋 Pattern Quick Stats
- Difficulty: Advanced
- Finished Size: Approx. 12–14 in tall (varies with tension)
- Hook Size: D/3 (3.25mm)
- Yarn Weight: Bulky (5) — chenille/velvet
- Techniques Used: magic ring, foundation chain, invisible decrease, continuous rounds, finger joining, color changes, surface crochet (hairstyle)
- Estimated Time: 8–12 hours
Materials for This Monkey Amigurumi Free Pattern
- Yellow yarn — Bulky (5) chenille/velvet, approx. 250g
US alternatives: Bernat Baby Velvet or Premier Parfait. This weight is classified as Bulky on the Craft Yarn Council yarn weight system. Despite the bulky weight, we’re using a much smaller hook than the label recommends — that’s intentional for amigurumi. The tight tension is what gives you clean, dense fabric that holds its shape and keeps stuffing from showing through. - White yarn — Bulky (5) chenille/velvet, approx. 60g
Match your white to the same brand as your yellow for consistent stitch definition. - Bright pink and light pink yarn — Bulky (5) chenille/velvet, approx. 50g total
Used for the nose, the optional scarf, and the hairstyle accent stitches. - Hook: D/3 (3.25mm)
- Polyfill stuffing — Poly-Fil by Fairfield works well. Add it gradually as you work; waiting too long makes even distribution difficult.
- 2 black safety eyes, 6mm — or 6mm black beads. I always recommend safety eyes with locking washers for any project going to a child. The locking mechanism is the safest option. Check the U.S. Consumer Product Safety Commission (CPSC) guidelines if this monkey is intended as a toy for young children — beads are not appropriate in that case.
- Tapestry needle for sewing parts and weaving in ends
- Long thin hand-sewing needle + strong black thread (DMC Perle Cotton #8 or #5) for embroidering the face
- Stitch marker — non-negotiable for tracking your round beginnings
Abbreviations Used in This Pattern
| Abbreviation | Meaning |
|---|---|
| sc | single crochet |
| inc | increase (2 sc in same stitch) |
| dec | decrease — see note below |
| sl st | slip stitch |
| ch | chain |
| mr | magic ring |
| 3-in-1 | 3 single crochets worked into the same stitch |
| FO | fasten off |
| st(s) | stitch(es) |
Special Techniques for This Monkey Amigurumi Free Pattern
This is an advanced build. Before you start, make sure you’re comfortable with the following:
Decrease method: Wherever this pattern writes “dec,” I work it as an invisible decrease — inserting the hook through the front loops only of the next two stitches simultaneously. It eliminates the gap that the standard sc2tog leaves behind. In chenille yarn especially, any gap will catch your eye. If you’re new to this technique, our complete invisible decrease tutorial walks through it step by step.
Magic ring: Most of the round parts in this pattern start with a magic ring. Pull it snug before you begin your first round so the center hole closes completely. If this technique is new to you, take a few minutes with our magic ring tutorial — it’s worth getting right from the start.
Continuous rounds: This pattern is worked in continuous rounds (a spiral), not joined rounds. Move your stitch marker at the end of every round. If you’re unsure about the difference, see our guide on working in continuous rounds.
Finger construction: The arms are the most technically demanding part of this pattern. You’ll crochet 4 fingers per arm (8 total across both arms), then join them to form the hand and continue into the arm tube. Read through the full arms section before you start. It’s easier than it looks once you understand the flow.
💡 Emma’s Tip: Chenille and velvet yarns are beautiful but unforgiving when you need to frog back. I always check my stitch count at the end of every row on complex joins — before I commit to the next row, not after I’ve crocheted another ten rounds.
Pattern Instructions
Arms (make 2)
Yarn: Yellow
Start: Make 4 separate fingers per arm (8 fingers total). Each finger begins with a magic ring.
Each Finger (make 8):
Row 1: 6 sc in mr (6)
Row 2: (1 sc, inc) ×3 (9)
Rows 3–5: 9 sc (3 rows) (9)
💡 Important — before cutting yarn: Of your 4 fingers per arm, do NOT cut the yarn on the 4th finger (you’ll continue directly from it to join). On your thumbs (2 of the 8 total fingers), do not cut the yarn either, as you’ll use them separately during the joining row. Cut yarn only on the remaining fingers.
Joining Fingers and Forming the Arm:
Row 6: 2 sc across 3rd finger, 2 sc across 2nd finger, 9 sc across 1st finger, across 2nd finger: 6 sc, across 3rd finger: 6 sc, across 4th finger: 9 sc (34)
Row 7: 14 sc (14)
Row 8: 14 sc (14)
Row 9: 4 sc, 2 sc together with thumb: (1 sc, dec) ×2, 1 sc, 8 sc across arm (17)
Row 10: 6 sc, dec, 9 sc (16)
Row 11: (dec, 1 sc) ×4, 2 dec (10)
Rows 12–33: 10 sc (22 rows) (10)
Set aside. Make second arm the same way.
Feet (make 2)
Yarn: Yellow
Start: Foundation chain
Row 1: 10 ch, from 2nd ch: 8 sc, 3-in-1, 9 sc (20)
Row 2: inc, 7 sc, 3 inc, 7 sc, 2 inc (26)
Row 3: 1 sc, inc, 7 sc, (1 sc, inc) ×3, 7 sc, (1 sc, inc) ×2 (32)
Row 4: 14 sc, inc, 15 sc, inc, 1 sc (34)
Rows 5–7: 34 sc (3 rows) (34)
Row 8: 14 sc, dec, 15 sc, dec, 1 sc (32)
Row 9: (14 sc, dec) ×2 (30)
Row 10: (dec, 10 sc, dec, 1 sc) ×2 (26)
Row 11: (11 sc, dec) ×2 (24)
Row 12: (10 sc, dec) ×2 (22)
Row 13: (9 sc, dec) ×2 (20)
Row 14: (8 sc, dec) ×2 (18)
Row 15: 18 sc (18)
Row 16: (dec, 1 sc) ×6 (12)
FO. Make second foot the same way.
Legs (make 2)
Yarn: Yellow
Start: Foundation chain joined into a ring
Row 1: 13 ch joined into a ring (13)
Rows 2–30: 13 sc (29 rows) (13)
💡 Important: Do NOT cut the yarn on the second leg. You’ll continue directly from it to begin the body.
Sew each foot to the bottom of its leg before joining to the body.
Body
Yarn: Yellow
Start: Worked by joining both legs together
💡 Emma’s Tip: The body join row is the most complex in the entire pattern. Read it through twice before you start. You’re working across one leg, across a bridging chain, across the second leg, and then back along the other side of the chain. Take it slowly — once this row is right, the rest of the body is straightforward.
Row 1: ch 7 and join to first leg: 3 sc, (1 sc, inc) ×3, 4 sc, across ch: 2 sc, inc, 1 sc, inc, 2 sc. Across leg: 4 sc, (inc, 1 sc) ×3, 3 sc, across other side of ch: 7 sc (48)
Row 2: across ch: 1 sc, inc, 3 sc, inc, 1 sc. Body: 3 sc, (2 sc, inc) ×3, 17 sc, (inc, 2 sc) ×3, 3 sc (56)
Rows 3–7: 56 sc (5 rows) (56)
Row 8: 5 sc, dec, 26 sc, dec, 21 sc (54)
Row 9: 54 sc (54)
Row 10: (7 sc, dec) ×6 (48)
Row 11: 48 sc (48)
Row 12: (6 sc, dec) ×6 (42)
Row 13: 3 sc, dec, (5 sc, dec) ×5, 2 sc (36)
Rows 14–20: 36 sc (7 rows) (36)
Row 21: (4 sc, dec) ×6 (30)
Row 22: Along body: 3 sc, dec, 4 sc, dec (catching loop of arm and body). Along arm: 4 sc, dec. Along body: 3 sc, dec, 2 sc, dec, 3 sc. Along arm: dec, 4 sc, dec (catching loop of arm and body). Along body: 1 sc (31)
Row 23: 3 sc, dec, 26 sc (30)
Row 24: (dec, 3 sc) ×6 (24)
Row 25: 1 sc, (dec, 2 sc) ×5, dec, 1 sc (18)
Row 26: (dec, 1 sc) ×6 (12)
Rows 27–28: 12 sl st (12)
Stuff firmly. FO.
💡 Emma’s Tip: Stuff the body in stages — add filling after Row 9, again around Row 15, and do a final adjustment before you close up after Row 26. Chenille yarn has a lot of give, and stuffing in layers gives you much better control over the final shape.
Tail
Yarn: Yellow
Start: Magic ring
Row 1: 6 sc in mr (6)
Row 2: (1 sc, inc) ×3 (9)
Row 3: 6 sc, inc, 2 sc (10)
Row 4: 10 sc (10)
Row 5: 2 sc, dec, 3 sc, inc, 2 sc (10)
Rows 6–33: Repeat rows 4–5 fifteen times (10)
Row 34: 10 sc (10)
Row 35: 3 sc, inc, 3 sc, dec, 1 sc (10)
💡 Note: Repeat rows 34 and 35 twelve more times after Row 35 to complete the full tail length.
FO.
Head
Yarn: Yellow
Start: Foundation chain
Row 1: 11 ch, from 2nd ch: 9 sc, 3-in-1, along 2nd side: 8 sc, inc (22)
Row 2: inc, 8 sc, 3 inc, 8 sc, 2 inc (28)
Row 3: 1 sc, inc, 8 sc, (1 sc, inc) ×3, 8 sc, (1 sc, inc) ×2 (34)
Row 4: 2 sc, inc, 8 sc, (2 sc, inc) ×3, 8 sc, (2 sc, inc) ×2 (40)
Rows 5–16: 40 sc (12 rows) (40)
Row 17: 2 sc, dec, 8 sc, (2 sc, dec) ×3, 8 sc, (2 sc, dec) ×2 (34)
Row 18: 1 sc, dec, 8 sc, (1 sc, dec) ×3, 8 sc, (1 sc, dec) ×2 (28)
Row 19: dec, 8 sc, 3 dec, 8 sc, 2 dec (22)
Stuff firmly. FO.
Hairstyle
Yarn: Yellow (or pink for accent tufts)
Start: Worked directly onto the head — no separate piece
Join yarn to the top of the head and work the following three passes directly into the head stitches:
Pass 1: 8 ch, from 2nd ch: 1 sc, 6 sl st, sl st into next head stitch
Pass 2: 10 ch, from 2nd ch: 2 sc, 7 sl st, sl st into next head stitch
Pass 3: 8 ch, from 2nd ch: 1 sc, 6 sl st, sl st into next head stitch
FO and weave in ends.
💡 Emma’s Tip: The three passes create a small, raised fringe at the top of the head. Work them close together across the crown for the most natural look. The sl sts will naturally curl upward once the yarn tension releases.
Muzzle
Yarn: White
Start: Foundation chain
Row 1: 14 ch, from 2nd ch: 12 sc, 3-in-1, along 2nd side: 13 sc (28)
Row 2: inc, 11 sc, 3 inc, 11 sc, 2 inc (34)
Row 3: 1 sc, inc, 11 sc, (1 sc, inc) ×3, 11 sc, (1 sc, inc) ×2 (40)
Row 4: 2 sc, inc, 11 sc, (2 sc, inc) ×3, 11 sc, (2 sc, inc) ×2 (46)
Row 5: 2 sc, inc, 11 sc, (3 sc, inc) ×3, 11 sc, (3 sc, inc) ×2, 1 sc (52)
Row 6: 2 sc, inc, 11 sc, (4 sc, inc) ×3, 11 sc, (4 sc, inc) ×2, 2 sc (58)
Row 7: 58 sc (58)
Row 8: (1 sc, dec) ×2, 14 sc, (1 sc, dec) ×5, 14 sc, (1 sc, dec) ×3 (48)
Row 9: 2 dec, 14 sc, 5 dec, 14 sc, 3 dec (38)
Row 10: 2 dec, 9 sc, 5 dec, 9 sc, 3 dec (28)
FO.
Nose
Yarn: Pink
Start: Foundation chain
Row 1: 5 ch, from 2nd ch: 3 sc, 3-in-1, along 2nd side: 4 sc (10)
Row 2: inc, 2 sc, 3 inc, 2 sc, 2 inc (16)
Row 3: 16 sc (16)
Row 4: dec, 2 sc, 3 dec, 2 sc, 2 dec (10)
Sew onto muzzle.
Eyes (make 2)
Yarn: White
Start: Magic ring
Row 1: 6 sc in mr (6)
Row 2: 6 inc (12)
Row 3: 12 sc (12)
Row 4: 6 dec (6)
FO. Insert safety eye or bead through the center before sewing onto head.
Ears (make 2)
Yarn: Yellow
Start: Foundation chain
Row 1: 8 ch, from 2nd ch: 6 sc, 3-in-1, along 2nd side: 5 sc, inc (16)
Row 2: inc, 5 sc, 3 inc, 5 sc, 2 inc (22)
Rows 3–6: 22 sc (4 rows) (22)
Leave a long tail for sewing. Do not stuff.
Tummy
Yarn: White
Start: Foundation chain
Row 1: 8 ch, from 2nd ch: 6 sc, 3-in-1, along 2nd side: 5 sc, inc (16)
Row 2: inc, 5 sc, 3 inc, 5 sc, 2 inc (22)
Row 3: 2 inc, 5 sc, 6 inc, 5 sc, 4 inc (34)
Row 4: 1 sc, inc, 9 sc, (1 sc, inc) ×4, 9 sc, (1 sc, inc) ×3 (42)
Row 5: 2 sc, inc, 9 sc, (2 sc, inc) ×4, 9 sc, (2 sc, inc) ×3 (50)
FO. Leave a long tail for sewing.
Assembly
- Sew the muzzle onto the head. Position it on the lower-center front of the head. Pin before sewing — the muzzle is large enough that placement really matters for the final expression.
- Sew the nose onto the muzzle. Center it on the front face of the muzzle, toward the upper edge.
- Attach the eyes. Insert safety eyes (or beads) through the white eye pieces and then through the head, securing the washers on the inside before you close up the head completely. Position them above and to either side of the muzzle.
- Sew the ears onto the head. Flatten slightly before sewing. Position them on the upper sides of the head, level with the eyes or just above.
- Sew the head onto the body. Take your time with this — pin it in several places and check the angle before you commit to sewing.
- Sew the tummy onto the body. Center the white tummy panel on the front of the body.
- Sew on the tail. Attach at the lower back of the body, angled slightly upward.
💡 Emma’s Tip: The arms are joined directly in the body’s Row 22 — they’re worked into the body as you crochet, not sewn on afterward. Re-read Row 22 carefully before you reach it. Everything else is sewn on with a tapestry needle.
Finishing Details for Your Monkey Amigurumi
Mouth embroidery: Using strong black thread (DMC Perle Cotton #8 or #5) and a long thin needle, embroider a simple curved or V-shaped mouth on the white muzzle. I like to make a few practice runs on a scrap before committing to the actual piece.
Belly button: Embroider a small cross stitch in black thread at the center of the white tummy panel.
Optional scarf: Work a simple striped rectangle in pink and white alternating rows, long enough to wrap around the neck with ends that hang down the front. Chain to your desired width, then single crochet in rows, changing color every 2 rows. Fasten off, weave in ends.
Emma’s Note
I’ve tested this pattern carefully, and every stitch count adds up — but I won’t pretend the arm construction is simple the first time through. If you get turned around during the finger joining row, put it down, come back fresh, and re-read the instructions from the beginning of that section. It’s one of those techniques that clicks suddenly and then feels obvious. The finished result — those long expressive arms, the curved tail, the little fringe hairstyle — is genuinely worth the patience. Happy hooking! 🧶
What yarn is best for this monkey amigurumi free pattern?
Bulky (5) chenille or velvet yarn gives the cleanest results — the dense plush texture produces firm, gap-free fabric at a small hook size. Bernat Baby Velvet or Premier Parfait are reliable US alternatives.
How long does it take to crochet this monkey amigurumi free pattern?
Plan for 8–12 hours total. The finger construction and arm-joining row take the most time; experienced amigurumi crocheters working with chenille yarn typically finish in 8–9 hours.
Can beginners make this monkey amigurumi pattern?
This pattern is rated Advanced. You should be comfortable with magic rings, invisible decreases, continuous rounds, and color changes before starting — the articulated finger construction is the most demanding technique and requires careful attention to the joining row.