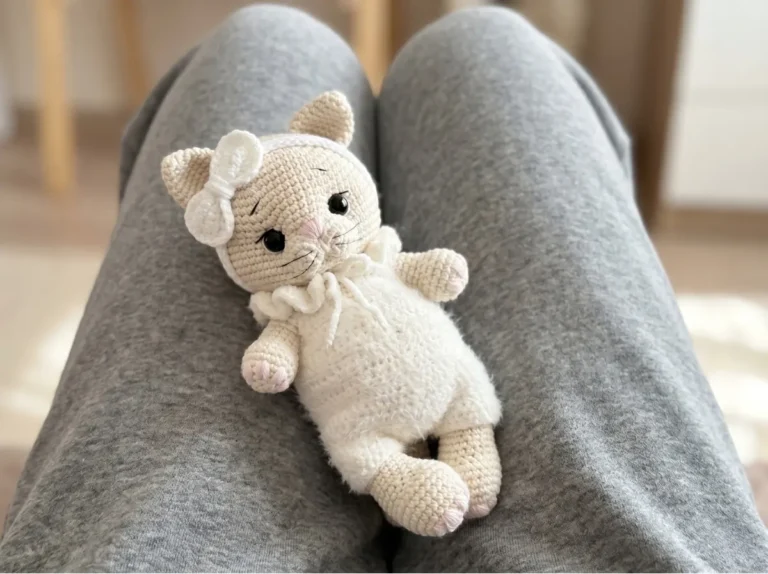
Crochet Cat Amigurumi — Free Pattern for a Cozy Gray Kitty
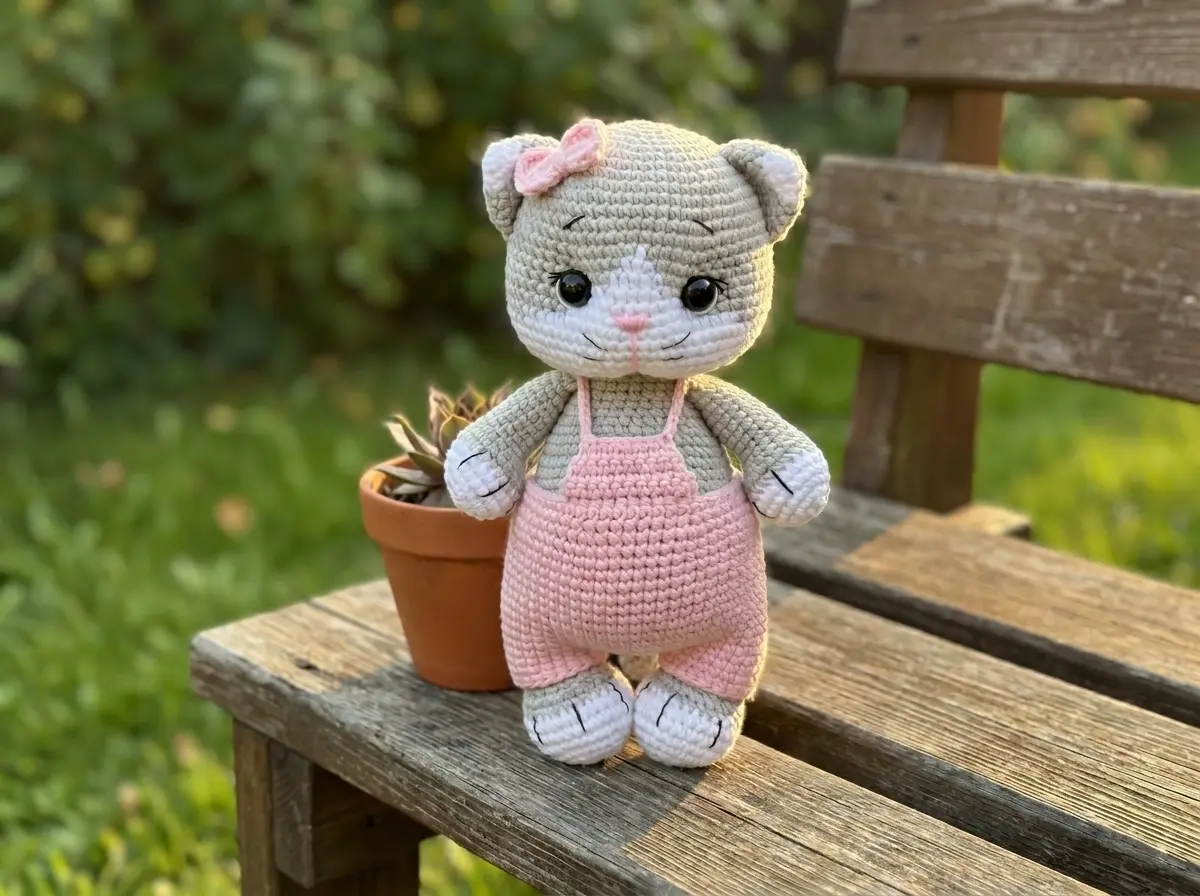
This crochet cat amigurumi has been living in my head rent-free since I first worked up the prototype — the round little cheeks, the pigeon-toed paws, that sweet white muzzle. I designed the published version of this crochet cat amigurumi pattern with clean shaping, tight fabric, and color changes that blend naturally into the face. Every stitch count is verified. Grab your hook and a cup of something warm — let’s make a cat.
📋 Pattern Quick Stats
- Difficulty: Intermediate
- Finished Size: Approx. 8–9 in (20–23 cm) tall
- Hook Size: 2.0 mm (US Steel 4)
- Yarn Weight: DK / Light Worsted (3)
- Techniques: magic ring, invisible decrease, color changes, continuous rounds, eye sculpting
- Estimated Time: 8–12 hours
Materials You’ll Need for This Crochet Cat Amigurumi
I always recommend gathering everything before you start — nothing kills your flow like hunting for a tapestry needle mid-assembly.
Yarn:
- Main Color (gray): Drops Muskat or Paintbox Cotton DK — DK/Light Worsted (3) — 1 skein. The original pattern uses YarnArt Jeans in colorways 49, 46, or 80. Any smooth cotton or cotton-blend DK weight yarn in gray will work beautifully.
- White: Same yarn brand and weight in white (YarnArt Jeans colorway 62 or equivalent).
- Pink: A small amount for embroidery details (YarnArt Jeans colorway 74 or equivalent).
- Black: A small amount for embroidery details.
This yarn is classified as DK / Light Worsted (3) on the Craft Yarn Council yarn weight system.
Tools:
- 2.0 mm crochet hook (US Steel 4) — I know this is smaller than what most DK patterns call for, and that’s intentional. You want a tight, dense fabric so no stuffing peeks through.
- 12 mm safety eyes (1 pair)
- Polyester fiberfill (Poly-Fil or similar)
- Tapestry needle
- Stitch markers
- Sculpting thread (strong sewing thread or dental floss works in a pinch)
- Scissors
Abbreviations Used in This Pattern
| Abbreviation | Meaning |
|---|---|
| mr | magic ring |
| sc | single crochet |
| sl st | slip stitch |
| inc | increase (2 sc in same stitch) |
| inv dec | invisible decrease (through front loops only) |
| (…) × N | repeat instructions in parentheses N times |
| FLO | front loop only |
| BLO | back loop only |
Special Techniques for This Crochet Cat
This pattern uses several techniques that are worth brushing up on before you begin — especially if you haven’t done intarsia-style color changes in amigurumi before.
- Magic ring: Every part of this cat starts with a magic ring. If you’re still getting comfortable with it, work through our step-by-step magic ring tutorial first.
- Invisible decrease: I always use the invisible decrease for amigurumi — it eliminates that little gap you get with a standard decrease. Our complete invisible decrease tutorial walks you through it.
- Color changes: The head of this cat uses intarsia-style color changes to create a white muzzle area. You’ll be carrying two colors within the same round. If color changes are new to you, review our guide on how to change colors in amigurumi.
- Continuous rounds: This entire pattern is worked in continuous rounds — no joining, no turning chains. Use a stitch marker to track your round starts.
- Eye sculpting: After inserting the safety eyes, you’ll use sculpting thread to create depth around the eye area. I’ll walk you through it in the Decoration section.
💡 Emma’s Tip: For the color changes on the head, I like to use separate small bobbins of yarn rather than carrying the unused color across the back. It keeps the inside cleaner and prevents color show-through on that tight fabric.
Crochet Cat Amigurumi Pattern Instructions
Work all pieces in continuous rounds unless otherwise noted. Place a stitch marker at the beginning of each round and move it up as you go. Use the invisible decrease for all decreases throughout this pattern.
Head (make 1)
Yarn: Gray (main color), switching to white as indicated
Start: With gray yarn, make a magic ring.
Row 1: 8 sc in mr (8)
Row 2: 8 inc (16)
Row 3: (1 sc, inc) × 8 (24)
Row 4: (2 sc, inc) × 8 (32)
Row 5: (3 sc, inc) × 8 (40)
Row 6: 40 sc (40)
Row 7: 2 sc, inc, (4 sc, inc) × 7, 2 sc (48)
Row 8: 48 sc (48)
Row 9: (5 sc, inc) × 8 (56)
Rows 10–11: 56 sc (2 rows) (56)
Row 12: 3 sc, inc, (6 sc, inc) × 7, 3 sc (64)
Row 13: 64 sc (64)
💡 Emma’s Tip: Starting at Row 14, you’ll begin working color changes to create the white muzzle area. Color instructions are noted in brackets. Take your time with these transitions — clean color changes make all the difference on this face.
Row 14: 31 sc [gray], 1 sc [white], 32 sc [gray] (64)
Row 15: 30 sc [gray], 3 sc [white], 31 sc [gray] (64)
Row 16: 29 sc [gray], 5 sc [white], 30 sc [gray] (64)
Row 17: 28 sc [gray], 7 sc [white], 29 sc [gray] (64)
Row 18: 27 sc [gray], 9 sc [white], 28 sc [gray] (64)
Row 19: 15 sc, inc, 9 sc [gray], 6 sc, inc, 6 sc [white], 9 sc, inc, 15 sc, inc [gray] (68)
Row 20: 16 sc, inc, 5 sc [gray], 11 sc, inc, 10 sc [white], 6 sc, inc, 16 sc, inc [gray] (72)
Row 21: 21 sc [gray], 27 sc [white], 24 sc [gray] (72)
💡 Emma’s Tip: After Row 21, switch entirely to white yarn. The remainder of the head is worked in white only.
Rows 22–24: 72 sc (3 rows) [white] (72)
Row 25: (10 sc, inv dec) × 6 [white] (66)
Row 26: (9 sc, inv dec) × 6 [white] (60)
Row 27: (8 sc, inv dec) × 6 [white] (54)
Row 28: (7 sc, inv dec) × 6 [white] (48)
💡 Emma’s Tip: Insert your 12 mm safety eyes and complete the eye sculpting (see Decoration section below) before continuing with the decreases. It’s much easier to position them accurately while the opening is still wide. Start stuffing the head firmly at this point as well.
Row 29: 24 inv dec [white] (24)
Row 30: (6 sc, inv dec) × 3 [white] (21)
Finish stuffing the head firmly. Leave open for attaching to the body.
Ears (make 2)
Yarn: Gray (main color)
Start: Make a magic ring.
Row 1: 6 sc in mr (6)
Row 2: (1 sc, inc) × 3 (9)
Row 3: (2 sc, inc) × 3 (12)
Row 4: (3 sc, inc) × 3 (15)
Row 5: (4 sc, inc) × 3 (18)
Row 6: (5 sc, inc) × 3 (21)
Row 7: (6 sc, inc) × 3 (24)
Row 8: Fold the ear in half and sc through both layers: 12 sc (12)
Fasten off, leaving a 6 in (15 cm) tail for sewing.
Body (make 1)
Yarn: Gray (main color)
Start: Make a magic ring.
Row 1: 6 sc in mr (6)
Row 2: 6 inc (12)
Row 3: (1 sc, inc) × 6 (18)
Row 4: (2 sc, inc) × 6 (24)
Row 5: (3 sc, inc) × 6 (30)
Row 6: (4 sc, inc) × 6 (36)
Row 7: (5 sc, inc) × 6 (42)
Row 8: (6 sc, inc) × 6 (48)
Row 9: (7 sc, inc) × 6 (54)
Row 10: 4 sc, inc, (17 sc, inc) × 2, 13 sc (57)
Row 11: (18 sc, inc) × 3 (60)
Row 12: 14 sc, inc, (19 sc, inc) × 2, 5 sc (63)
Rows 13–15: 63 sc (3 rows) (63)
Row 16: 5 sc, inv dec, (19 sc, inv dec) × 2, 14 sc (60)
Row 17: (18 sc, inv dec) × 3 (57)
Row 18: 13 sc, inv dec, (17 sc, inv dec) × 2, 4 sc (54)
Rows 19–20: 54 sc (2 rows) (54)
Row 21: (7 sc, inv dec) × 6 (48)
Rows 22–23: 48 sc (2 rows) (48)
Row 24: (6 sc, inv dec) × 6 (42)
Row 25: 42 sc (42)
Row 26: (5 sc, inv dec) × 6 (36)
Row 27: 36 sc (36)
Row 28: (4 sc, inv dec) × 6 (30)
Row 29: 30 sc (30)
Row 30: (3 sc, inv dec) × 6 (24)
Row 31: 24 sc (24)
Row 32: (6 sc, inv dec) × 3 (21)
Row 33: 21 sc (21)
💡 Emma’s Tip: Start stuffing the body firmly around Row 15. Add more as you decrease — if you wait until the end, it’s nearly impossible to get an even shape. I like to check our guide on how to stuff amigurumi if you’re unsure about firmness.
Fasten off, leaving an 8 in (20 cm) tail for sewing.
Upper Arms (make 2)
Yarn: White, then gray (main color)
Start: With white yarn, make a magic ring.
Row 1: 6 sc in mr [white] (6)
Row 2: 6 inc [white] (12)
Row 3: (1 sc, inc) × 6 [white] (18)
Row 4: (2 sc, inc) × 6 [white] (24)
Rows 5–6: 24 sc (2 rows) [white] (24)
Switch to gray (main color) before beginning Row 7.
Row 7: 6 sc, (1 sc, inv dec) × 4, 6 sc [gray] (20)
Row 8: 6 sc, 4 inv dec, 6 sc [gray] (16)
Row 9: 6 sc, 2 inv dec, 6 sc [gray] (14)
Rows 10–14: 14 sc (5 rows) [gray] (14)
Row 15: 6 sc, inv dec, 6 sc [gray] (13)
Rows 16–17: 13 sc (2 rows) [gray] (13)
Row 18: 6 sc, inv dec, 5 sc [gray] (12)
Row 19: 12 sc [gray] (12)
After Row 19, work 4 more sc, then fold the top in half and sc through both layers for 5–6 sc to close.
Stuff the paw area lightly — you want the paw to be plump but the arm itself to stay relatively flat. Fasten off, leaving a 6 in (15 cm) tail for sewing.
Legs (make 2)
Yarn: White, then gray (main color)
Start: With white yarn, make a magic ring.
Row 1: 6 sc in mr [white] (6)
Row 2: 6 inc [white] (12)
Row 3: (1 sc, inc) × 6 [white] (18)
Row 4: (2 sc, inc) × 6 [white] (24)
Row 5: (3 sc, inc) × 6 [white] (30)
Row 6: (9 sc, inc) × 3 [white] (33)
Rows 7–9: 33 sc (3 rows) [white] (33)
Switch to gray (main color) before beginning Row 10.
Row 10: 7 sc, (1 sc, inv dec) × 6, 8 sc [gray] (27)
Row 11: 7 sc, 6 inv dec, 8 sc [gray] (21)
Row 12: 4 sc, 6 inv dec, 5 sc [gray] (15)
Rows 13–24: 15 sc (12 rows) [gray] (15)
💡 Emma’s Tip: Stuff the paw firmly, but leave the leg portion lightly stuffed — you want these to have a bit of a floppy, natural drape when the cat sits.
For the right leg: After Row 24, work 2 more sc, then fold in half and sc through both layers for 7 sc. The fold angle will make the paw turn slightly inward (pigeon-toed).
For the left leg: After Row 24, work 8 sc, then fold in half and sc through both layers for 7 sc.
Fasten off, leaving a tail for sewing.
Tail (make 1)
Yarn: White, then gray (main color)
Start: With white yarn, make a magic ring.
Row 1: 8 sc in mr [white] (8)
Rows 2–7: 8 sc (6 rows) [white] (8)
Switch to gray (main color) before beginning Row 8.
Rows 8–20: 8 sc (13 rows) [gray] (8)
After Row 20, fold the top in half and sc through both layers for 3–4 sc. Do not stuff the tail — you want it flexible. Fasten off, leaving a tail for sewing.
Assembly
Take your time with assembly — this is the part where your cat’s personality comes together. I like to pin everything in place first with sewing pins and check the look from all angles before committing to a single stitch.
- Attach the head to the body. Align the open end of the head (Row 30) with the open end of the body (Row 33). The white muzzle area should face forward. Sew together using a whip stitch, adding extra stuffing to the neck area as needed for firmness.
- Attach the ears. Sew the ears to the top of the head, positioning them between Rows 7 and 15 of the head. Space them evenly on either side. The folded edge becomes the bottom of the ear.
- Attach the legs. Sew the legs to the bottom of the body, positioning them between Rows 13 and 14 of the body. The pigeon-toed paw angle should face forward — this gives the cat a sweet, slightly clumsy look.
- Attach the upper arms. Sew the arms to the sides of the body, just below where the head meets the body. Position them so the white paws face forward.
- Attach the tail. Sew the tail to the back of the body, positioned low near the base. The white tip should hang naturally.
Safety Eyes and Decoration
Safety eye placement: Insert 12 mm safety eyes between Rows 17 and 18 of the head. From the white section on Row 17, count 3 sc into the gray area — that’s your insertion point. The distance between the two eyes should be 11 sc. Secure the locking washers firmly on the inside.
⚠️ Important: If this cat is intended for a child under 3, consider embroidering the eyes instead of using plastic safety eyes. For toy safety guidelines, visit the U.S. Consumer Product Safety Commission.
Eye sculpting: This step adds depth and expression to the face. You’ll need strong sculpting thread and a long needle. Each eye gets two sculpting pulls using a separate piece of thread:
- Insert the needle at the second-to-last row of the head (near the base) and bring it out just below the safety eye.
- Insert the needle back into the stuffing and bring it out at the inner corner of the eye.
- Pull gently but firmly to create a subtle indent — this gives the eyes dimension.
- You can repeat this pull once more for deeper definition.
- Secure the thread and bury the tail inside the head.
Repeat for the second eye.
Embroidery Details
Using pink yarn and a tapestry needle, embroider a small triangular nose centered on the white muzzle area. Using black yarn, add a small mouth line below the nose. Take your time here — a few well-placed stitches make all the difference.
Emma’s Note
I’ve made this little gray cat more times than I can count, and the part I love most is seeing how the white muzzle gradually appears as you work those color-change rows on the head. It’s one of those patterns where you can really see the character take shape round by round. If the color changes feel tricky at first, slow down and trust the stitch counts — they work. Don’t rush the eye sculpting either; that’s what gives this cat its expression. Happy hooking! 🧶
What yarn is best for this crochet cat amigurumi?
A smooth DK or Light Worsted (weight 3) cotton or cotton-blend yarn works best — it creates a tight, even fabric that hides stuffing. YarnArt Jeans, Drops Muskat, and Paintbox Cotton DK are all excellent choices.
How long does it take to crochet this cat amigurumi?
Expect 8–12 hours total, depending on your speed and experience with color changes. The head with its muzzle color work takes the most time.
Can beginners make this crochet cat amigurumi pattern?
his pattern is rated intermediate due to the intarsia-style color changes on the head and the eye sculpting technique. Confident beginners who are comfortable with magic rings and invisible decreases can give it a try, especially with the linked tutorials.