Batman Amigurumi — Free Crochet Batman Pattern
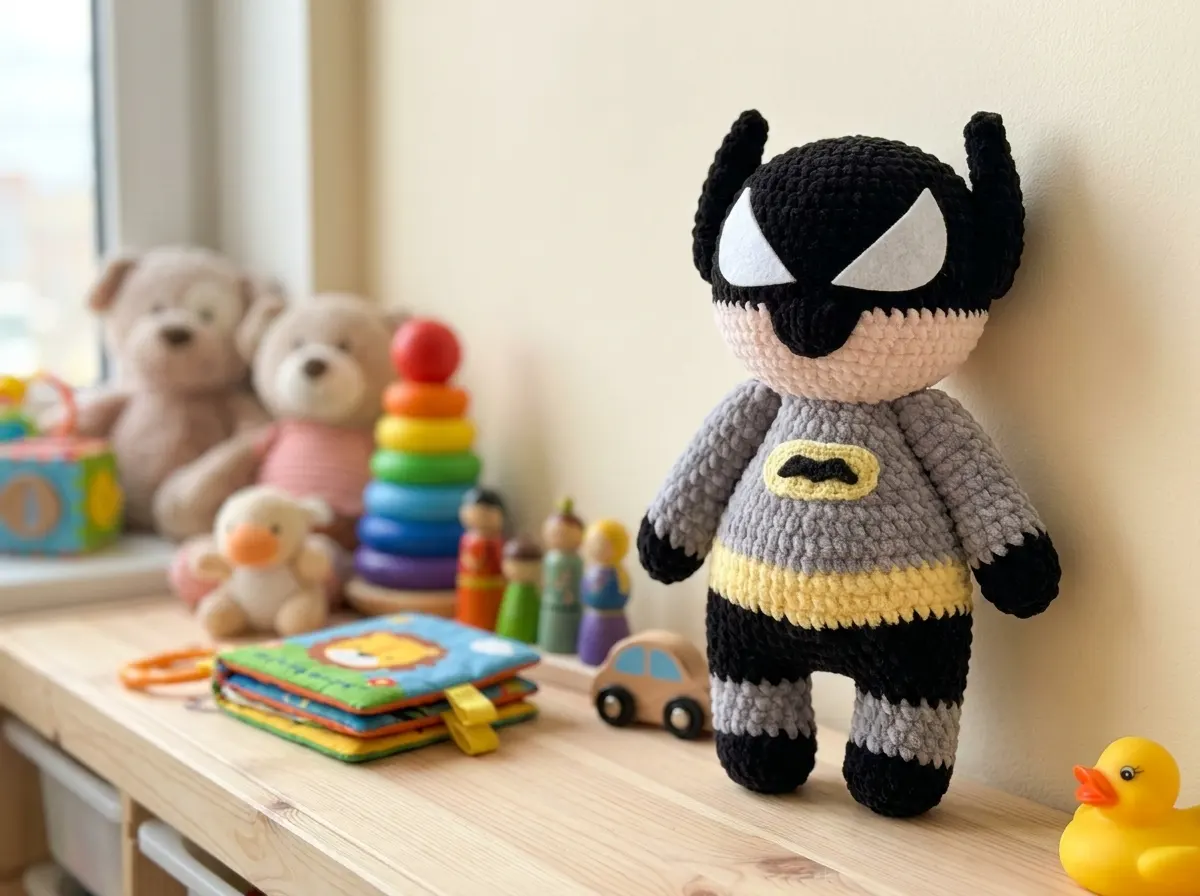
This batman amigurumi has been on my project list for longer than I’d like to admit, and the finished result is every bit as satisfying as I hoped. I wanted a pattern with clean shaping, a properly structured cape, and a symbol detail worth the effort — so I made sure every part of this one delivers. He stands just over 10 inches tall, and I’ve counted every stitch. Let’s make him.
📋 Pattern Quick Stats
- Difficulty: Intermediate
- Finished Size: 10.2 in (26 cm)
- Hook Size: G/6 (4.0 mm) main; steel 4 (2.0 mm) for details
- Yarn Weight: Bulky (5) — chenille/velvet
- Techniques: starting chain method, invisible decrease, BLO, color changes, leg joining, flat cape rows, assembly by thread attachment
- Estimated Time: 8–12 hours
Materials for Your Batman Amigurumi
This pattern is worked in a Bulky (5) chenille yarn — that velvet texture is what gives Batman his soft, structured look. The recommended yarn is Himalaya Dolphin Baby; the US alternatives I’ve tested and liked are Bernat Baby Velvet and Premier Parfait, both widely available at Joann and Michaels. You’ll need approximately 4.2 oz (120 g) total, broken down by color:
- Black: approx. 0.35 oz (10 g) — arms, head mask rows, cape, ears, bat symbol
- Gray (body color): approx. 1.9 oz (55 g) — arms upper section, legs/body main, head lower section
- Yellow: approx. 0.18 oz (5 g) — belt stripe rows, Batman symbol oval
- Secondary gray shade: approx. 1.75 oz (50 g) — body and leg accent (use a slightly different gray for contrast, or match your main gray for a simpler colorway)
Chenille is classified as Bulky (5) on the Craft Yarn Council yarn weight system — worth bookmarking if you ever need to substitute yarn and want to get the sizing right.
Additional materials:
- G/6 (4.0 mm) crochet hook — main hook
- Steel 4 (2.0 mm) crochet hook — detail work
- 10 mm safety eyes (×2)
- Polyfill stuffing (Poly-Fil by Fairfield works well)
- White, yellow, and black felt
- Polymer craft glue (not super glue — it can melt felt)
- Long tapestry needle (approx. 5 in / 12 cm)
- Strong nylon thread or dental floss — for thread attachment method on arms and ears
- Stitch markers
- Knitting needles — for positioning the head before sewing
- Scissors
💡 Emma’s Tip: Chenille yarn can be tricky to frog — the fibers snag and pill when you pull back. Work carefully and use a stitch marker at the start of every round. If you make an error, catch it fast.
Abbreviations
| Abbreviation | Meaning |
|---|---|
| ch | chain |
| sc | single crochet |
| inc | increase — 2 sc worked into the same stitch |
| dec | invisible decrease — insert hook through front loops only of next 2 stitches simultaneously, yarn over, pull through, yarn over, pull through 2 loops |
| sl st | slip stitch |
| BLO | back loop only |
| FO | fasten off |
| MR | magic ring (not used in this pattern — all parts begin with a starting chain) |
Special Techniques in This Batman Amigurumi
Before you start, I want to flag a few things that’ll save you frustration.
Starting chain method: All parts begin with a starting chain of 2 ch. Work the stated number of sc into the 2nd chain from the hook to form your first round. This is a reliable alternative to the magic ring for chenille, since chenille can be harder to tighten cleanly.
Invisible decrease: The dec in this pattern is always worked through the front loops only of the next two stitches — this is the invisible decrease method, and it matters. The standard sc2tog leaves a visible gap that shows through chenille fiber badly. Take the extra second to pick up both front loops at once.
Color changes: This pattern has frequent color changes — particularly in the legs/body section. I recommend reading our full guide on how to change colors in amigurumi if you haven’t done stranded chenille work before. The key is keeping your yarn ends secure and your tension consistent at every transition row.
Leg joining: Joining two separately crocheted legs into one body is one of those techniques that looks harder than it is. The instructions walk you through it step by step — use your stitch marker to keep track of the count at Row 11, which hits 48 stitches.
Thread attachment for arms and ears: Arms and ears are not sewn in the traditional sense — they’re attached using the thread attachment method with strong nylon thread or dental floss. This gives Batman a wider range of poseable placement and a cleaner finish at the join.
Batman Amigurumi Pattern
Arms (×2)
Yarn: black (Rows 1–4), gray (Rows 5–15)
Starting method: ch 2, work into 2nd ch from hook
Row 1: 7 sc in 2nd ch from hook [black] (7)
Row 2: 7 inc [black] (14)
Rows 3–4: 14 sc [black] (14)
Rows 5–7: 14 sc [gray] (14)
Row 8: dec, 12 sc [gray] (13)
Row 9: dec, 11 sc [gray] (12)
Rows 10–14: 12 sc [gray] (12)
Row 15: 6 dec [gray] (6)
Finishing: Leave a yarn tail. Close the opening with your tapestry needle by picking up the front loops of the remaining 6 stitches and pulling tight. Weave in ends. Do not stuff the arms.
💡 Emma’s Tip: Work both arms before moving on. Having them side by side makes it easy to check that the shaping is symmetrical and the color change rows line up.
Legs and Body (×1)
The legs and body make up the core structure of the batman amigurumi.
Yarn: black, gray, yellow
Starting method: ch 2, work into 2nd ch from hook — make legs separately, then join
Work two legs identically through Row 9, then follow the different finishing instructions for each:
Row 1: 8 sc in 2nd ch from hook [black] (8)
Row 2: 8 inc [black] (16)
Row 3: 16 sc in BLO [black] (16)
Rows 4–5: 16 sc [black] (16)
Rows 6–9: 16 sc [gray] (16)
First leg — Row 10: 16 sc + sl st [black]. Cut yarn. (16)
Second leg — Row 10: 16 sc + 2 sc [black]. Do not cut yarn. (18)
💡 Joining the legs: From the second leg, ch 3. Insert your hook under the sl st at the 16th sc of Row 9 of the first leg and work a sl st to join. You’re now working the body in continuous rounds. Place your stitch marker here — Row 11 is a long, complex round and you’ll want to track your position carefully.
Row 11: 1 sc, (inc, 3 sc)×3, inc, 2 sc along first leg, sl st, inc, sl st along chain, 1 sc, (inc, 3 sc)×3, inc, 2 sc along second leg, sl st, inc, sl st along other side of chain (48)
Rows 12–13: 48 sc (48)
Row 14: 8 sc, dec, 23 sc, dec, 13 sc (46)
Row 15: 46 sc (46)
Row 16: 46 sc [yellow] (46)
Row 17: 7 sc, dec, 23 sc, dec, 12 sc [yellow] (44)
Row 18: 44 sc [yellow]. Stuff the legs firmly at this point. (44)
Row 19: 44 sc [gray] (44)
Row 20: 6 sc, dec, 23 sc, dec, 11 sc [gray] (42)
Row 21: 42 sc [gray] (42)
Row 22: (4 sc, dec)×7 [gray] (35)
Rows 23–24: 35 sc [gray]. Stuff the body firmly at this point. (35)
Row 25: (3 sc, dec)×7 [gray] (28)
Row 26: 28 sc [gray] (28)
Row 27: (2 sc, dec)×7 [gray] (21)
Row 28: 21 sc [gray] (21)
Row 29: (2 sc, dec)×5, 1 sc [gray] (16)
Row 30: 16 sc + sl st [gray]. Finish stuffing the body. (16)
💡 Emma’s Tip: Rows 27 and 28 are your reference points for assembly — the cape attaches at Row 27, and the head attaches at Row 28. Mark both rows with a piece of scrap yarn before you close up.
Head (×1)
Yarn: black (Rows 1–11), gray/body color (Rows 12–20)
Starting method: ch 2, work into 2nd ch from hook
Row 1: 7 sc in 2nd ch from hook [black] (7)
Row 2: 7 inc [black] (14)
Row 3: (1 sc, inc)×7 [black] (21)
Row 4: (2 sc, inc)×7 [black] (28)
Row 5: (3 sc, inc)×7 [black] (35)
Row 6: (4 sc, inc)×7 [black] (42)
Row 7: (5 sc, inc)×7 [black] (49)
Rows 8–11: 49 sc [black] (49)
Rows 12–15: 49 sc [body color/gray] (49)
Row 16: (5 sc, dec)×7 [body color] (42)
Row 17: (4 sc, dec)×7 [body color] (35)
Row 18: (3 sc, dec)×7 [body color] (28)
Row 19: (2 sc, dec)×7 [body color] (21)
Row 20: (2 sc, dec)×5, 1 sc [body color] (16)
Finishing: Install safety eyes before closing — position them in the black mask section (Rows 9–11 area), approximately 7–8 stitches apart. Insert the washer backing firmly before you begin the decrease rows. Stuff the head firmly, then cut yarn and close with a tapestry needle through the remaining loops.
💡 Safety eyes and children’s toys: If this batman amigurumi is intended for a child under 3, replace safety eyes with embroidered eyes using yarn. The U.S. Consumer Product Safety Commission recommends avoiding small parts in toys for young children — safety eye washers can come loose over time.
Cape (×1)
The cape is one of the defining features of this batman amigurumi.
Yarn: black
Worked flat, in rows — chain 11 to start
Row 1: ch 11; 10 sc from 2nd ch from hook (10)
Row 2: ch 1, turn; inc, 8 sc, inc (12)
Row 3: ch 1, turn; 12 sc (12)
Row 4: ch 1, turn; inc, 10 sc, inc (14)
Rows 5–9: ch 1, turn; 14 sc (5 rows) (14)
Row 10: ch 1, turn; inc, 12 sc, inc (16)
Rows 11–13: ch 1, turn; 16 sc (3 rows) (16)
Border round: Without turning, work a single crochet border all the way around the cape edge: down the left side (12 sc), into the corner (sc, ch, sc), along the bottom edge (15 sc), into the corner (sc, ch, sc), up the right side (13 sc). Fasten off and leave a long tail for sewing.
Ears (×2)
Yarn: black
Starting method: ch 2, work into 2nd ch from hook
Row 1: 6 sc in 2nd ch from hook (6)
Row 2: 5 sc, inc (7)
Row 3: 6 sc, inc (8)
Row 4: 7 sc, inc (9)
Row 5: 8 sc, inc (10)
Row 6: 10 sc (10)
Row 7: 9 sc, inc (11)
Row 8: 10 sc, inc (12)
Row 9: 11 sc, inc (13)
Row 10: 12 sc, inc (14)
Finishing: Work 7 more sc, then fold the piece flat and work the two sides together with 7 sc to close the bottom edge. Leave a long yarn tail for sewing.
Batman Symbol — Oval Base (×1)
Yarn: yellow
Starting method: ch 12
Row 1: inc in 2nd ch from hook, 9 sc, 3 sc in last ch, 9 sc along the other side, 1 sc in last unworked loop (24)
Row 2: 2 inc, 9 sc, 3 inc, 9 sc, 1 inc (30)
Row 3: inc, 1 sc, inc, 1 sc, 9 sc, inc, 1 sc, inc, 1 sc, inc, 1 sc, 9 sc, inc, 1 sc + sl st (37)
Fasten off and weave in ends.
Bat (for symbol) (×1)
Yarn: black
Starting method: ch 13
Row 1: From 2nd ch from hook — 2 sc, skip 2 ch, 2 sc, 2 ch, 2 sc along chain, skip 2 ch, 2 sc
Fasten off. Leave a tail for sewing or use craft glue to attach the bat to the center of the yellow oval.
💡 Emma’s Tip: The crocheted symbol is beautiful, but if you’re short on time or working in a larger scale, the original design also allows for cutting the oval from yellow felt and the bat from black felt, then gluing them together. Use polymer craft glue — not super glue, which can melt or discolor felt. Both versions look polished on the finished piece.
Assembly
Assembling your batman amigurumi takes about 30 minutes once all pieces are finished.
- Head to body: Pin the head in place over the opening at Row 28 using knitting needles to hold the position before you commit to sewing. This is worth the extra few minutes — the head angle makes a huge difference in how the finished batman amigurumi reads. Sew around the full circumference securely.
- Arms: Attach using the thread attachment method with strong nylon thread or dental floss. Position the arms at the upper body sides, aligned with approximately Row 24–25 of the body.
- Ears: Sew the ears 1–2 rows above the color-change line where the black mask meets the gray face. Position them on the sides of the head toward the top. Sew the inner (flat folded) edge to the head, then use the thread attachment method to secure them firmly so they hold their upright position.
- Cape: Sew the cape to the stitches at Row 27 of the body. The border round you worked earlier gives you a clean, finished edge all around and a natural attachment line at the top.
- Symbol: Sew or glue the completed Batman symbol to the chest, centered on the body between approximately Rows 20–24.
Finishing Details
These final touches give your batman amigurumi its character.
Nose embroidery: Using a length of chenille yarn (gray or black, your preference), secure the starting end under the ear area and bring your needle out at the bottom edge of the black mask section. Draw the yarn down to a single point approximately 3–4 rows below the mask line, pulling it to a fine tip. The nose width should span 6–7 stitches. Secure at the back and weave in.
Eyes: Cut eye shapes from white felt. If you want a slightly finished edge, the original design notes that the edges can be lightly heat-singed before gluing — do this carefully if at all, and test on a scrap first. Glue in place above and slightly overlapping the 10 mm safety eyes, or position them to frame the eyes completely depending on the effect you want.
For a guide on working in continuous rounds — which this entire pattern uses — I have a full tutorial that covers how to track your rounds without a seam and why it produces a cleaner finish for all amigurumi work.
Emma’s Note
This batman amigurumi is genuinely one of the more satisfying builds I’ve done — there’s something about a character with a structured costume that rewards the extra detail work. The leg-joining row is the moment most people hesitate, but if you count carefully and use your stitch marker, it comes together cleanly. Take your time with the nose embroidery too; that single tapered line does a lot of the expressive work. I’d love to see your finished Batman. Happy hooking! 🧶
What yarn is best for this batman amigurumi?
The pattern calls for Bulky (5) chenille yarn such as Himalaya Dolphin Baby, Bernat Baby Velvet, or Premier Parfait. Chenille gives the amigurumi its soft, structured look and velvet texture that works especially well for character designs.
How long does it take to crochet this batman amigurumi?
Most crocheters finish this batman amigurumi in 8–12 hours across several sessions. The leg-joining round and final assembly take the most time, so plan for at least 2–3 working sessions.
Can beginners make this batman amigurumi pattern?
The pattern is rated Intermediate. Crocheters comfortable with single crochet, increases, and invisible decreases can attempt it, but some prior experience with color changes and joining separate pieces is helpful before starting.