Free Crochet Angel Amigurumi Pattern — Little Seraphine with Snap-On Wings & Tiny Knitted Overalls
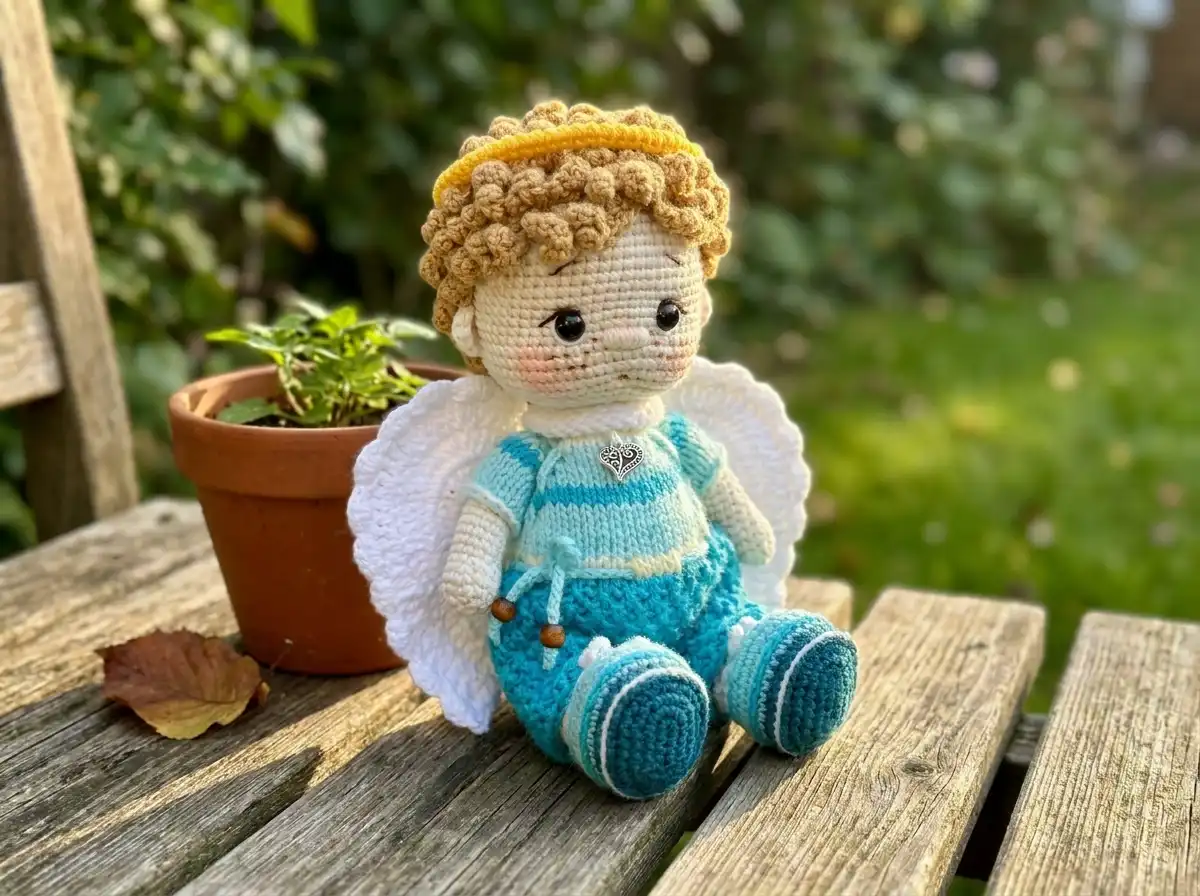
This free angel amigurumi pattern brings to life a small, soft creature with an expression so gentle it stops you mid-stitch — the kind of face that looks like it’s listening to something only it can hear. I named mine Seraphine before I’d even finished her head. She arrived with sandy curls, snap-on wings, and the tiniest knitted overalls you’ve ever seen. If you’ve been waiting for a project that becomes something real, this is where you start.
📖 Meet Seraphine
- 🌟 Personality: gentle, dreamy, quietly watchful
- 🎨 Color Palette: warm cream with soft sandy curls, ivory wings, and a deep teal accent on her tiny boots
- 📏 Size: ~7–7.25 in (18–18.5 cm)
- 🪝 Hook: 1.9mm / 1.5mm (Steel size 8) + US size 0 (2.0mm) knitting needles
- ⏱️ Time: 25–35 hours
- ✨ Signature Detail: hand-curled sandy wig, snap-on wings, and a golden halo tied in a bow
- 💡 Difficulty: Advanced
What You’ll Need for This Angel Amigurumi
Seraphine is a layered project — she’s crocheted, knitted, embroidered, and assembled with the kind of patience that results in something that feels genuinely handmade. Here’s everything you’ll need before you sit down with her.
Yarn
- Body, Head, Ears, Legs, Arms: DK / Light Worsted weight yarn (CYCA 3) in warm ivory or natural cream — approximately 160 yds. US alternatives: Drops Muskat, Paintbox Simply DK. DK / Light Worsted (CYCA 3) gives Seraphine that soft, matte finish that makes her face feel like a storybook illustration.
- Wig: Fingering or sport weight yarn in sandy golden — approximately 100 yds. Something with a slight halo or soft texture will give the curls more life.
- Overalls: DK / Light Worsted weight yarn in white, soft iceberg blue, and light emerald — approximately 50 yds of each color. These three colors together give the overalls a sweet, layered look.
- Wings: DK / Light Worsted weight yarn in clean white or pale cream — approximately 50 yds.
- Bootie Soles: DK / Light Worsted weight yarn in deep teal — approximately 50 yds. This is the dark accent that grounds the whole palette.
- Halo: Any lightweight yarn in soft yellow or gold — approximately 10 yds.
Tools
- 1.9mm crochet hook (for body and main pieces)
- 1.5mm crochet hook / Steel size 8 (for booties and finer details)
- US size 0 (2.0mm) knitting needles (for the overalls)
- Tapestry / yarn needle
- Stitch markers
- Scissors
Other Supplies
- 7mm screw-in safety eyes (×2)
- Black or brown iris embroidery thread (for mouth, eyebrows, freckles, and eyeliner)
- Polyester fiberfill stuffing
- 4 small buttons, approx. 1/16 in (1.5mm) — for button joints on arms and legs
- 2 buttons — for overalls closure
- 2 small wooden beads — for drawstring ties
- 2 small snap fasteners — for attaching the wings
- Firm plastic sheeting or thick cardboard — for insoles inside legs and booties
- Wire approximately 3.5 in (9 cm) long + electrical tape — for neck armature
- Dry pastel, blush, or brown eyeshadow — for cheek shading and brow tinting
- Sewing needle and strong thread
✨ Sophie’s Note: Seraphine is not a weekend project. She’s a full act of creation — crocheted parts, a knitted outfit, an embroidered face, a wire armature inside her neck. I spent an unreasonable amount of time on the wig alone. No regrets. When you finally sit her down and look at her straight on, you’ll understand why.
Angel Amigurumi Abbreviations
Crochet Abbreviations
| Abbreviation | Meaning |
|---|---|
| mr | magic ring |
| ch | chain |
| sl st | slip stitch |
| sc | single crochet |
| hdc | half double crochet |
| hdc-inc | half double crochet increase (2 hdc in one stitch) |
| hdc-dec | half double crochet decrease |
| dc | double crochet |
| tr | treble crochet |
| inc | increase — 2 sc worked into the same stitch |
| dec | decrease — 2 sc worked together (see note below) |
| BLO | back loop only |
| FLO | front loop only |
| FO | fasten off |
| st(s) | stitch(es) |
| (…)× | repeat the indicated number of times |
Knitting Abbreviations (Overalls Only)
| Abbreviation | Meaning |
|---|---|
| k | knit stitch |
| p | purl stitch |
| yo | yarn over |
| k2tog | knit 2 together (decrease) |
| inc | increase (knit into front and back of stitch) |
✨ Sophie’s Note on “dec”: Wherever you see dec in the crochet sections of this pattern, I strongly recommend working an invisible decrease — inserting your hook through the front loops only of the next two stitches simultaneously, rather than the standard method. It eliminates the small gap that regular decreases leave behind, and on a face as expressive as Seraphine’s, every surface detail matters.
Before the Story Begins
A few things worth knowing before Seraphine takes shape.
Start with the magic ring. Almost every part of this angel amigurumi begins with one — the body, the head, the legs, the arms, the wig, the wings. If you’ve never worked one before, or if yours tends to loosen over time, our amigurumi magic ring tutorial walks through the technique quietly and clearly. A tight, secure ring is what keeps the center of each piece from showing a hole.
Safety eyes go in before stuffing. Seraphine uses 7mm screw-in safety eyes installed with intentional indentations to give her face that soft, slightly sunken look that makes her expression so gentle. Our guide to attaching safety eyes covers both standard placement and the indentation technique — it makes an extraordinary difference on a face this small.
Stuff gradually, and stuff thoughtfully. The body, head, and legs all have specific notes about when to add fiberfill and how firmly to pack it. Seraphine’s cheeks, in particular, need to be packed more firmly than the rest of the head — that’s what gives her that soft, round expression. Our stuffing tutorial covers how to control firmness in different areas of the same piece.
The wire armature is essential. A small wire inside the neck, wrapped completely in electrical tape, gives Seraphine a poseable head that will hold its tilt. This is the detail that makes her feel alive — the slight angle of the head is where her whole personality lives.
This pattern includes knitting. The overalls are worked on US size 0 (2.0mm) knitting needles with raglan-style shaping. If you’re a crocheter who hasn’t knitted before, the overalls are worth learning for — they give Seraphine a completely different texture and dimension than crochet would.
Free Angel Amigurumi Pattern — Seraphine
Body (×1)
Yarn: warm ivory DK weight. Starting method: magic ring. Work in continuous rounds.
Row 1: 6 sc in mr (6)
Row 2: 6 inc (12)
Row 3: (1 sc, inc) × 6 (18)
Row 4: 1 sc, inc, (2 sc, inc) × 5, 1 sc (24)
Row 5: (3 sc, inc) × 6 (30)
Row 6: 2 sc, inc, (4 sc, inc) × 5, 2 sc (36)
Row 7: (5 sc, inc) × 6 (42)
Row 8: 42 sc (42)
Row 9: 3 sc, inc, (6 sc, inc) × 5, 3 sc (48)
Row 10: (7 sc, inc) × 6 (54)
Rows 11–13: 54 sc (54)
Row 14: (16 sc, dec) × 3 (51)
Row 15: 51 sc (51)
Row 16: (15 sc, dec) × 3 (48)
Row 17: 48 sc (48)
Row 18: (14 sc, dec) × 3 (45)
Row 19: 45 sc (45)
Row 20: (13 sc, dec) × 3 (42)
Row 21: 42 sc (42)
Row 22: (12 sc, dec) × 3 (39)
Row 23: 39 sc (39)
Row 24: 1 sc, dec, 4 sc, dec, (5 sc, dec) × 2, 4 sc, dec, 10 sc (34)
Row 25: (2 sc, dec) × 7, 6 sc (27)
Row 26: (2 sc, dec) × 5, 5 sc, dec (21)
Row 27: (1 sc, dec) × 2, 3 sc, (dec, 1 sc) × 4 (15)
Rows 28–30: 15 sc (15)
Row 31: (1 sc, dec) × 5 (10)
Rows 32–36: 10 sc (10)
Row 37: 5 dec (5)
✨ Sophie’s Note: Add fiberfill stuffing after Row 25, then continue stuffing as you go. For the neck wire: cut a piece of wire approximately 3.5 in (9 cm) long, bend both ends, and wrap entirely with electrical tape — no sharp edges should be exposed. Place fiberfill inside the neck, insert the wrapped wire, and pack a little more stuffing around it. The neck section (Rows 31–37) should be firm and upright.
Close the opening. FO, cut yarn.
Head (×1)
Yarn: warm ivory DK weight. Starting method: magic ring. Work in continuous rounds.
Row 1: 6 sc in mr (6)
Row 2: 6 inc (12)
Row 3: (1 sc, inc) × 6 (18)
Row 4: 1 sc, inc, (2 sc, inc) × 5, 1 sc (24)
Row 5: (3 sc, inc) × 6 (30)
Row 6: 2 sc, inc, (4 sc, inc) × 5, 2 sc (36)
Row 7: (5 sc, inc) × 6 (42)
Row 8: 3 sc, inc, (6 sc, inc) × 5, 3 sc (48)
Row 9: (7 sc, inc) × 6 (54)
Row 10: 4 sc, inc, (8 sc, inc) × 5, 4 sc (60)
Rows 11–21: 60 sc (60)
Row 22: 19 sc, (inc, 1 sc) × 4, 7 sc, (1 sc, inc) × 4, 18 sc (68)
Rows 23–25: 68 sc (68)
Row 26: (5 sc, dec) × 9, 5 sc (59)
Row 27: 2 sc, dec, (4 sc, dec) × 9, 1 sc (49)
Row 28: 2 sc, dec, (6 sc, dec) × 5, 5 sc (43)
Row 29: (5 sc, dec) × 6, 1 sc (37)
Row 30: 2 sc, dec, (4 sc, dec) × 5, 3 sc (31)
Row 31: (3 sc, dec) × 6, 1 sc (25)
Row 32: (2 sc, dec) × 6, 1 sc (19)
Row 33: (3 sc, dec) × 3, 2 sc, dec (15)
Row 34: BLO 15 sc (15)
Rows 35–39: 15 sc (15)
✨ Sophie’s Note: The head is done. Set it down on your desk and look at it straight on — even before the eyes, there’s already something there. A shape that’s waiting to become someone. Begin adding fiberfill after Row 29. Pack the cheeks (the expanded area from Row 22) more firmly than the rest — this is what gives her that soft, full expression. Do NOT stuff the neck tube worked after Row 34. Instead, gently push that section inside the head cavity using a chopstick or the blunt end of a pencil.
FO, cut yarn.
Ears (×2)
Yarn: warm ivory DK weight. Starting method: magic ring.
Row 1: 6 sc in mr (6)
Pull the ring closed but do not join. Ch 1, turn.
Row 2: 6 sc (6)
Leave a tail for sewing. Cut yarn.
Legs (×2)
Yarn: warm ivory DK weight. Starting method: magic ring. Work in continuous rounds.
Row 1: 6 sc in mr (6)
Row 2: 6 inc (12)
Row 3: (3 inc, 3 sc) × 2 (18)
Row 4: ((1 sc, inc) × 3, 3 sc) × 2 (24)
Row 5: ((2 sc, inc) × 3, 3 sc) × 2 (30)
Row 6: BLO 30 sc (30)
Rows 7–9: 30 sc (through both loops) (30)
Row 10: 2 sc, 6 dec, 16 sc (24)
Row 11: 5 dec, 12 sc, 1 dec (18)
Rows 12–26: 18 sc (18)
Row 27: (1 sc, dec) × 6 (12)
Row 28: 6 dec (6)
✨ Sophie’s Note: After Row 5, cut a cardboard or firm plastic insole to match the sole shape. After Row 9, apply a thin layer of instant adhesive to one side of the insole and insert it into the leg — it keeps the foot from collapsing under the weight of the body. Begin fiberfill stuffing after Row 11; continue stuffing as you go. Leave the top 3–4 rows lightly stuffed so the leg is flexible at the attachment point.
Close the opening. FO, cut yarn and weave in ends.
Arms (×2)
Yarn: warm ivory DK weight. Starting method: magic ring. Work in continuous rounds.
Row 1: 5 sc in mr (5)
Row 2: 5 inc (10)
Row 3: (1 sc, inc) × 5 (15)
Rows 4–9: 15 sc (15)
Row 10: dec, sl st, dec, 3 sc, hdc, hdc-dec, hdc, 3 sc (12)
Rows 11–12: 3 sl st, 3 sc, 3 hdc, 3 sc (12)
Rows 13–18: 12 sc (12)
Row 19: 6 dec (6)
Row 20: 6 inc (12)
Rows 21–22: 12 sc (12)
Row 23: 6 dec (6)
✨ Sophie’s Note: Add a small amount of fiberfill before Row 19 — just enough to give the arm a gentle shape without making it stiff. Add fiberfill into the fist and hand section before closing Row 23. The slight asymmetry of Rows 10–12 is what gives the hands that softly bent, natural look.
Close the opening. Weave in ends.
Wig (×1)
Yarn: fingering/sport weight in sandy golden. Starting method: magic ring. Work the first two rows using the “herringbone” (single crochet variation) method for tighter, more defined stitch texture.
Row 1: 8 sc in mr (8)
Row 2: BLO 8 inc (16)
Row 3: (1 sc, inc) × 8 (24)
Row 4: (3 hdc, inc) × 6, sl st (30)
Row 5: (4 hdc, inc) × 6, sl st (36)
Row 6: (5 hdc, inc) × 6, sl st (42)
Row 7: 42 hdc, sl st (42)
Row 8: (ch 9, starting from the 2nd ch from hook: 8 sc, 2 sl st) × 21
✨ Sophie’s Note: Rows 3–6 each end with a sl st and ch 2 for the turning chain. After Row 8, join to the next row with slip stitches and work additional strands into the remaining front loops — working in the same way as Row 8 — continuing up toward the crown. This is what gives the wig its layered, curly texture. I spent an unreasonable amount of time on this section. No regrets. The sandy curls are the first thing anyone notices about Seraphine.
Leave a tail for sewing. FO, bring tail to wrong side.
Wings (×2)
Yarn: clean white or pale cream DK weight. Starting method: ch 30. Work in turning rows without turning chains.
Row 1: Starting from the 2nd ch from hook: 29 sc (29)
Row 2: 5 sc, 3 dc dec, 9 dc, 4 tr inc, dc, 3 sc
Row 3: 2 sc, dc, dc inc, 7 tr inc, dc inc, 9 dc, 2 dc dec, 2 sc
Row 4: 3 sc, 24 dc, dc inc, dc, 3 sc, sl st
Row 5: ch 1 (turning chain), skip 1 st, (4 sc in one st, sl st, skip 1 st) × to end of row
✨ Sophie’s Note: Work the second wing identically to the first, but mirrored — so the two wings are a matched pair. Once finished, block both wings by pressing gently with a damp cloth and allowing them to dry flat. Blocking is what gives them that clean, feathered shape. The scalloped edging from Row 5 is the detail that makes them look like real wings and not just crochet triangles.
FO, cut yarn.
Halo (×1)
Yarn: lightweight yarn in soft yellow or gold. Leave a starting tail of approximately 20 in (50 cm) for the tie.
Ch 60.
Row 1: Starting from the 2nd ch from hook: 59 sc (59)
Row 2: Work in crab stitch (reverse sc) to the end of the row.
Ch 30, cut yarn. On the opposite side of the starting chain, using the long starting tail, ch 30 for the second tie.
Tie knots at the ends of both ties. Cut yarn.
Overalls (×1) — Knitted
Yarn: white, iceberg blue, and light emerald DK weight. Tools: US size 0 (2.0mm) knitting needles. Cast on 30 stitches (28 working stitches + 2 selvedge stitches). The first and last 2 stitches form the button band, knitted as knit stitches on every row. Selvedge stitches are not counted in stitch totals. Slip the first stitch of each row; work the last stitch as a purl.
Rows 1–10: Stockinette stitch — knit on right side rows, purl on wrong side rows (30)
Row 11: [Switch to iceberg blue] 26 k, yo, k2tog (buttonhole)
Row 12: 2 k, 24 p, 2 k
Row 13: 2 k, 2 k, yo, k, yo, 4 k, yo, k, yo, 8 k, yo, k, yo, 4 k, yo, k, yo, 2 k, 2 k (36)
Row 14: 2 k, 32 p, 2 k
Row 15: 2 k, 3 k, yo, k, yo, 6 k, yo, k, yo, 10 k, yo, k, yo, 6 k, yo, k, yo, 3 k, 2 k (44)
Row 16: 2 k, 40 p, 2 k
Row 17: [Switch to light emerald] 2 k, 4 k, yo, k, yo, 8 k, yo, k, yo, 12 k, yo, k, yo, 8 k, yo, k, yo, 4 k, 2 k (52)
Row 18: 2 k, 48 p, 2 k
Row 19: [Switch to iceberg blue] 2 k, 5 k, yo, k, yo, 10 k, yo, k, yo, 14 k, yo, k, yo, 10 k, yo, k, yo, 5 k, 2 k (60)
Row 20: 2 k, 56 p, 2 k
Row 21: 2 k, 6 k, yo, k, yo, 12 k, yo, k, yo, 16 k, yo, k, yo, 12 k, yo, k, yo, 6 k, 2 k (68)
Row 22: 2 k, 64 p, 2 k
Row 23: 2 k, 7 k, yo, k, yo, 14 k, yo, k, yo, 18 k, yo, k, yo, 14 k, yo, k, yo, 7 k, yo, k2tog (buttonhole) (76)
Row 24: 2 k, 72 p, 2 k
Row 25: [Switch to white] 2 k, 9 k, bind off 16 sts (first sleeve), 1 st remains on right needle, 20 k, bind off 16 sts (second sleeve), 1 st remains on right needle, 9 k, 2 k (44)
Row 26: 2 k, 10 p, cast on 2 sts using twisted backward-loop cast-on, 21 p, cast on 2 sts using twisted backward-loop cast-on, 9 p, 2 k
Row 27: [Switch to light emerald] Bind off 3 sts (for button band), (4 k, inc) × 10, 3 k, 2 k
Row 28: 55 p (55)
Rows 29–42: Work in 1×1 ribbing: (1 k, 1 p) alternating, reversing the pattern every 2 rows as follows:
Row 29: (1 k, 1 p) × 27, 1 k
Row 30: (1 p, 1 k) × 27, 1 p
Row 31: (1 p, 1 k) × 27, 1 p
Row 32: (1 k, 1 p) × 27, 1 k
Row 33: (1 k, 1 p) × 27, 1 k
Row 34: (1 p, 1 k) × 27, 1 p
Row 35: (1 p, 1 k) × 27, 1 p
Row 36: (1 k, 1 p) × 27, 1 k
Row 37: (1 k, 1 p) × 27, 1 k
Row 38: (1 p, 1 k) × 27, 1 p
Row 39: (1 p, 1 k) × 27, 1 p
Row 40: (1 k, 1 p) × 27, 1 k
Row 41: (1 k, 1 p) × 27, 1 k
Row 42: (1 p, 1 k) × 27, 1 p
Now work the legs separately. Place the second set of stitches on a spare needle while working the first leg.
First Leg:
Row 43: (1 p, 1 k) × 13, 1 p, turn
Row 44: 28 sts on needle (26 + 2 selvedge). (1 p, 1 k) × 13
Row 45: (1 k, 1 p) × 13
Row 46: (1 k, 1 p) × 13
Row 47: (1 p, 1 k) × 13
Row 48: (1 p, 1 k) × 13
Row 49: (1 k, 1 p) × 13
Bind off all stitches. Leave a tail for seaming. Cut yarn.
Second Leg: Rejoin yarn. 29 stitches on needle (27 + 2 selvedge).
Row 1: (1 p, 1 k) × 13, 1 p
Row 2: (1 k, 1 p) × 13, 1 k
Row 3: (1 k, 1 p) × 13, 1 k
Row 4: (1 p, 1 k) × 13, 1 p
Row 5: (1 p, 1 k) × 13, 1 p
Row 6: (1 k, 1 p) × 13, 1 k
Row 7: (1 k, 1 p) × 13, 1 k
Bind off all stitches. FO, cut yarn.
Booties (×2)
Yarn: deep teal DK weight for the sole, iceberg blue for the body, light emerald for the tongue. Starting method: magic ring.
Row 1: 6 sc in mr (6)
Row 2: 6 inc (12)
Row 3: (3 inc, 3 sc) × 2 (18)
Row 4: ((1 sc, inc) × 3, 3 sc) × 2 (24)
Row 5: ((2 sc, inc) × 3, 3 sc) × 2 (30)
Row 6: [Switch to iceberg blue] BLO 30 sc (30)
Row 7: 30 sc (30)
Row 8: BLO 30 sc (30)
Row 9: 30 sc (30)
Row 10: 2 sc, 6 dec, 16 sc (24)
Heel:
Row 11: 2 sc, ch 1, turn
Row 12: 18 sc, ch 1, turn (18)
Row 13: 18 sc, ch 1, turn (18)
Row 14: 18 sc (18)
FO, cut yarn.
Tongue: Rejoin light emerald yarn to the remaining stitches, working into BLO.
Row 1: 6 sc, ch 1, turn (6)
Row 2: Through both loops: 1 sc, inc, 2 sc, inc, 1 sc, ch 1, turn
Rows 3–4: 8 sc, ch 1, turn (8)
FO, cut yarn.
Second Bootie Sole (×2)
Yarn: deep teal DK weight. Starting method: magic ring. These flat soles are worked separately and joined to the bottoms of the booties.
Row 1: 6 sc in mr (6)
Row 2: 6 inc (12)
Row 3: (3 inc, 3 sc) × 2 (18)
Row 4: ((1 sc, inc) × 3, 3 sc) × 2 (24)
Row 5: ((2 sc, inc) × 3, 3 sc) × 2 (30)
Cut a firm cardboard or plastic insole to match the sole shape. Leave a tail for joining. Do not FO yet.
Assembling Your Angel Amigurumi
This is the moment when all the separate pieces stop being yarn and start being Seraphine. Assembly takes patience — the head tilt, the arm angle, the eye placement — all of it shapes who she becomes. Work slowly here.
- Attach the head to the body. Thread strong yarn onto a long needle. Insert through the magic ring of the head and bring it out through the bottom opening, then push down into the top of the wire neck armature and bring back up next to the starting point. Repeat, passing through the wire above the decrease rows on the front/belly side. Pull gently and tie off with knots at the crown — the wig will cover them.
- Create the eye indentations. The two eye positions sit 9 sc apart (between the increases of Row 22), 19 rows up from the magic ring. At the bottom of the head (Row 32), place 2 pins spaced 1 sc apart. Insert your needle at the crown point, bring it out at the right eye pin, move over 1 sc, then bring it out at the second bottom point. Repeat for the left eye. Pull gently to create indentations, then tie 2 knots. These small depressions are what give Seraphine her soft, contemplative expression.
- Set the eyes. Insert 7mm screw-in safety eyes at the indented positions. Secure each with a drop of glue.
- Create the mouth indentation. Count 3 rows down from the nose. Place pins 1 sc apart. Thread the needle through the crown, bring out at the first pin, insert at the second pin, bring out through the crown again. Pull gently. Tie 2 knots.
- Attach the ears. Sew the ears at eye level, positioned 8 sc away from the eyes. Each ear spans 4 rows.
- Attach the arms and legs via button joints. Using 1.5mm buttons and strong yarn, attach both arms and legs through the body — arms at shoulder level (8 rows up from the neck join), legs 4 rows up from the body’s magic ring. The decrease rows (Rows 24–27) are the front/belly side — use this as your orientation guide.
- Attach the wig. Place the wig on the head, positioning it 5 rows above the eyebrows. Pin it in place, then sew first around the perimeter, then work inward row by row toward the crown.
✨ Sophie’s Note: Before you sew the wig down permanently, set Seraphine on a flat surface and look at her from across the room. The head tilt — even a single row’s difference — changes her completely. Adjust until she looks the way she looks in your imagination. Then pin and sew.
Assembling the Outfit
The overalls, booties, and halo are what transform Seraphine from a soft figure into a character with a whole story behind her.
Overalls: Sew the leg inseams on the wrong side, then sew up to the waistband on the right side using mattress stitch. Overlap the button band and tack it in place with a few stitches. Sew on 2 buttons. For the drawstring tie, crochet a chain of 120 stitches using iceberg blue yarn, thread it through the buttonhole in Row 27, and thread wooden beads onto both ends.
Booties: Place the second crocheted sole against the bottom of the bootie and join both pieces with sc through the remaining loops. After working 20 sc, insert the cardboard insole and complete the round. Finish the boot edges: join white yarn into the FLO at the back edge of the sole and work a row of sl st. Join iceberg blue to the remaining FLO at the back of the bootie in Row 8 and work a row of sl st. For the laces, crochet a chain of 90 stitches using white yarn, thread through the bootie eyelets, and tie a knot at both ends.
Wings: Sew the socket half of each small snap fastener to the back of the wings, and the ball half to the back of the overalls near the top button. The snap-on system means the wings can be removed — she becomes a completely different character without them, which is exactly as it should be.
Halo: Tie the golden halo around Seraphine’s head using the two tie chains, positioning the halo slightly tilted. A halo that sits perfectly straight is too certain. A tilted one is more interesting.
Decorating Seraphine: The Details That Make Her Real
This is the section I always arrive at last, and always linger in the longest. The embroidery and shading are what give Seraphine her expression — do this slowly, and check after every step.
- Eye whites: Using white yarn, embroider the lower half of each eye in small stitches.
- Eyeliner: Using iris embroidery thread, embroider a small liner or soft arrow shape above each eye.
- Nose: Using 2 strands of body-color yarn, work 3 stitches at nose width (3 sc wide, at eye level), then “wrap” the nose with additional stitching to give it dimension.
- Eyebrows: Mark position with pins — eyebrows are 8 sc apart and 4 rows above the eyes. Embroider using iris embroidery thread in a soft, natural arch.
- Mouth: Embroider a single stitch at the mouth indentation point, 1 sc wide.
- Freckles: A few small dots in brown iris embroidery thread across the nose bridge. Optional, but they give her personality.
- Shading: Using a dry brush, lightly shade the eyebrows and upper eyelids with brown eyeshadow. Apply soft blush or pastel to the cheeks with a circular motion. The shading is subtle — barely there — but it makes the face three-dimensional in a way that no amount of embroidery alone can achieve.
✨ Sophie’s Note: I always do the cheek shading last, after everything else is finished. Hold Seraphine at arm’s length before applying the blush. Look at where the light falls naturally on her face — that’s where the color goes. A little lighter than you think you need. You can always add more; you can’t take it back.
Meet Seraphine
She’s sitting on my desk right now, wig slightly tousled, wings snapped on and tilted just so, tiny overalls buttoned up to the chin. The halo is askew in the way that all the best halos are. There’s something about the way her head tilts — the wire armature holds it at just that angle — that makes her look like she’s listening. Not to you, necessarily. To something slightly further away. Something quiet.
That’s the thing about a project like this one: you pour so many hours into the wig, the overalls, the little bootie laces, and then somewhere between finishing the face embroidery and tying the halo, the pieces stop being yarn and become someone. Name yours. She’ll have an opinion about what she’s called — you’ll know it when you get it right. Put her somewhere she can be seen: on a bookshelf between two books she’d probably like, or next to a reading lamp where the light catches the golden curls just right.
She deserves a spot. 🧶
Can beginners make this angel amigurumi pattern?
This is an advanced pattern designed for experienced makers. It combines amigurumi crochet, basic knitting, wire armature construction, button joints, and detailed face embroidery — beginners should build up to it with simpler amigurumi projects first.
How long does it take to crochet this angel amigurumi?
Seraphine takes approximately 25–35 hours from start to finish, including the layered wig, knitted overalls, and all face embroidery and shading details.
What yarn is best for this angel amigurumi?
DK or Light Worsted weight (CYCA 3) yarn in warm ivory is recommended for the body and main pieces — Drops Muskat and Paintbox Simply DK are both excellent choices for the soft, matte finish that makes Seraphine’s face feel like a storybook illustration.